High Bar Skills List: Difficulty Values A to I and Hardest Skills
High bar skills list with FIG 2025-2028 difficulty values for all four element groups, every H skill, the I-rated Miyachi and how the D-score is counted.
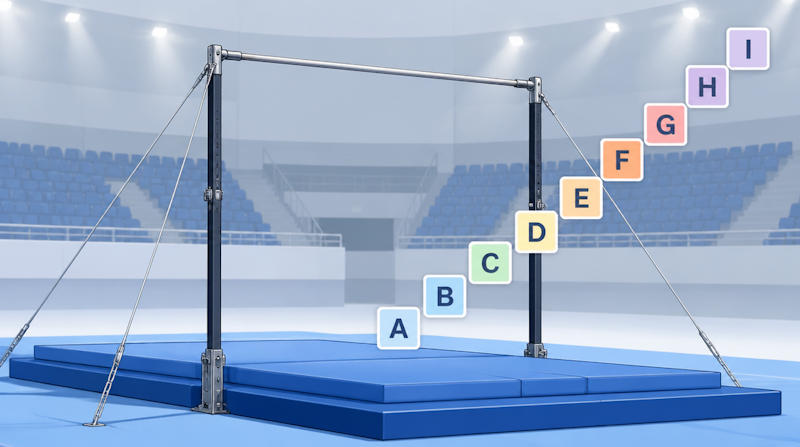
This is a complete high bar skills list with the difficulty value of each skill, taken element by element from the FIG Men's Artistic Gymnastics Code of Points 2025–2028. High bar skills are split into four element groups — giants and turns, release moves, in-bar and Adler elements, and dismounts — and their values run from A (0.1) up to I (0.9), the highest value on the apparatus. Below you will find a table for every group with the official element numbers, the hardest skill on high bar (the Miyachi), every H-rated skill, and a worked example of how those values add up to a D-score.
Before the high bar skills list: four element groups and difficulty values
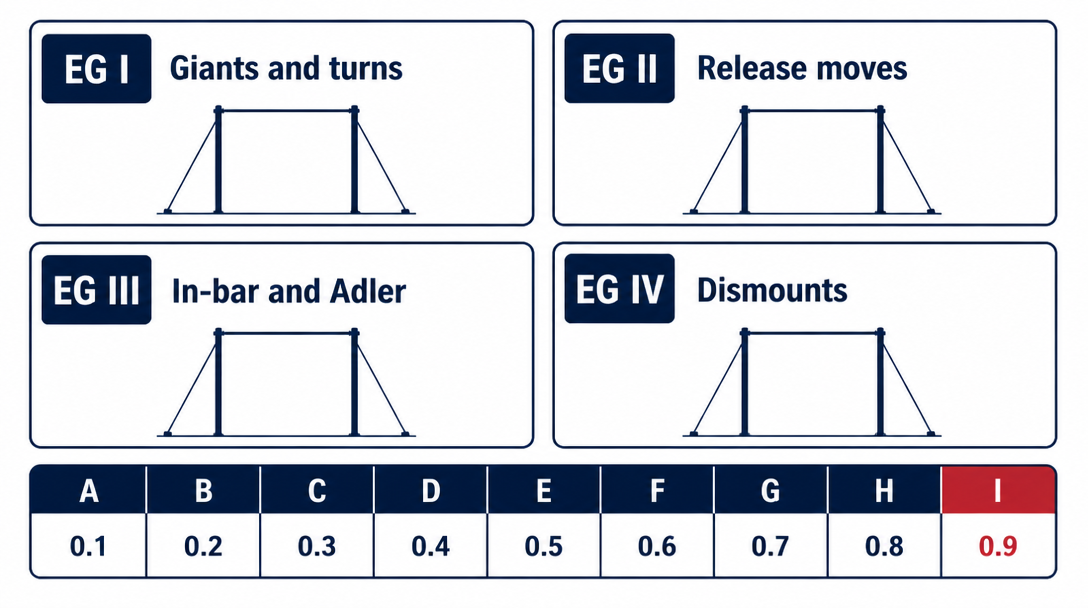
High bar skills are split into four element groups
Section 15 of the FIG Men's Artistic Gymnastics Code of Points 2025–2028 divides high bar skills into four element groups (EG). A routine must include at least one skill from each of groups I to III, and it must finish with a group IV dismount that lands on the feet.
Group | FIG name | Typical skills |
|---|---|---|
I | Long hang swings and turns | Backward giant, Quast, Rybalko, Zou Li Min |
II | Flight elements (release moves) | Tkatchev, Kovacs, Kolman, Cassina, Miyachi |
III | In bar and Adler elements | Endo, Stalder, Adler, Weiler |
IV | Dismounts | Double layout, Tsukahara, triple back |
Most skill names honour the gymnast who first performed the skill successfully at an international competition. How a skill gets its name is explained in How gymnastics skills are named after gymnasts.
High bar difficulty runs from A to I
Article 7.1 of the Code sets the value of each difficulty letter. Each step up the scale adds 0.1 points. The table in Article 7.1 goes all the way to J (1.0), but the highest value that actually appears in the 2025–2028 high bar tables is I.
Value | A | B | C | D | E | F | G | H | I |
|---|---|---|---|---|---|---|---|---|---|
Points | 0.1 | 0.2 | 0.3 | 0.4 | 0.5 | 0.6 | 0.7 | 0.8 | 0.9 |
Every skill in the difficulty tables has a code made of the group number and the element number — for example, II.96 is element 96 in group II, the Cassina. For how the scale works across all six men's apparatus, see the men's gymnastics difficulty table from A to J.
If you want to check the difficulty and group bonuses of a routine yourself, Gymnastics AI — the D-score calculator app can help. It follows the FIG 2025–2028 Code and lets you build a routine from a database of men's skills on all six apparatus, including high bar, and calculates the D-score automatically.
The apparatus and basic routine rules
According to the Code, the bar sits 260 cm above the top of the landing mat and 280 cm above the floor. The bar is 240 cm long and 2.8 cm in diameter (Horizontal bar – Wikipedia, based on the FIG Apparatus Norms). Articles 15.1 and 15.2.1 add these expectations for the routine itself:
- The exercise should be a fluid series of swings, turns and release moves, alternating between skills close to the bar and skills away from it
- A cast of up to three swings is allowed at the start; each extra swing costs 0.3
- Skills that pass through handstand are deducted according to how far they finish from vertical
- A release move with a salto over the bar must be followed by a giant swing, or the E-jury deducts 0.3
Group I: high bar giants and turns with difficulty values
Giant swings list (backward giant, flying giant, Quast)
Group I covers the giant swings performed in a long hang with straight arms, plus the turns and grip changes made during those giants. They are the foundation of every high bar routine. Element numbers and values below come from the group I table of the 2025–2028 Code.
No. | Skill (FIG name) | Value |
|---|---|---|
I.31 | Giant swing backward | A |
I.13 | Giant swing forward | A |
I.43 | Giant swing backward with hop to undergrip | A |
I.44 | Flying giant swing backward | B |
I.45 | Flying giant swing backward with 1/1 turn (Quast) | C |
I.32 | One-arm giant swing backward | B |
I.68 | El-grip giant swing | B |
I.69 | Russian giant (giant swing rearways forward) | C |
I.70 | Czech giant (giant swing rearways backward) | D |
Turning skills list (Rybalko, Zou Li Min)
For skills that twist and regrasp during a giant, the value depends on the amount of turn and the final grip. The best-known example is the Rybalko: a backward giant with a hop and a 3/2 turn.
No. | Skill (FIG name) | Value |
|---|---|---|
I.50 | Giant swing backward with hop 1/2 turn to el-grip | B |
I.51 | Giant swing backward with hop 3/2 turn to undergrip or mixed el-grip | C |
I.52 | Giant swing backward with hop 3/2 turn to double el-grip (Rybalko) | D |
I.26 | One-arm giant swing forward in undergrip | B |
I.27 | One-arm giant forward with 1/1 turn to el-grip and 1/1 turn (Zou Li Min) | C |
I.74 | Steineman uprise with 1/2 turn to support (Ono) | B |
I.75 | El-grip giant with 1/1 turn through handstand in mixed grip | C |
I.76 | Czech giant with 1/2 turn to forward giant swing | D |
The Rybalko (D) finishes with both hands in el-grip; finishing in undergrip or mixed el-grip makes it I.51, a C. The hop must be visible and the turn fluid, without pivoting on the supporting arm (Article 15.2.2-3h). The 2025 Code also relaxed the handstand-angle deductions for turns ending in mixed or el-grip, flying giants and the Quast. The analysis site Magnastics expects this to make the Rybalko far more common.
Key points for group I
- As long as it is among the counting skills, any group I skill earns the full 0.5 element group bonus regardless of value (Article 7.2.6; other groups need a D or higher for 0.5, while A–C earns 0.3)
- Only one grip variation of the same turning element can count (Article 15.2.2-5b)
- Backward giants with a hop and two or more full turns are prohibited
Group II: high bar release moves list (Tkatchev and Kovacs families)
Tkatchev and Piatti release moves
Group II contains the release moves: the gymnast lets go of the bar, performs a skill in the air and catches the bar again. It is the most spectacular group and holds all of the highest-value skills on the apparatus. A Tkatchev swings forward and travels backward over the bar; a Piatti is a Tkatchev entered from a Stalder or a backward free hip circle.
No. | Skill | Description | Value |
|---|---|---|---|
II.15 | Tkatchev | Straddled vault backward over the bar | C |
II.21 | Piked Tkatchev | Piked vault backward over the bar | C |
II.16 | Layout Tkatchev | Straight body over the bar | D |
II.23 | Kulesza | Straddled Tkatchev with 1/2 turn to double el-grip | E |
II.18 | Liukin | Layout Tkatchev with 1/1 turn | G |
II.28 | Piatti | Straddled Tkatchev from a Stalder or free hip circle | D |
II.34 | Piked Piatti | Piatti in a piked position | D |
II.29 | Kierzkowski | Layout Piatti | E |
II.36 | Suarez | Layout Piatti with 1/1 turn | H |
II.3 | Markelov | Back uprise and straddled hecht with 1/2 turn to hang | C |
II.9 | Yamawaki | Markelov with legs together | C |
II.6 | Walstrom | Back uprise and layout hecht with 3/2 turn to hang | G |
The Yamawaki carries the name of Koji Yamawaki, a member of Japan's bronze-medal team at the 1984 Los Angeles Olympics (Koji Yamawaki – Japanese Wikipedia). For a closer look at how the Tkatchev and Kovacs differ, read High bar release moves: Tkatchev, Kovacs and Rybalko.
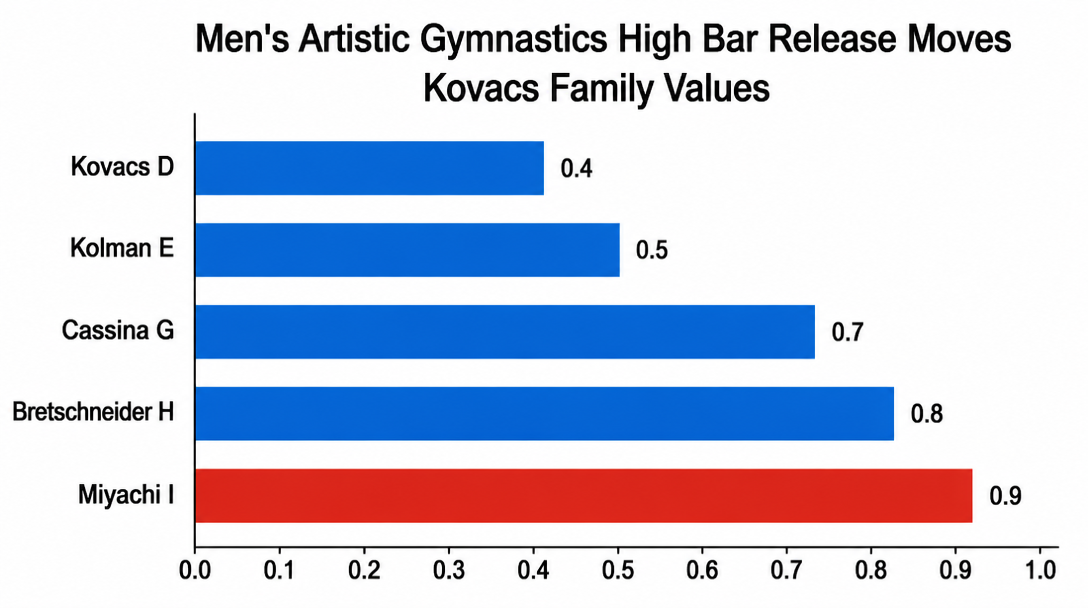
Kovacs family release moves (Kolman, Cassina, Miyachi)
A Kovacs is a double back salto that travels over the bar before the gymnast catches it again. Each added twist raises the value, and the highest-rated skill on high bar belongs to this family.
No. | Skill | Description | Value |
|---|---|---|---|
II.88 | Kovacs | Tucked double back salto over the bar | D |
II.95 | Piked or layout Kovacs | Kovacs in a piked or straight position | E |
II.89 | Kolman | Kovacs with 1/1 turn | E |
II.96 | Cassina | Layout Kovacs with 1/1 turn (Pineda when piked) | G |
II.108 | Shaham | Kovacs with 3/2 turn to mixed grip | G |
II.90 | Bretschneider | Kovacs with 2/1 turn | H |
II.102 | Miyachi | Layout Kovacs with 2/1 turn | I |
The origin of the Cassina and how it differs from the Kovacs are covered in What is the Cassina on high bar?, and you can look up individual skills in our high bar skills database.
Front salto and Gaylord release moves
Group II also includes front saltos from a backswing (the Jäger family), back saltos from a front swing (the Gienger family) and front saltos over the bar (the Gaylord family).
No. | Skill | Description | Value |
|---|---|---|---|
II.39 | Jäger | Swing backward and tucked or straddled front salto to hang | C |
II.40 | Piked Jäger | Piked front salto to hang | D |
II.41 | Balabanov | Layout front salto to hang | E |
II.42 | Winkler / Pogorelev | Layout front salto with 1/1 turn | G |
II.48 | (unnamed) | Layout front salto with 2/1 turn | H |
II.57 | Deltchev | Swing forward, 1/2 turn to straddled front salto to hang | C |
II.58 | Gienger | Swing forward and piked back salto with 1/2 turn to hang | D |
II.60 | Deff | Swing forward and back salto with 3/2 turn to hang | G |
II.65 | Gaylord | Tucked front salto over the bar | E |
II.78 | Piked Gaylord | Gaylord in a piked position | F |
II.66 | Pegan | Gaylord with 1/2 turn | G |
II.72 | Koudinov | Gaylord with 1/1 turn | H |
II.83 | Gaylord 2 | Piked back salto with 1/2 turn over the bar | E |
II.84 | Maras | Piked Pegan | H |
Limits on the number of release moves
The 2025 Code restricts stacking difficulty with many releases from the same family (Article 15.2.2-5c and 6):
- Only two each of Tkatchev/Piatti, Kovacs, Gienger, Jäger, Markelov and front-salto-over-the-bar style releases are permitted
- A fifth release is allowed only if at least two releases are connected (minimum C+C)
- A release move still receives value if the gymnast shows a distinct hang phase before falling
Under the previous Code, Kovacs and Tkatchev/Piatti releases were limited to two unless two were connected, in which case three were allowed; the 2025 Code cut this to two overall (Magnastics summary of the 2025–28 changes).
Group III: high bar in-bar and Adler skills list with difficulty
Endo, Stalder and Weiler skills
Group III contains the skills performed close to the bar. The gymnast circles with the legs straddled or together outside the hands and rises through handstand to set up the next skill.
No. | Skill | Description | Value |
|---|---|---|---|
III.1 | Kip to handstand | From hang to handstand | A |
III.13 | Free hip circle through handstand | From hang or support | A |
III.8 | Weiler | From handstand, free hip circle forward through handstand | B |
III.32 | Endo | Straddled free circle forward through handstand | B |
III.33 | Endo with legs together | Pike-together version of the Endo | C |
III.99 | Endo in el-grip | Endo performed in el-grip | C |
III.100 | Endo legs together in el-grip | El-grip, legs together | D |
III.38 | Stalder | Straddled free circle backward through handstand | B |
III.45 | Stalder with legs together | Pike-together version of the Stalder | C |
III.40 | Stalder with hop 3/2 turn to mixed el-grip | Rybalko-style turn from a Stalder | D |
III.41 | Stalder with hop 3/2 turn to el-grip | The so-called Stalder Rybalko | E |
Adler skills list
An Adler is performed in a piked position with the legs passing between the arms, circling the bar and rising to handstand. Adding turns or a hop to regrasp raises the value.
No. | Skill | Description | Value |
|---|---|---|---|
III.63 | Adler | Stoop circle rearward forward through handstand | C |
III.64 | Adler with 1/2 turn | Through handstand to overgrip | D |
III.70 | Adler with hop | Hop to handstand in undergrip, overgrip or mixed grip | D |
III.76 | Baldauf | Adler with 1/1 turn to mixed grip (also with hop) | D |
III.65 | Fuentes | Adler with 1/1 turn to undergrip | E |
The Endo, Adler and Markelov have similar-sounding names and are often confused. We compare them in Endo vs Adler vs Markelov on high bar.
Dorsal hang and stoop circle skills
Group III also contains skills from a dorsal hang (gripping the bar behind the back) and stoop circles with the feet on the bar.
- III.79 back toss to dorsal hang (A), III.80 Steineman (B), III.87 Köste (C)
- III.104 stoop circle forward to straddle cut through handstand (B), III.105 Carballo (C), III.106 Carballo with 1/2 turn to mixed el-grip (D), III.107 Quintero (E)
- Only two Adler-type elements are permitted; if more are performed, the two highest-value ones count (Article 15.2.2-5a)
Group IV: high bar dismounts list with difficulty values
Backward salto dismounts
Group IV is the dismount: the gymnast releases the bar at the end of the routine, saltos and lands on the mat. Most high bar dismounts are double back saltos with added twists.
No. | Skill | Description | Value |
|---|---|---|---|
IV.25 | Piked or layout back salto | Also with 1/2 or 1/1 turn | A |
IV.32 | Tucked or piked double back | No twist | B |
IV.33 | Tsukahara | Tucked double back with 1/1 turn | C |
IV.34 | Tucked double back with 2/1 turn | — | D |
IV.39 | Layout double back | No twist | C |
IV.40 | Layout double back with 1/1 turn | — | D |
IV.41 | Watanabe | Layout double back with 2/1 turn | E |
IV.42 | Fedorchenko | Layout double back with 3/1 turn | F |
IV.48 | Andrianov / Hoffmann | Tucked triple back (the over-the-bar version is the Hoffmann) | F |
IV.54 | Fardan | Piked triple back | G |
IV.60 | Belle | Tucked triple back with 1/1 turn | G |
The Tsukahara is the full-twisting double back that Mitsuo Tsukahara premiered on high bar, often called the "moon salto" or moonsault. Tsukahara won the Olympic high bar title in both Munich 1972 and Montreal 1976 (Mitsuo Tsukahara – Wikipedia, Olympedia).
Over-the-bar and front salto dismounts
No. | Skill | Description | Value |
|---|---|---|---|
IV.50 | Tucked double back over the bar | — | B |
IV.58 | Hayden | Layout double back with 1/1 turn over the bar | D |
IV.59 | Faulk / Valverde | Layout double back with 3/2 or 2/1 turn over the bar | E |
IV.1 | Piked or layout front salto | Also with 1/2 turn | A |
IV.16 | Roethlisberger 2 | Layout double front (also with 1/2 turn) over the bar | D |
IV.17 | Alvarez | Layout double front with 1/1 or 3/2 turn | E |
IV.6 | Rumbutis | Tucked triple front (also with 1/2 turn) | G |
The dismount value counts twice
On high bar the dismount earns its difficulty value and an element group bonus of the same amount (Article 7.2.8). An F dismount, for example, is worth 0.6 for difficulty plus 0.6 for the group requirement — 1.2 points in total. A stuck landing after a dismount of at least C value also earns a 0.1 bonus (Article 7.2.9). Landing deductions and the stick bonus are explained in gymnastics landing technique and deductions.
- The dismount must land on the feet first
- Dismounts from el-grip or dorsal hang have the same value as from regular grip (Article 15.2.2-4)
- A harder dismount raises both the difficulty value and the group bonus
The hardest high bar skills: the I-rated Miyachi and every H skill
The hardest skill is the I-rated Miyachi
The highest-value skill on high bar in the 2025–2028 Code is II.102, the Miyachi (layout Kovacs with 2/1 turn), rated I (0.9). Japan's Hidetaka Miyachi first performed it at the October 2017 World Championships in Montreal, and the FIG added it to the Code under his name in December of that year (Asian Gymnastics Union news, Hidetaka Miyachi – Japanese Wikipedia).
The Miyachi is the layout version of the Bretschneider (Kovacs with 2/1 turn, rated H). The Bretschneider is named after Germany's Andreas Bretschneider (Andreas Bretschneider – Wikipedia).
Every H-rated high bar skill
No. | Skill | Description | Family |
|---|---|---|---|
II.90 | Bretschneider | Kovacs with 2/1 turn | Kovacs |
II.36 | Suarez | Layout Piatti with 1/1 turn | Tkatchev / Piatti |
II.72 | Koudinov | Gaylord with 1/1 turn | Gaylord |
II.84 | Maras | Piked Pegan | Gaylord |
II.48 | (unnamed) | Layout front salto with 2/1 turn to hang | Jäger |
Every high bar skill rated H or above is a group II release move. The highest dismounts are rated G (Fardan, Belle and Rumbutis), the highest group III skills are rated E, and group I tops out at D.
Notable G-rated skills
- Release moves: Cassina, Shaham, Liukin, Walstrom, Winkler / Pogorelev, Deff, Pegan
- Dismounts: Fardan (piked triple back), Belle (tucked triple back with 1/1 turn), Rumbutis (tucked triple front)
To see how high bar's top value compares with the other five men's apparatus, read the men's gymnastics difficulty table.
How the high bar D-score is counted from these difficulty values
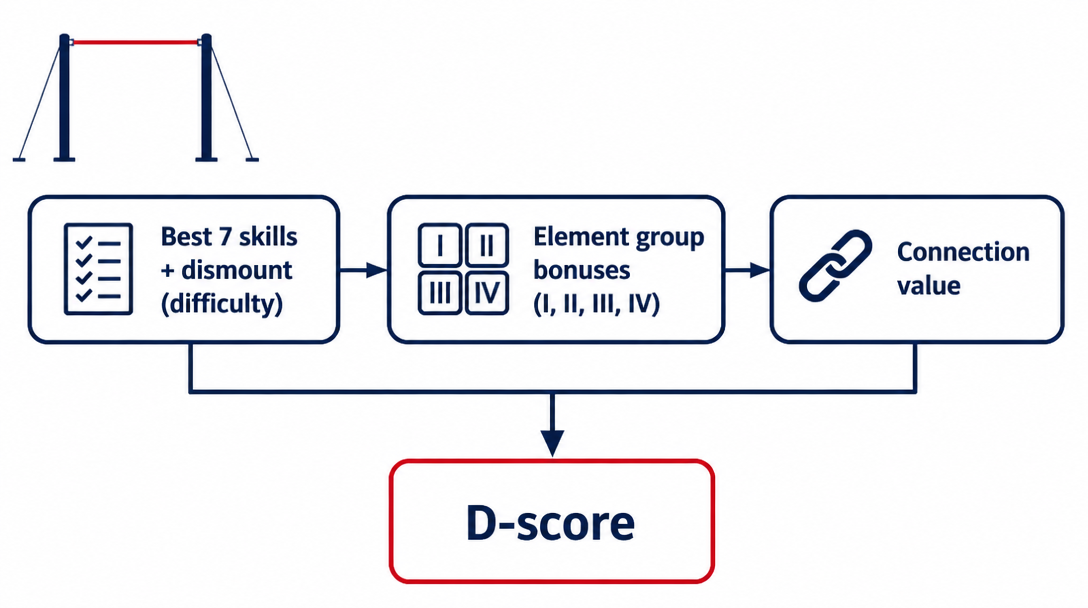
The best seven skills plus the dismount
Article 6.1 of the Code defines which skills count toward the D-score:
- Take the seven highest-value skills other than the dismount (no more than four from the same element group)
- Add the dismount, giving eight counting skills, and total their difficulty values
- Add the element group bonuses and connection value
A repeated skill (one with the same element number) does not count a second time (Article 7.1.4).
Element group bonuses and connection value
Groups I to III are each worth up to 0.5, and group IV is worth the same as the dismount's value (Article 7.2). Connection value on high bar is awarded only for these direct connections (Article 15.2.2-2):
Connection | Bonus |
|---|---|
C release + D-or-higher release (either order) | 0.1 |
D release + D release | 0.1 |
D-or-higher release + E-or-higher release (either order) | 0.2 |
D-or-higher group I or III skill + D release (either order) | 0.1 |
D-or-higher group I or III skill + E-or-higher release (either order) | 0.2 |
Connection value only applies to skills that are among the eight counting skills. The 2025 Code also removed the bonus for connecting two C releases.
Worked example with a hypothetical routine
The routine below is a made-up example to illustrate the rules; it is not any real gymnast's exercise.
Skill | Group | Value |
|---|---|---|
Cassina | II | G 0.7 |
Kolman | II | E 0.5 |
Stalder with hop 3/2 turn to el-grip | III | E 0.5 |
Adler 1/2 → layout Tkatchev (connected) | III → II | D 0.4 + D 0.4 |
Rybalko | I | D 0.4 |
Quast | I | C 0.3 |
Dismount: Watanabe | IV | E 0.5 |
- Difficulty: seven skills (0.7 + 0.5 + 0.5 + 0.4 + 0.4 + 0.4 + 0.3 = 3.2) + dismount 0.5 = 3.7
- Element groups: I 0.5 + II 0.5 + III 0.5 + IV 0.5 = 2.0
- Connection: Adler 1/2 (group III, D) + layout Tkatchev (D release) = 0.1
- Total D-score: 5.8 (5.9 with the 0.1 stick bonus)
As the example shows, the same skills can produce different D-scores depending on how they are connected and which dismount is chosen. With Gymnastics AI you simply pick high bar skills and line them up; the app calculates difficulty, element group bonuses, connection value and the dismount bonus, so you can compare the score of different routine orders instantly.
Summary
- High bar skills fall into four groups: I giants and turns, II release moves, III in-bar and Adler elements, IV dismounts
- Values run from A (0.1) to I (0.9); the hardest skill is the I-rated Miyachi (layout Kovacs with 2/1 turn)
- Every skill rated H or above is a release move; the top dismounts are rated G (Fardan, Belle, Rumbutis)
- The D-score is the value of the best seven skills plus the dismount, plus element group bonuses and connection value
- Under the 2025 Code, each release family is limited to two, and C+C release connections no longer earn a bonus
If you want to try calculating a high bar D-score from this skills list, give Gymnastics AI — the D-score calculator app a try. It runs on iOS and Android and is free to use.