Panning & Stereo Imaging: How to Place and Widen a Mix
A guide to panning and stereo imaging: placement, pan law (-3/-4.5/-6dB), LCR panning, widening with the Haas effect and Mid/Side, plus mono and phase checks.
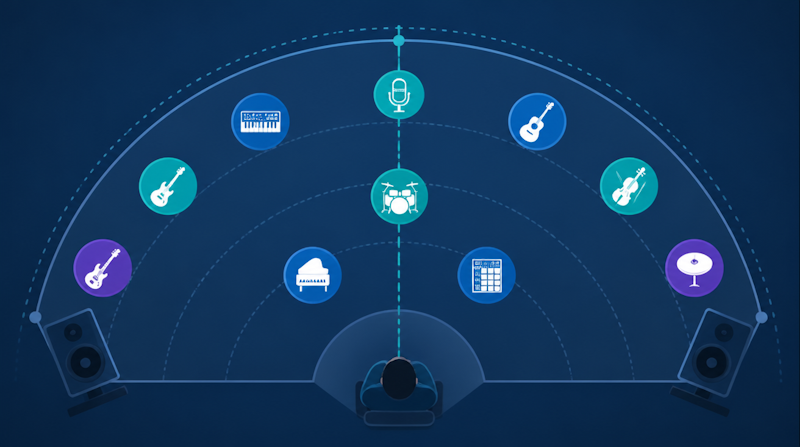
Panning is the process of deciding where each instrument sits between the left and right speakers, while stereo imaging is how you shape the overall width and depth of a mix. Getting panning and stereo imaging right untangles a crowded m
ix and turns a flat wall of sound into a three-dimensional, easy-to-follow arrangement. This guide walks through the fundamentals of placement, pan law, instrument positioning, Mid/Side processing, and the mono-compatibility checks that keep your mix solid everywhere.
What Panning and Stereo Imaging Really Are
Let's define the terms first. Panning decides where a source is placed from left to right; stereo imaging is the broader idea of how wide and how deep the whole mix feels. They are closely related but serve different goals.
Panning: setting left-right placement
Panning places each track somewhere between hard left (L) and hard right (R). The word "pan" comes from "panorama"—the horizontal landscape of sound created between your speakers. Your ears infer direction from the level difference between the two channels.
Stereo imag ing: width and depth
Stereo imaging is not just about moving sounds left or right—it is about designing how wide and how front-to-back the mix feels. If panning places "points," stereo imaging designs the whole "plane," the stereo field.
Mono, stereo, and phase basics
Stereo uses two channels to convey direction; mono uses one. How closely the left and right signals agree in time and phase determines both the sense of width and how stable the mix stays in mono. The more out-of-phase content you add, the wider it sounds—but the greater the risk that sounds cancel when summed to mono. A reliable monitoring setup matters too: see our guides to choosing studio monitors and the pitfalls of mixing on headphones.
Understanding Pan Law
To pan correctly, you need to understand pan law (panning law), a system built into DAWs and mixers. Without it, simply moving a pan control can throw off your level balance.
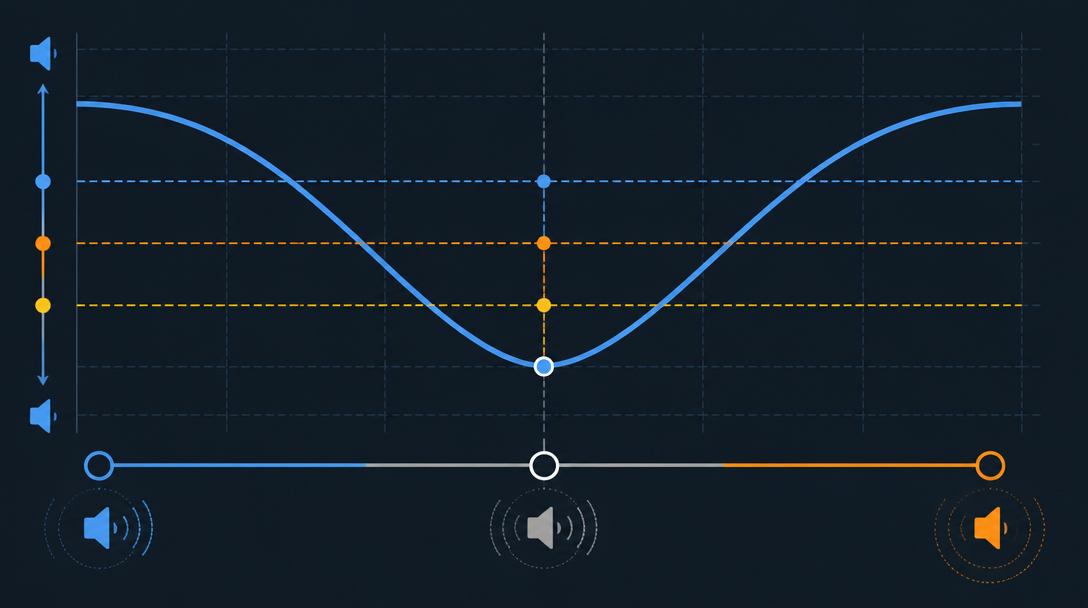
What pan law is (why the center gets louder)
Play the same in-phase signal from both speakers and it images to the center while also getting louder. According to the Wikipedia entry on panning law, an equal-amplitude,
in-phase signal in both channels can rise in perceived loudness by up to about 6dB. Pan law compensates for this "louder in the center, quieter at the sides" discrepancy.
-3dB vs -4.5dB vs -6dB
There are three common pan-law standards. Drawing on Sound on Sound's pan-law advice:
Setting | Idea | Best for |
|---|---|---|
-3dB (constant power) | Compensates acoustic summation (+3dB); constant level on speakers | Playback mainly over stereo speakers |
-6dB (constant voltage) | Compensates electrical summation (+6dB); constant level in mono | Radio/TV, clubs, phones—anywhere mono summing is likely |
-4.5dB (compromise) | Halfway between the two; used by many consoles and DAWs | The safe default when in doubt |
Sound on Sound suggests that if in doubt, -4.5dB is the best of both worlds. Start there, then reconsider based on how your audience will actually listen.
DAW settings and gotchas
Default pan law varies by DAW. If a center-panned track seems to change volume when you open a project in another program, mismatched pan law is often the cause. Align pan-law values when collaborating or exchanging stems. For overall gain management, see our mixdown primer on EQ and compression.
How to Decide Placement (Panning in Practice)
With the theory covered, decide where each instrument goes. The rule of thumb: place by role and by frequency.
Keep low end centered (kick and bass)
Kick, bass, and other low-frequency content belong in the center (mono). According to Mastering The Mix's kick-and-bass guide, low frequencies carry a lot of energy, so panning them even slightly unbalances the mix and hurts mono compatibility. Generally keep roughly the 50–120Hz region centered for power and stability.
The LCR approach
LCR panning limits pan positions to hard L, center, or hard R. Per Sound on Sound's take on LCR, avoiding in-between angles forces clear decisions and improves separation—but remember that hard-panned elements drop about 6dB relative to center sounds when summed to mono. eMastered's LCR guide describes the classic layout: lead vocal, kick, snare, and bass in the center; guitars, keys, and overheads to the sides.
Place by frequency and role
As a starting point—adjust to the song and genre:
- Center: lead vocal, kick, snare, bass (the stars and the low end)
- Slightly L/R: rhythm guitars, keys, percussion (present but not stealing focus)
- Hard L/R: doubled guitars, synth pads, backing vocals, stereo effects (the width)
When you pan something to one side, place a counterpart on the other side to keep balance. If panning alone won't separate parts, carve their frequencies with EQ instead.
Creating Width and Depth with Stereo Imaging
Once placement is set, add width and depth with imaging techniques. Here are three common methods.
Widening with the Haas effect
The Haas effect (precedence effect) is the phenomenon where two nearly identical sounds arriving within a very short time gap are heard as a single sound. The Wikipedia article on the precedence effect notes it was documented in 1949 by Helmut Haas's thesis and by Wallach and colleagues.
According to iZotope's Haas-effect explainer and EDMProd's guide, duplicating a mono source, panning the copies apart, and delaying one by roughly 5–30ms (generally under 40ms) is perceived as width rather than direction. Too much delay, however, causes comb filtering—phase interference that cancels certain frequencies and thins the sound in mono.
Controlling width with Mid/Side (M/S)
Mid/Side processing splits a stereo signal into Mid (center = L+R) and Side (difference = L−R) so you can treat them independently. Per iZotope's Mid/Side guide, boosting the Side widens the image while boosting the Mid emphasizes and narrows the center. Sonarworks' Mid/Side EQ article explains that EQing the Mid (vocals, kick) separately from the Side (cymbals, pads) is far more precise than standard stereo EQ.
Doubling, chorus, and reverb
Recording a part twice and panning the takes apart ("doubling"), plus chorus, stereo delay, and stereo reverb, are staple widening tools. Time-based effects are especially good for depth; see our guide on using reverb and delay. These spatial techniques are used in real productions—you can hear examples in Daito's released tracks.
Mono Compatibility and Phase Checks
Widening tools are powerful, but overdone they fall apart in mono. Phone speakers and some club systems are still near-mono, so checking is essential.
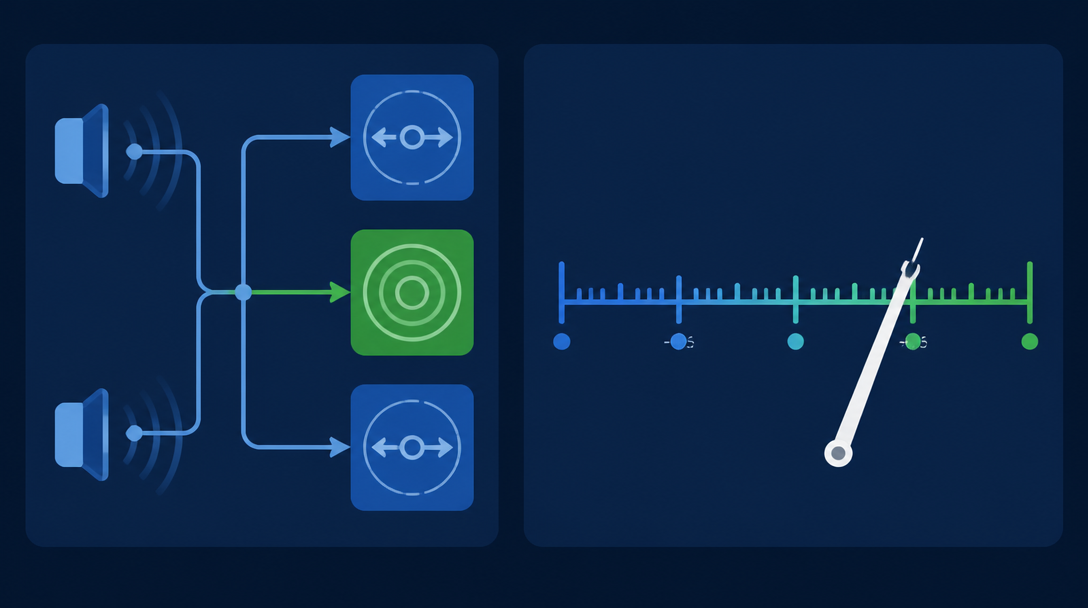
Reading the correlation meter (+1 to −1)
A phase correlation meter shows left-right correlation from +1 to −1. +1 is perfect mono (identical), 0 means L/R are uncorrelated (widest), and −1 means fully out of phase. A healthy range generally sits between 0 and +1; frequently dipping toward 0 or negative risks thinning when summed to mono.
Always check in mono
Periodically switch to mono while mixing and listen for anything that disappears or thins out. Elements that sound fine in stereo but collapse in mono have phase problems. Make this a habit:
- Insert a mono/correlation checking plugin on the master
- Toggle stereo/mono and listen for level and tone changes
- If something thins badly, revisit its pan amount, delay, or Side content
Avoiding comb filtering
Haas and doubling techniques invite comb filtering from delays and timing offsets. iZotope notes the problem surfaces when summing to mono or when speakers sit close together. Remedies: keep delays modest, widen with Mid/Side (which cancels less destructively in mono), and keep key elements centered. For final loudness and tonal balance, see our mastering fundamentals.
Common Mistakes and How to Fix Them
Finally, here are frequent panning and imaging mistakes with fixes.
Over-widening or panning the low end
Wider is not automatically better. Push the Side too hard and the center hollows out and collapses in mono. Never pan the low end—keep kick and bass centered.
Everything centered and cluttered
The opposite problem: with nothing panned, every part piles up in the middle and gets buried. Spread parts with different roles across the field and combine panning with EQ separation.
Watch out at the mastering stage
If phase and mono compatibility aren't sorted in the mix, stereo widening in mastering only amplifies the problems. Widen only where needed, sparingly, and always while checking in mono.
Summary
Panning and stereo imaging are foundational skills that bring dimension and separation to a mix. Key points:
- Panning handles left-right placement; stereo imaging handles overall width and depth
- For pan law, use -4.5dB when unsure; lean toward -6dB where mono summing is common
- Keep the low end (kick, bass) centered; place by role and frequency (LCR works well)
- Widen with the Haas effect, Mid/Side, and doubling—but watch for comb filtering
- Always check in mono and confirm health on the correlation meter
Our original tracks are available on Daito's streaming releases—useful references for how placement and width come together in practice.