Home Vocal Recording Guide: Techniques & Setup Tips
Learn how to record professional-quality vocals at home. Covers microphone selection, room acoustics, miking techniques, gain settings, and DAW processing with EQ and compression.

With the right equipment and environment, recording studio-quality vocals at home is entirely achievable. However, poor microphone choices or neglected acoustic treatment can undermine even the most talented vocalist. This comprehensive guide walks through everything you need to know about home vocal recording — from selecting the right gear and treating your room, to miking techniques and processing vocals inside your DAW.
Essential Gear for Home Vocal Recording
Choosing a Microphone: Condenser vs. Dynamic
The microphone is the centerpiece of any vocal recording setup. Two main categories dominate the market: condenser microphones and dynamic microphones, each with distinct characteristics suited to different recording situations.
Condenser microphones offer high sensitivity, capturing the subtle nuances of a vocal performance — delicate breath sounds, transient detail, and tonal complexity. According to Waves Audio, condenser mics deliver a bright, open sound quality that has made them the standard choice in professional recording studios for decades. The trade-off is that their sensitivity also means they pick up room reflections, air conditioning hum, and other ambient noise with equal clarity.
Dynamic microphones, by contrast, are more forgiving of imperfect environments. Their reduced sensitivity naturally attenuates background noise and room reverb, making them a practical option for home studios that lack proper acoustic treatment. As noted by Sound On Sound, dynamic mics can "reject a significant amount of room sound and background noise," which is a meaningful advantage in untreated spaces.
Feature | Condenser Microphone | Dynamic Microphone |
|---|---|---|
Sensitivity | High — captures fine vocal detail | Lower — rejects ambient noise naturally |
Sound Character | Bright, open, detailed | Warm, full-bodied, robust |
Best Environment | Acoustically treated rooms | Untreated or noisy spaces |
Power Requirement | Phantom power (+48V) required | None required |
Price Range | $80–$3,000+ | $50–$500+ |
If your recording space is well-treated acoustically, a condenser microphone is the recommended choice for capturing the full expressiveness of a vocal performance. If your room is untreated or prone to noise, starting with a quality dynamic microphone is a practical and cost-effective approach.
The Role of an Audio Interface and How to Choose One
An audio interface is the bridge between your microphone and your computer. It converts the analog signal from the microphone into a digital signal your DAW can process, provides phantom power for condenser microphones, and allows you to control input gain. If you plan to use a condenser microphone, ensure the interface supports +48V phantom power — this is a non-negotiable requirement.
For solo vocalists recording a single track at a time, a two-channel interface is more than sufficient. Entry-level interfaces from brands such as Focusrite, PreSonus, and Universal Audio provide clean, low-noise preamps that are perfectly capable of professional results. Higher-end interfaces — such as the Universal Audio Apollo series — also offer onboard DSP and analog modeling, allowing you to simulate the characteristics of vintage microphone preamps in real time during recording, adding warmth and character before the signal even reaches your DAW.
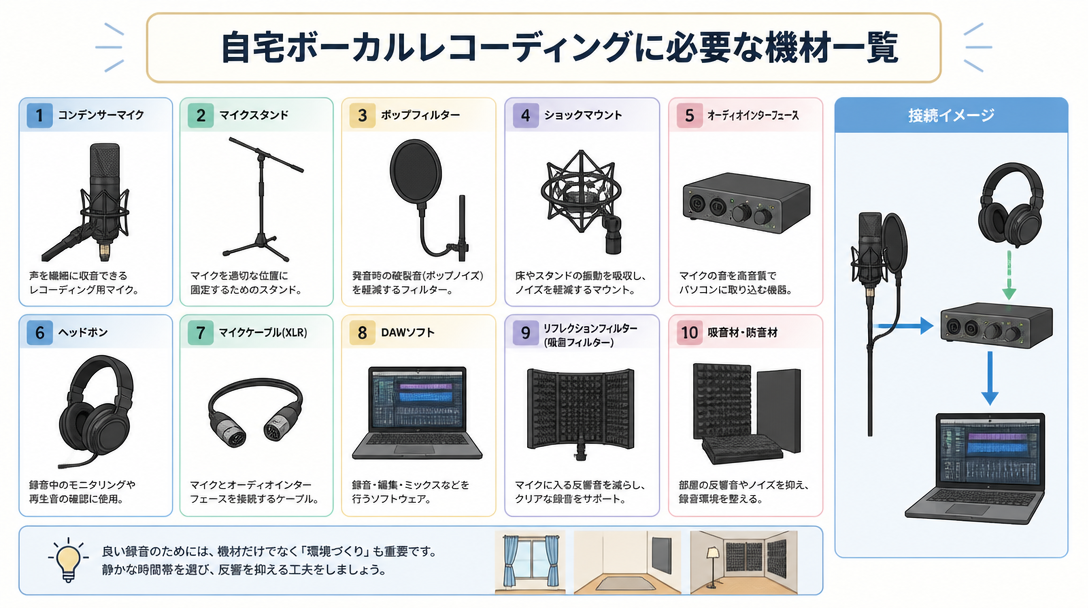
Essential Accessories: Pop Filter, Shock Mount, and Mic Stand
Three accessories have an outsized impact on the quality of vocal recordings and should be considered mandatory additions to any home studio setup.
- Pop Filter (Pop Shield): A mesh or nylon screen placed between the singer and the microphone capsule. It diffuses the sudden bursts of air produced by plosive consonants ("p," "b," "t") that cause loud low-frequency thuds — known as plosive or "pop" noise — in recordings. According to Waves Audio, a quality pop filter costs as little as $20–$100 and delivers results that no amount of post-processing can fully replicate. It is one of the most cost-effective investments in any vocal recording chain.
- Shock Mount: A suspension cradle that isolates the microphone from mechanical vibrations transmitted through the mic stand — footsteps, desk bumps, and low-frequency rumble. Condenser microphones are especially susceptible to these vibrations, and a good shock mount eliminates an entire category of noise contamination at the source.
- Microphone Stand: A sturdy, stable stand is essential for maintaining a consistent mic position throughout a session. Budget stands with lightweight bases are prone to tipping, particularly with heavier large-diaphragm condensers. Investing in a solid boom stand prevents costly accidents and ensures repeatable mic placement between takes.
Acoustic Treatment: Why Your Room Matters as Much as Your Gear
Choosing the Right Room
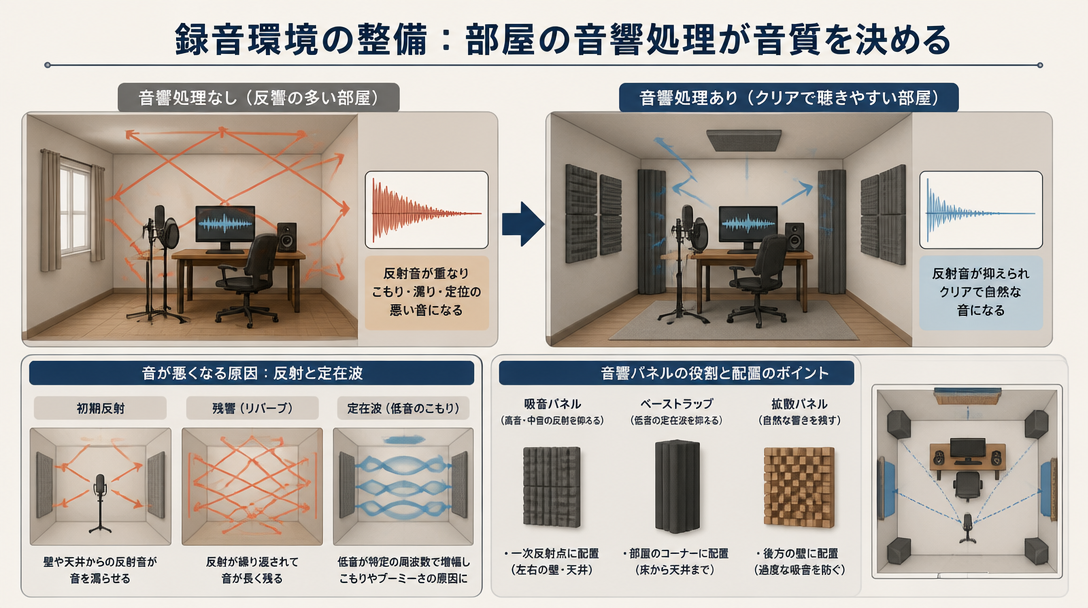
The acoustic properties of your recording space have just as much impact on sound quality as the microphone you choose. As LANDR Blog puts it, "Sound is always changed by the room it's recorded in. This is especially true for vocals." No amount of post-processing can fully undo the damage caused by a poorly chosen recording environment.
The characteristics of an ideal home recording room include:
- Small to medium size — large rooms produce longer reverb tails that bleed into recordings
- Abundant soft furnishings — beds, sofas, heavy curtains, and carpets act as natural sound absorbers
- Minimal hard, parallel surfaces — concrete walls, bare floors, and tiled rooms cause excessive reflections and standing waves
- Low ambient noise — rooms away from air conditioning units, street traffic, or shared walls with noisy neighbors
One surprisingly effective solution frequently recommended by recording professionals is a walk-in closet. The clothing inside acts as natural broadband acoustic absorption, and the small, irregular space prevents the build-up of problematic standing waves. Recording in a well-stocked closet can yield remarkably clean, dry vocal recordings without any permanent acoustic modification to the space.
Installing Acoustic Treatment
Treating a home recording space does not require expensive purpose-built products. Strategic placement of absorptive materials can dramatically reduce problematic reflections. The single most important surface to treat is the wall directly behind the microphone — reflections from this surface arrive at the capsule out of phase with the direct vocal signal, causing comb filtering and tonal coloration that is difficult to remove in post-production.
Practical acoustic treatment approaches for home studios include:
- Acoustic foam panels or mineral wool panels mounted on the wall behind the microphone
- Heavy moving blankets or thick curtains hung from walls and ceiling around the recording position
- A mattress or duvet placed behind the microphone to create a simple vocal absorption booth
- Bookshelves filled with books and irregularly shaped objects positioned around the room to scatter reflections
As noted by Sound On Sound, investing in acoustic treatment before purchasing a more expensive microphone is frequently the more cost-effective path to better recordings. A $100 microphone in a well-treated room will often outperform a $1,000 microphone in a reverberant, untreated space.
Using a Reflection Filter
A reflection filter — sometimes called a portable vocal booth or microphone shield — is a curved, acoustically absorptive panel that mounts directly to the microphone stand behind the capsule. It reduces the level of rear-arriving reflections reaching the microphone without requiring any permanent room treatment. Reflection filters are a popular and portable solution for home studios, particularly for recording in multiple locations.
It is important to understand that a reflection filter is a supplementary tool, not a replacement for genuine room treatment. It primarily addresses reflections from the rear wall, leaving side and ceiling reflections largely unaddressed. Used in combination with wall panels or heavy drapes, however, it provides a meaningful improvement in recording clarity and dryness.
Microphone Technique: Distance, Angle, and Placement
Setting the Right Distance
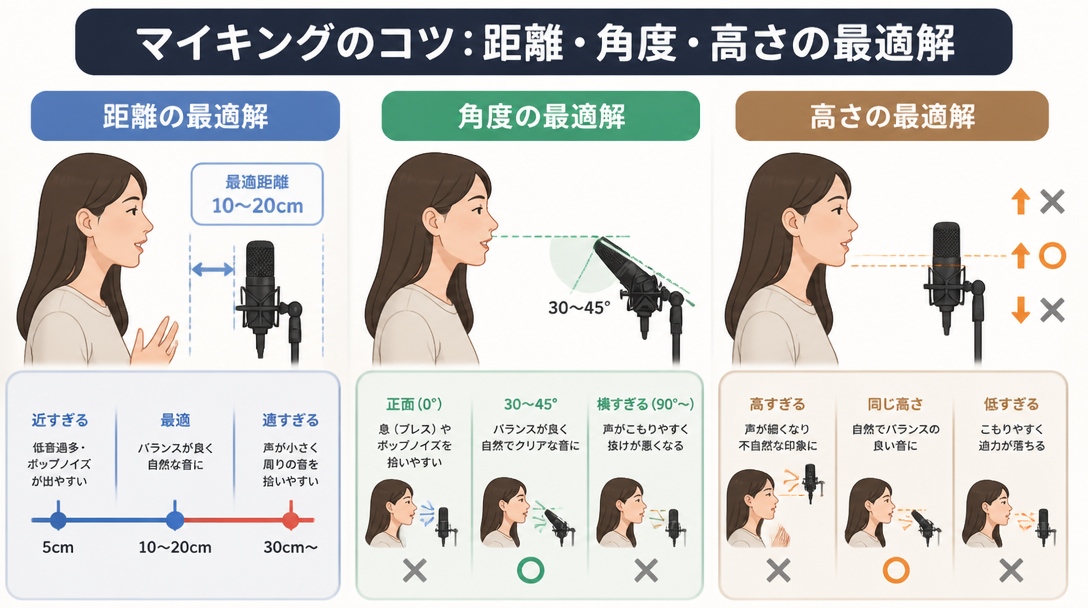
Microphone-to-source distance directly shapes the character and quality of a vocal recording. The standard recommendation is to position the microphone approximately 6 to 8 inches (15–20 cm) from the singer's mouth — roughly the span of an outstretched hand from the tip of the thumb to the tip of the little finger, as Waves Audio suggests. This distance provides a natural, balanced sound for the majority of vocal styles.
Distance | Sound Characteristics | Best Suited For |
|---|---|---|
2–4 inches (close) | Enhanced low-end warmth from proximity effect; intimate and powerful | Punchy rock, pop, hip-hop vocals |
6–8 inches (standard) | Balanced, natural representation of the voice | Most genres and vocal styles |
12 inches or more (distant) | More room ambience; spacious and airy character | Classical, acoustic, choir recordings |
In home recording environments where room ambience is an issue, erring toward a slightly closer position (5–7 inches) reduces the amount of room sound captured by the microphone. Fine-tune the distance based on the vocalist's output level, vocal style, and the amount of low-end warmth desired.
Microphone Angle and Plosive Control
With cardioid (unidirectional) condenser microphones, the singer's orientation relative to the capsule has a profound effect on the recorded sound. Cardioid microphones exhibit the tightest polar response directly on-axis (0°), with a noticeable drop in high-frequency pickup as the angle increases. According to guidance from Sound On Sound, turning the head more than 30–45 degrees away from the microphone capsule during a take can cause audible tonal inconsistencies. Singers should be coached to maintain a consistent forward position relative to the mic throughout a performance.
Plosive noise control is best approached through a combination of methods:
- Pop filter placement: Position the pop filter 2–3 inches in front of the microphone capsule. This is the most reliable method and should be the first line of defense against plosives.
- Off-axis angling: Tilting the microphone slightly upward or downward so that the direct breath path from the mouth does not travel straight into the capsule can reduce plosive impact without significantly altering the tonal character.
- Vocal technique: Singers who consciously direct plosive consonants slightly downward or to the side will naturally reduce the amount of air striking the capsule.
Gain Staging: Targeting -18 dBFS
Setting the correct input gain on the audio interface is one of the most critical — and most commonly mishandled — aspects of home vocal recording. Recording at too high a level risks clipping and distortion that cannot be repaired in post-production. Recording too quietly introduces more noise floor into the signal.
The recommended targets for vocal recording gain are:
- Average signal level: Aim for approximately -18 dBFS on the DAW meter during normal singing passages
- Peak signal level: Ensure peaks do not exceed -10 dBFS, leaving headroom for louder moments
- Interface gain knob: Set conservatively — typically around 50–60% of maximum — and adjust based on the vocalist's output level
Modern DAWs operating at 24-bit or 32-bit depth have an exceptionally low noise floor, meaning there is no sonic penalty for recording at a conservative level. Always conduct a soundcheck by having the vocalist perform the loudest section of the song before committing to a gain setting. This prevents clipping during emotionally intense passages that may be louder than average.
Preparing for the Recording Session
Warming Up the Voice
Just as instrumentalists warm up before recording, vocalists should invest time in vocal preparation before pressing record. Waves Audio recommends warming up properly, breathing from the diaphragm rather than the chest, and scheduling sessions for times when the voice is at its best. Beginning a warm-up routine 30 minutes before the session allows the vocal cords, surrounding muscles, and resonating cavities to reach optimal performance condition.
Effective vocal warm-up exercises include:
- Lip trills (lip rolls): Producing a motorboat-like sound with loosely closed lips while vocalizing. This simultaneously relaxes the lips, jaw, and vocal cords while encouraging diaphragmatic breath support.
- Scale runs: Methodically singing up and down major or minor scales across the full vocal range, starting in the middle register and gradually extending upward and downward.
- Humming: Gentle humming with resonance directed into the chest and nasal cavity activates the body's natural resonators and gently warms up the vocal folds without strain.
The Case for Recording Multiple Takes
Professional recording sessions are built around the accumulation of multiple takes — and home recordings should be no different. LANDR Blog recommends capturing a minimum of three complete takes of each section, which provides sufficient material for comp editing — the process of assembling the best moments from multiple performances into a single composite track.
The benefits of a multi-take recording approach are significant:
- Pitch and timing imperfections in one take can be seamlessly replaced with a better moment from another
- Technical issues such as plosive noise or an ill-timed breath in one take are covered by cleaner alternatives
- Vocalists often deliver their most relaxed, emotionally authentic performances in later takes once nerves have settled — having multiple options ensures the best of these performances is captured
Organizing takes in the DAW with clear labeling and color coding significantly streamlines the comp editing process and prevents the frustration of searching through recordings to locate the correct passage.
Setting Up a Monitoring Environment
Headphone monitoring is essential during vocal recording. Playing the backing track through speakers will cause the speaker output to bleed into the microphone, creating an unusable doubling or phasing artifact on the recording. Closed-back headphones provide the best isolation for vocalists, preventing bleed while still delivering a clear, detailed listening experience.
Latency — the slight delay between singing and hearing playback through the DAW — can be distracting and disruptive to vocal performance. Most modern audio interfaces include a direct monitoring function that routes the microphone signal directly to the headphone output, bypassing the computer entirely. This provides zero-latency monitoring of the live vocal signal, which many vocalists find essential for natural performance. The trade-off is that direct monitoring does not include DAW effects in the headphone mix; a small amount of reverb or ambience applied through the interface's hardware processing or a low-latency software plugin can help vocalists feel more comfortable during recording.
DAW Processing Fundamentals: EQ, Compression, and Effects
EQ: Start by Subtracting, Not Adding
Equalization in the mix shapes how a vocal sits relative to other instruments and how intelligible it sounds on various playback systems. The foundational principle of vocal EQ is to remove problematic frequencies before attempting to enhance desirable ones — a "subtractive first" approach.
Frequency Range | Processing Direction | Purpose |
|---|---|---|
Below 80 Hz | High-pass filter (roll off) | Eliminate mic stand rumble, HVAC noise, and subsonic energy |
200–300 Hz | Gentle cut (-2 to -4 dB) | Reduce muddiness and boxiness; improve clarity |
3–5 kHz | Gentle boost (+1 to +3 dB) | Enhance presence and intelligibility in the mix |
8–12 kHz | High-shelf boost | Add air and brilliance; open up the top end |
These settings serve as starting points rather than fixed rules — every voice and recording environment will respond differently. The goal is to carve out space for the vocal within the full mix, ensuring it does not compete with instruments occupying similar frequency ranges. A clean high-pass filter at 80 Hz is almost universally beneficial for vocal tracks regardless of style.
Compression: Controlling Vocal Dynamics
The natural dynamic range of a vocal performance — the difference between a quiet, intimate verse and a full-voiced chorus — is far greater than what a recorded mix can comfortably accommodate. Compression reduces this dynamic range, bringing up quieter passages and taming louder peaks to create a more consistent, controlled vocal sound that sits steadily in the mix.
Recommended starting point settings for vocal compression:
- Threshold: -20 dBFS to -10 dBFS, adjusted so the compressor engages during moderately loud passages
- Ratio: 2:1 to 4:1 for natural-sounding compression; 4:1 to 6:1 for a more controlled, pop-produced sound
- Attack: 5 ms to 20 ms — too fast an attack time will suppress consonants and reduce intelligibility; allow some transient detail through
- Release: 50 ms to 200 ms, adjusted to the phrasing and tempo of the song
The question of whether to apply EQ before or after compression is debated among engineers, but the most widely recommended approach is EQ first, then compression. Removing problematic low frequencies and resonant buildups with EQ before the compressor prevents those frequencies from triggering excessive gain reduction, leading to more transparent and controlled results. For a detailed exploration of this signal chain, see the mix processing fundamentals guide.
Reverb and Delay: Adding Space and Dimension
Vocals recorded in a treated home studio will sound dry and close — which is precisely what is needed for maximum flexibility in post-production. Space, ambience, and depth are added intentionally during mixing using reverb and delay effects.
- Reverb: Simulates the acoustic reflections of physical spaces — concert halls, recording studios, small rooms, and cathedrals. Shorter reverb tails (0.5–1.5 seconds decay time) suit contemporary pop, R&B, and rock productions, providing a sense of space without overwhelming the dry vocal. Longer reverb tails (2 seconds or more) work well for ballads, ambient music, and dramatic productions where a sense of scale is desired.
- Delay: Repeats of the vocal signal at defined time intervals, creating echo effects that add depth and rhythmic interest. The most musical results come from setting the delay time in sync with the tempo of the song — quarter-note delays provide a straightforward rhythmic echo, while dotted eighth-note delays create the syncopated, slap-back effect common in modern pop and country productions.
Both reverb and delay are best applied via send/return routing in the DAW, where the dry vocal signal remains on the main channel and the effects are blended in via auxiliary returns. This approach gives precise control over the wet/dry balance and allows the same reverb or delay to be shared across multiple tracks for a cohesive spatial environment. Be mindful during mixing that excessive reverb can make the mastering stage significantly more difficult — a vocal that sounds appropriately wet in the mix may become muddy when the master is brought up to commercial loudness levels.
Common Home Recording Problems and How to Solve Them
Dealing with Background Noise and HVAC Hum
Air conditioning and ventilation noise is the most persistent challenge in home vocal recording. Condenser microphones with their high sensitivity will faithfully capture the low-frequency rumble and mid-frequency hiss of HVAC systems, often rendering takes unusable. The most reliable solution is to turn off the air conditioning unit during recording sessions and allow the room to cool or heat beforehand.
When switching off climate control is not practical — particularly in extreme weather conditions — the following approaches can help minimize the impact:
- Record a few minutes of "room tone" (silence) at the start of each session with the HVAC running, which allows noise reduction software to analyze and remove the consistent noise profile from recorded takes
- Use noise reduction tools such as iZotope RX, which can isolate and attenuate stationary background noise with remarkable precision
- Experiment with microphone polar patterns — figure-8 or hypercardioid patterns can reject noise arriving from certain directions more effectively than standard cardioid patterns
Managing Room Reflections in Recordings
Room reflections — the sound of your voice bouncing off walls, floors, and ceilings — are far easier to prevent during recording than to remove afterward. Once room ambience is captured in a recording, it becomes an irreversible part of the signal. Prevention strategies include:
- Avoiding placement of the microphone at the geometric center of the room, where standing waves concentrate and cause uneven frequency response
- Positioning the microphone at least 20 inches (50 cm) from the wall directly behind it to prevent early reflections from the rear wall arriving at the capsule with minimal delay
- Orienting the recording setup diagonally rather than parallel to the room's walls, which reduces the build-up of axial standing waves
- Combining a reflection filter behind the microphone with broadband absorption panels on surrounding walls for maximum isolation
Preventing and Managing Clipping
A clipped audio signal — one that has exceeded the maximum digital level of 0 dBFS, causing distortion — cannot be repaired by mixing or mastering processing. Any take that shows red clipping indicators in the DAW meter should be discarded and re-recorded at a lower gain setting.
The most reliable way to prevent clipping is a thorough soundcheck before committing to a recording session. Have the vocalist perform the loudest, most intense passage of the song — typically the final chorus or an emotional climax — and set the input gain so that these peaks remain below -10 dBFS. This ensures the full dynamic range of the performance is captured safely.
Some DAW applications now support 32-bit float recording, a technology that effectively eliminates the possibility of clipping regardless of input level. Audio interfaces and recorders with 32-bit float capability can capture transient peaks that exceed 0 dBFS and allow them to be recovered in post-production. While this technology does not eliminate the importance of proper gain staging, it provides a useful safety net for live recording situations where unexpected volume spikes are difficult to anticipate.
Summary
Achieving professional-quality vocal recordings in a home studio is a matter of making the right decisions at each stage of the recording process. The key takeaways from this guide are:
- Microphone selection: Choose a condenser microphone if the room is well-treated; opt for a dynamic microphone in untreated or noisy environments. Always include a pop filter and shock mount in the setup.
- Room acoustics: Acoustic treatment yields a greater improvement in recording quality than upgrading microphone hardware. A closet lined with clothing, heavy blankets on walls, or dedicated acoustic panels all make meaningful contributions.
- Microphone technique: Position the microphone 6–8 inches from the mouth, maintain a consistent on-axis orientation throughout the performance, and set the input gain to average around -18 dBFS with peaks below -10 dBFS.
- Recording practice: Warm up the voice before every session, conduct a thorough soundcheck, and record a minimum of three complete takes to provide material for comp editing.
- DAW processing: Follow a logical signal chain — high-pass filter and EQ cleanup, then compression to control dynamics, then reverb and delay to add spatial character. Apply effects on send channels for maximum flexibility.