Subtractive Synthesis Explained: Synth Sound Design Basics
Learn subtractive synthesis from the ground up—oscillators, filters, ADSR envelopes, and LFOs—plus practical recipes for lead, pad, and bass sounds.
Subtractive synthesis is the most widely used approach to sound design in modern music production. From stock software synthesizers bundled with your DAW to premium hardware instruments, the underlying signal flow is remarkably consistent across virtually every device. Master the core concepts once, and you can apply them to any synth you encounter. This guide walks through each major building block—oscillators, filters, envelopes, and LFOs—explaining what each one does and how to use it, then wraps up with practical recipes for three essential synth sounds.
What Is Subtractive Synthesis?
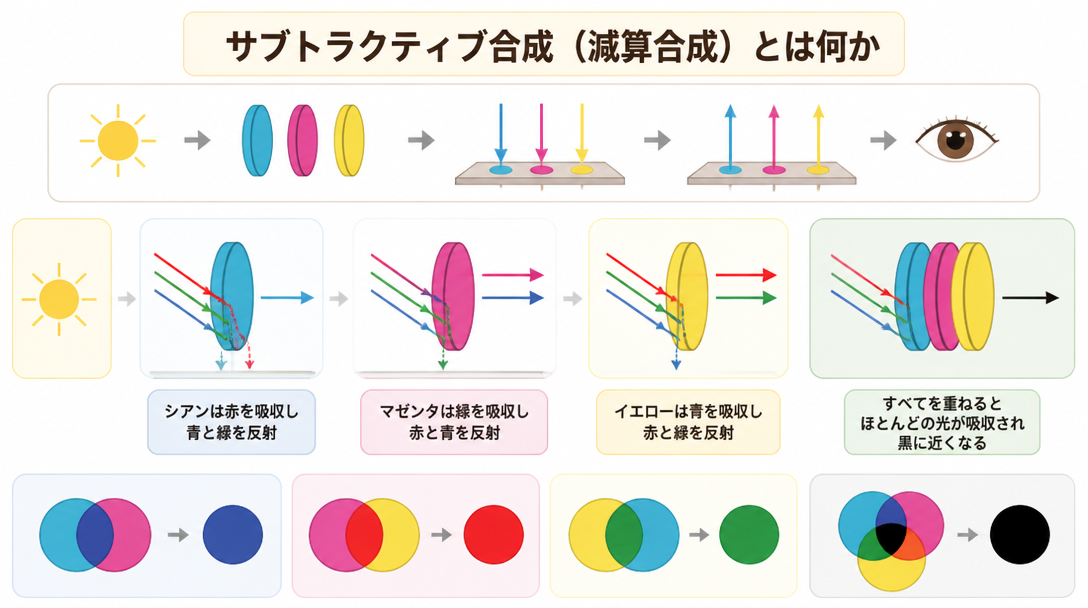
A Sculpting Approach to Sound
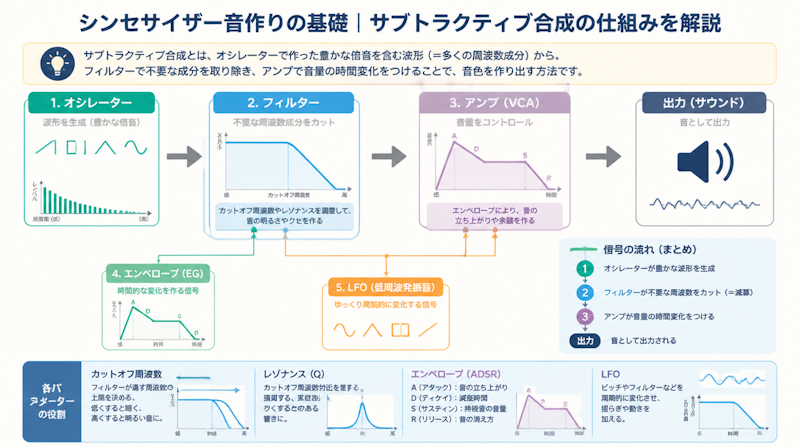
Subtractive synthesis works by generating a harmonically rich waveform with an oscillator, then using a filter to carve away unwanted frequency content until the desired tone emerges. Native Instruments describes this as "sculpting sound like a marble statue"—rather than building a sound from nothing, you begin with a raw, complex material and chip away at it to reveal the shape you want.
The conceptual opposite of subtractive synthesis is additive synthesis, which layers large numbers of pure sine waves to construct complex timbres. While additive synthesis offers fine-grained control over every harmonic, it is computationally expensive and can feel unintuitive in practice. Subtractive synthesis, by contrast, follows a simple Oscillator → Filter → Amplifier signal chain that is easy to visualize and learn, making it the ideal starting point for anyone new to synthesis and the conceptual foundation on which all other synthesis methods build.
A Brief History and Key Instruments
Subtractive synthesis entered the mainstream in 1964 when American engineer Robert Moog unveiled his voltage-controlled synthesizer. Early Moog systems were large, modular installations, but the launch of the Minimoog in 1970 changed everything: it packed the core subtractive architecture into a portable, performance-ready instrument and accelerated the adoption of synthesizers across popular music (Moog synthesizer – Wikipedia).
Through the 1980s, Japanese manufacturers Roland, KORG, and Yamaha expanded the market dramatically. The Roland Juno-106 (1984) became one of the most celebrated subtractive synthesizers ever made, praised for its warm sound and intuitive controls. The Roland TB-303, originally designed as a bass-line accompaniment device, found a second life in underground electronic music—its distinctive filter envelope character became the defining voice of acid house and techno. Today, software synthesizers such as Xfer Serum, Native Instruments Massive, and Arturia's Analog Lab bring the same subtractive architecture to any DAW with no hardware required.
Era | Instrument | Significance |
|---|---|---|
1970s | Minimoog (Moog) | First portable subtractive synthesizer; brought synths to live performance |
1980s | Roland Juno-106 | Built-in chorus, user-friendly interface; hugely popular in pop and electronic music |
1980s | Roland TB-303 | Distinctive filter envelope; foundation of acid house and techno bass sounds |
Present | Serum, Massive, Analog Lab, etc. | Software synthesizers delivering full subtractive synthesis inside any DAW |
Oscillators (VCO/OSC): Building the Raw Sound
Core Waveforms and Their Sonic Characteristics
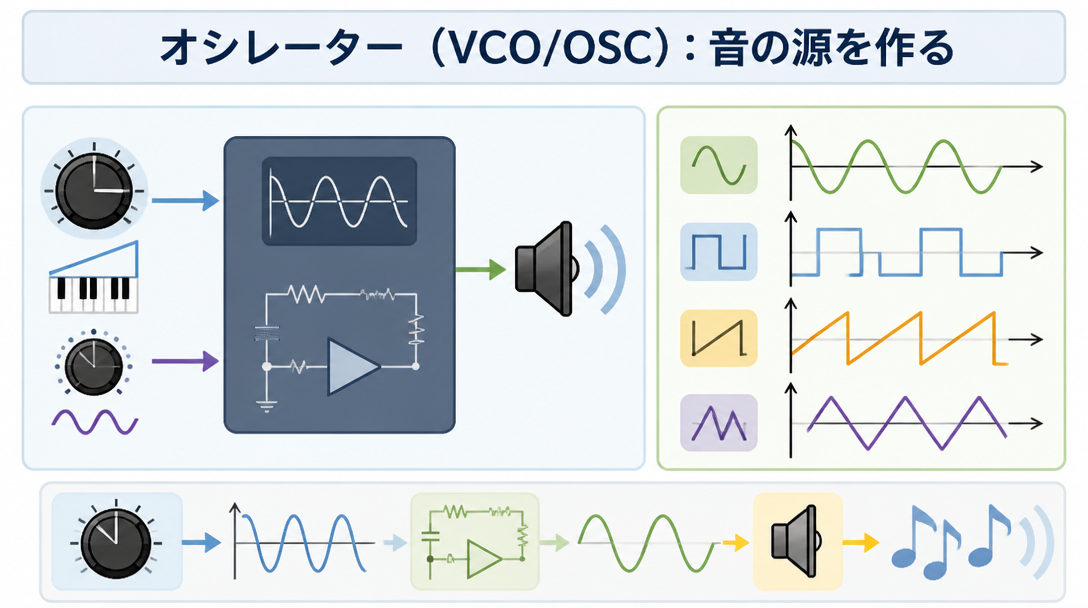
The oscillator is where every synthesizer patch begins. When a key is pressed, the oscillator generates a continuous waveform at the corresponding pitch, which then flows downstream into the filter and amplifier sections. Choosing a waveform is the first and most fundamental sound-design decision, because it determines the harmonic content—and therefore the basic character—of everything that follows.
The five waveforms found on most synthesizers are summarized below.
Waveform | Harmonic Content | Sonic Character | Best Used For |
|---|---|---|---|
Sawtooth | All harmonics (odd and even), decreasing in amplitude | Bright, buzzy, harmonically rich | Lead synths, pads, strings-style sounds |
Square / Pulse | Odd harmonics only | Hollow, woody, slightly nasal | Bass lines, clarinet-like tones, retro video-game sounds |
Triangle | Odd harmonics only, very low amplitude | Soft, mellow, flute-like | Flute imitations, gentle lead sounds |
Sine | Fundamental only—no harmonics | Pure, clean, tonally minimal | Sub-bass, kick drum low-end reinforcement |
Noise | Energy across all frequencies simultaneously | Hissing, unpitched | Percussion, wind effects, breath textures |
The sawtooth wave is widely recommended as the starting point for beginners. Because it contains both odd and even harmonics at significant levels, it gives the filter the most material to work with, making the effect of adjusting the cutoff frequency immediately and dramatically audible. Start with a sawtooth, experiment with the filter, and the logic of subtractive synthesis will click very quickly.
Multiple Oscillators, Unison, and Detuning for Width and Thickness
Most synthesizers provide two or three oscillators that can be combined to add depth, weight, or harmonic complexity. The single most impactful multi-oscillator technique is detuning: pitching two or three oscillators slightly apart—typically by just a few cents—so their waveforms drift in and out of phase with each other. This interaction produces a rich, chorusing, beating quality often described as "supersaw," and it is the foundation of the wide, wall-of-sound lead tones heard throughout EDM.
- Unison: Stack multiple oscillators at the same pitch with slight detuning for immediate thickness and width.
- Octave layering: Set one oscillator an octave below the main oscillator to add low-end weight and body.
- Fifth layering: Tune a second oscillator up a perfect fifth for a fuller, more three-dimensional tone.
- Noise blend: Mix in a small amount of noise to simulate the breathiness or air of acoustic instruments.
Synthesizers reach their full potential when used within a well-configured DAW environment. For guidance on choosing the right software, see The Complete DAW Buyer's Guide: Logic, Ableton, and FL Studio Compared.
Filters (VCF): The Heart of Subtractive Synthesis
Filter Types and When to Use Each
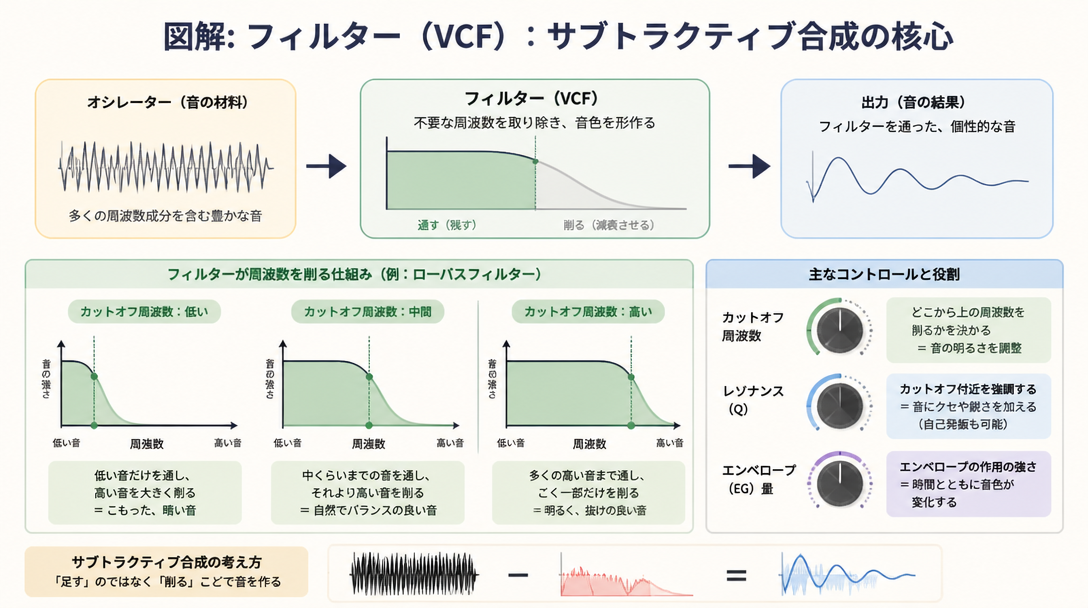
If the oscillator provides the raw material, the filter is where subtractive synthesis does its defining work. The filter removes specific frequency ranges from the oscillator's output, transforming a harsh, harmonically cluttered waveform into a shaped, musical tone. Understanding filter types is essential to developing an instinct for sound design.
- Low-Pass Filter (LPF): Passes frequencies below the cutoff point and attenuates everything above it. This is by far the most commonly used filter type in subtractive synthesis. Reducing the cutoff makes the sound progressively darker and warmer; opening it up restores brightness and edge.
- High-Pass Filter (HPF): The mirror image of the LPF—attenuates low frequencies below the cutoff while passing the highs. Useful for thinning out a sound, removing muddiness from a bass-heavy patch, or creating a telephone or radio-style effect.
- Band-Pass Filter (BPF): Passes only a defined band of frequencies around the cutoff, attenuating both high and low content. Produces a distinctively nasal or vocal-formant character.
- Notch Filter (Band-Reject): The inverse of the band-pass—cuts a narrow band of frequencies while leaving the rest largely intact. Useful for removing specific resonant frequencies or for creative tonal sculpting.
According to LANDR's guide to subtractive synthesis, the low-pass filter "removes high-frequency content to bring out different harmonic characters," and simply sweeping the cutoff knob up and down is enough to understand the power the filter holds over a sound's overall personality.
Cutoff Frequency and Resonance: The Two Essential Controls
Nearly every filter section centers on two parameters that work in tandem.
Cutoff Frequency sets the boundary point at which the filter begins to take effect. For a low-pass filter, frequencies below the cutoff pass through largely unaffected, while frequencies above it are progressively attenuated. Think of the cutoff knob as a tone control with far more precision than a simple treble knob: turn it clockwise for a brighter, more open sound; counter-clockwise for something darker and more subdued.
Resonance (sometimes labeled Q or Emphasis) boosts the frequencies immediately around the cutoff point, creating a peak or "bump" in the frequency response right at the filter's edge. As resonance increases, this peak becomes more pronounced, giving the sound an increasingly nasal, whistling character. At extreme settings many filters self-oscillate—the filter itself begins to generate a pitched sine-wave tone at the cutoff frequency, a trick used deliberately in experimental sound design and techno. LANDR describes resonance as allowing you to "further sculpt the sound by creating a 'bump' around the cutoff frequency."
Adjustment | Effect on Sound | Typical Application |
|---|---|---|
Cutoff ↑ (open) | Brighter, more aggressive, more harmonic content | Lead synths, cutting through a mix |
Cutoff ↓ (closed) | Darker, warmer, subdued high-frequency content | Pads, background textures, softer tones |
Resonance ↑ | Nasal, whistling peak at the cutoff frequency | Acid bass, techno, wah-wah style effects |
Resonance at maximum | Self-oscillation; filter generates a pitched sine tone | Sound effects, drones, experimental design |
Envelopes (ADSR): Shaping Sound Over Time
The Four ADSR Stages and What They Control
An envelope generator modulates a parameter over time in response to a note event. The standard model used on virtually every synthesizer is the ADSR envelope, named for its four stages: Attack, Decay, Sustain, and Release. When applied to the amplifier section, the ADSR controls how the overall volume of a note evolves from the moment a key is pressed to the moment after it is released.
- A — Attack: The time taken for the sound to rise from silence to its peak level after a key is pressed. A very short attack produces a sharp, percussive click at the note's onset. A long attack creates a gradual swell—the characteristic sound of a string pad fading in.
- D — Decay: After reaching peak level, the decay stage determines how quickly the sound falls to the sustain level. A short decay gives the sound a punchy, transient-heavy quality (think plucked strings or struck percussion). A longer decay creates a more gradual, natural settling.
- S — Sustain: Unlike the other three stages, sustain specifies a level rather than a time. It sets the amplitude at which the sound holds while a key is continuously pressed. An organ-like patch holds at full sustain indefinitely; a piano-like patch decays to near-zero.
- R — Release: The time taken for the sound to fade to silence after a key is released. A short release cuts the note off cleanly and immediately, which suits staccato playing or tight rhythmic parts. A long release lets notes decay gradually after the key is lifted, which is essential for realistic pads and lush ambient textures.
For beginners, prioritizing attack and release first is the most efficient path to understanding envelopes. These two parameters alone account for the majority of the perceived "feel" of any synthesizer patch—whether it snaps, swells, punches, or breathes.
Filter Envelopes: Making Timbre Move Over Time
Envelopes are not limited to controlling volume. Routing an envelope to the filter's cutoff frequency creates a sound whose tonal character changes dynamically over the course of each note—a technique called a filter envelope. This is one of the most expressive tools in subtractive synthesis.
Here is the basic approach:
- Set the filter cutoff relatively low so the sound is initially dark and muffled.
- Assign a positive Envelope Amount to the filter section (sometimes labeled "Env Amount" or "Filter Envelope Depth").
- Set a short attack on the filter envelope. When a key is pressed, the cutoff leaps upward toward a brighter tone, then decays back down to the darker base setting over the decay stage.
This technique creates the signature "vowel-like" movement that makes synthesizer sounds feel alive rather than static. The Roland TB-303 exploited this approach to its logical extreme: by combining a tightly adjusted filter envelope with elevated resonance and an offset pitch sequencer, it produced the bubbling, squelching acid bass tone that defined an entire genre of electronic music. Reversing the envelope amount to a negative value produces the inverse effect—a sound that opens brightly at the note's start and closes into darkness, useful for reverse-swell textures and experimental timbres.
ADSR Settings for Common Instrument Archetypes
Instrument Archetype | Attack | Decay | Sustain | Release |
|---|---|---|---|---|
Piano | Instant (0 ms) | Medium–Long | Low (near zero) | Short |
Organ | Instant (0 ms) | None (0) | Full (100%) | Instant (0 ms) |
String Pad | Long (0.5–2 s) | None (0) | Full (100%) | Long (1–3 s) |
Plucked Guitar / Harp | Instant (0 ms) | Short–Medium | Low | Short |
Brass / Horn | Short (slight swell) | Short | High | Short |
LFO (Low-Frequency Oscillator): Adding Movement and Expression
What an LFO Does: The Basics of Modulation
A Low-Frequency Oscillator (LFO) is an oscillator that operates well below the threshold of human hearing—typically below 20 Hz—so it produces no audible pitch of its own. According to Native Instruments' LFO explainer, "an LFO doesn't generate audio signals directly; instead, it acts as a modulator, cyclically varying other parameters." In other words, the LFO is a rhythmic automation tool built into the synthesizer: connect it to a destination parameter, and that parameter will oscillate up and down at the LFO's rate, adding periodic movement to an otherwise static sound.
The key controls found on a typical LFO section are:
- Rate: How fast the LFO cycles. Slow rates (0.1–2 Hz) produce gentle, breathing modulation; faster rates (5–20 Hz) create rapid tremolo or vibrato effects.
- Amount / Depth: How much the LFO moves the destination parameter. A low depth creates subtle movement; a high depth creates dramatic sweeping changes.
- Shape: The waveform of the LFO itself. Sine waves produce smooth, rounded movement; sawtooth waves ramp up then snap back; square waves alternate between two fixed values; sample-and-hold waveforms produce random stepwise jumps.
- Destination: Which parameter the LFO modulates. Common destinations include pitch, filter cutoff, and amplitude.
Vibrato, Tremolo, and Filter Sweeps in Practice
Three LFO applications stand out as essential tools for any synthesizer programmer.
- Vibrato: Route the LFO to pitch and use a slow sine wave at moderate depth. The result is a gentle pitch wavering that closely mimics the natural vibrato of a vocalist or string player. Assigning the modulation wheel (MIDI CC#1) to control LFO depth in real time lets performers introduce or intensify vibrato expressively during a performance—a standard technique for synth lead playing.
- Tremolo: Route the LFO to the amplifier (volume). The amplitude pulses up and down periodically, replicating the tremolo articulation used by guitarists and string sections. Increasing the rate pushes this effect toward an auto-wah or choppy gating quality.
- Filter Sweep: Route the LFO to the filter cutoff frequency. As the cutoff rises and falls cyclically, the sound takes on a "wah-wah" or talking-filter character. This is one of the most recognizable effects in electronic music, used extensively in EDM build-ups, funk-influenced synthesizer lines, and psychedelic textures. A slow filter sweep at high resonance creates the illusion of a sound breathing in and out.
For information on controlling LFO parameters in real time via MIDI—including modulation wheel assignments and MIDI CC routing—see MIDI Fundamentals Explained: What Every DAW Beginner Needs to Know.
Practical Sound Design Recipes Using Subtractive Synthesis
How to Create a Lead Synth Sound
A cutting, expressive lead synthesizer is one of the most versatile sounds in any genre, from pop and R&B to techno and EDM. The following recipe produces a solid starting point that can be shaped in many directions.
- Oscillators: Use two or three sawtooth waves. Apply light detuning between them—roughly ±5 to ±15 cents—to introduce thickness and a subtle chorusing effect.
- Filter: Set a low-pass filter with the cutoff at around 60–80% open. Add a moderate amount of resonance (approximately 20–30%) to give the sound presence and a slightly vocal edge.
- Amp Envelope: Set attack to the minimum, decay short, sustain high, and release short to medium. This produces a note that speaks immediately and holds cleanly.
- LFO: Assign a slow sine wave LFO to the pitch destination for gentle vibrato. Map the modulation wheel to LFO depth so vibrato can be added expressively during performance.
How to Create a Pad Sound
Pads provide harmonic warmth and atmosphere, filling space in a mix without competing aggressively with other elements. The long attack is the defining characteristic.
- Oscillators: Layer two or three sawtooth or square waves with unison and detuning applied generously to maximize width and movement.
- Filter: Set the low-pass filter cutoff to around 40–55% and apply a modest positive filter envelope amount so that each note opens slightly brighter at the onset before settling back to the darker base tone.
- Amp Envelope: Set attack to 1–3 seconds, decay to zero, sustain to maximum, and release to 2–4 seconds. The slow attack prevents the pad from sticking out rhythmically; the long release allows chords to linger and blend smoothly.
- LFO: Apply a very slow sine wave to the filter cutoff at low depth. This creates a slow, organic breathing quality that keeps the pad from sounding static over time.
How to Create a Synth Bass Sound
A tight, focused synth bass anchors the rhythm section and provides the low-end energy that drives a track forward. Keep it focused and avoid unnecessary complexity.
- Oscillators: Use one or two oscillators with a sawtooth or square wave. Detune the second oscillator down by one octave to function as a sub-oscillator, adding low-end weight without cluttering the mid-range.
- Filter: Set a low-pass filter with the cutoff at approximately 30–50% and resonance at moderate levels (30–50%). Apply a short-attack filter envelope with a positive envelope amount to create a brief "thwack" or "plop" at the note's onset—this is what gives synth bass its punchy, articulate character.
- Amp Envelope: Set all stages short: instant attack, short decay, medium sustain, and the shortest possible release. A tight amp envelope keeps the bass rhythmically precise and prevents notes from bleeding into each other.
- LFO: Generally not needed for a standard synth bass. If desired, a very slow, low-depth sine wave on the amplitude can add a subtle pulse or throb to a sustained bass note.
For advice on monitoring low-frequency sounds accurately during sound design, see How to Choose an Audio Interface: A Beginner's Guide to Home Recording. A quality audio interface combined with full-range studio monitors will reveal low-end detail that consumer speakers miss entirely, which is critical when dialing in bass sounds.
Summary
This guide has covered the full signal chain of subtractive synthesis, from oscillator waveform selection through to complete sound design recipes. Here are the key takeaways:
- Subtractive synthesis is about removal, not addition. Oscillators generate harmonically rich raw material; filters carve away unwanted frequencies to reveal the desired tone.
- Waveform selection sets the character of everything that follows. The sawtooth wave is the most versatile starting point for beginners because its full harmonic content makes filter effects highly audible.
- The filter is the defining element of subtractive synthesis. Cutoff frequency and resonance together determine the majority of a sound's tonal personality.
- ADSR envelopes design the time dimension of a sound. Adjusting attack and release alone can transform the perceived instrument type entirely—from percussive to sustained, from snappy to lush.
- Filter envelopes make timbre dynamic. The TB-303's acid bass is the most iconic demonstration of what happens when filter envelope modulation is pushed to the extreme.
- LFOs inject movement and life into static patches. Vibrato, tremolo, and filter sweeps each serve distinct expressive functions and are fundamental tools for professional-quality sound design.