Reverb vs Delay: How to Use Spatial Effects for Depth
Master reverb and delay in your DAW. Learn types, parameters, instrument-specific tips, and pro mixing techniques to add depth and space to your mix.
When producing music in a DAW, one of the most common challenges is knowing when to reach for reverb and when to use delay. Both are classified as spatial effects — they add depth, dimension, and a sense of space to a recording — but the way they work and the results they deliver are fundamentally different. This guide breaks down the core differences between reverb and delay, explores the major types of each, explains the key parameters you need to understand, offers instrument-by-instrument recommendations, and covers the professional mixing techniques that will immediately elevate the quality of your productions.
Reverb vs Delay — The Core Difference Between Two Spatial Effects
What Is Reverb?
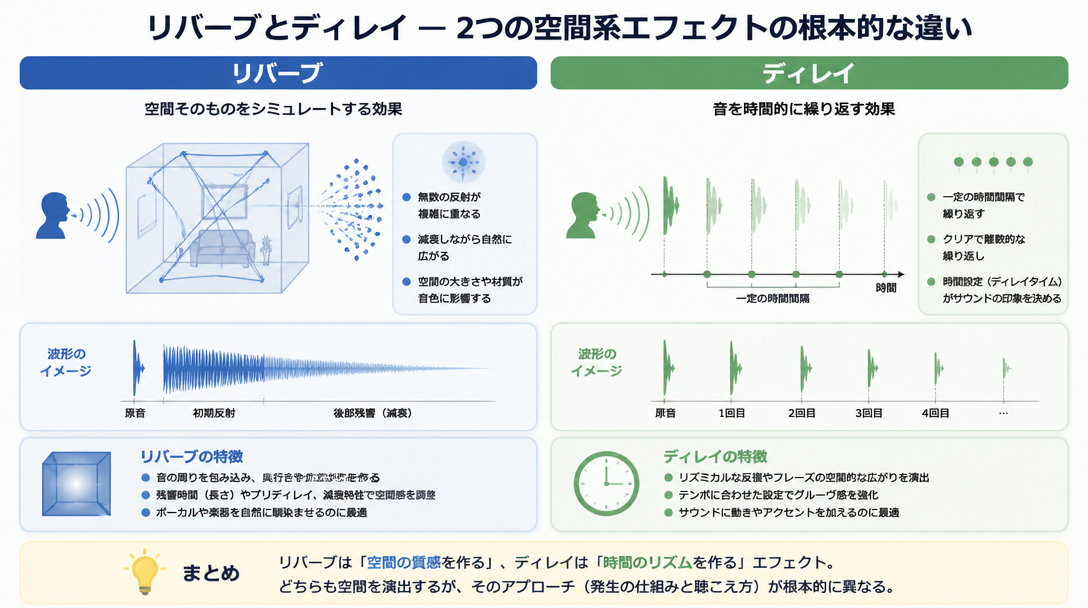
Reverb (short for reverberation) is an effect that simulates the natural acoustic reflections of a physical space — a room, a concert hall, a cathedral, a recording studio. To understand reverb intuitively, imagine bouncing a basketball inside a gymnasium. The sound strikes the floor, walls, and ceiling from multiple angles simultaneously. Those reflections combine and blend together, then gradually fade out over time. That slow, dense decay — the "tail" — is what reverb recreates.
Applying reverb to a dry recorded signal gives it a sense of physical presence. A vocal tracked through headphones in a treated home studio can sound as if it were performed in a living room, a tiled bathroom, or a grand concert hall — purely by changing the reverb settings. According to iZotope's official guide, reverb is defined as "the persistence of sound in a space after the source has stopped, caused by multiple reflections that blend and decay over time."
What Is Delay?
Delay is an effect that records an audio signal and plays it back after a set period of time, creating a distinct, audible repeat — essentially a controllable echo. A classic real-world analogy is shouting across the Grand Canyon and hearing your voice bounce back as a clear, identifiable repetition moments later. That's delay in its purest form.
Because delay operates in precise millisecond increments, it can be synced to the tempo of a track. Setting delay times to rhythmic note values — eighth notes, dotted eighth notes, quarter notes — means the repeats lock into the groove of the music and feel intentional rather than accidental. This tempo-sync capability makes delay a uniquely musical tool.
The Decisive Difference Between the Two
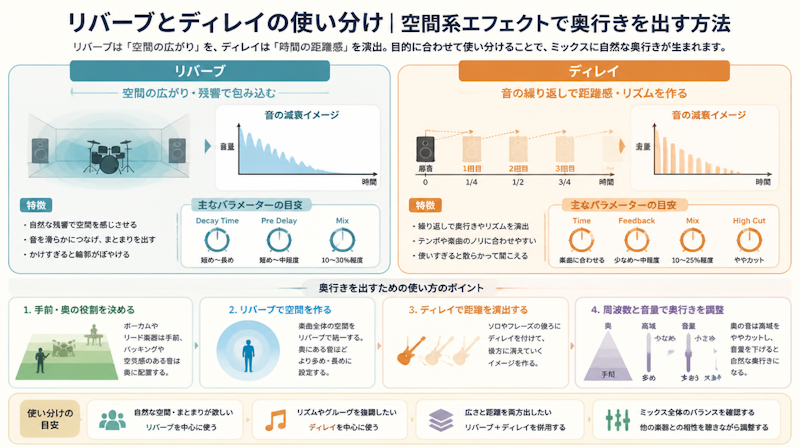
The single biggest distinction between reverb and delay comes down to the clarity of the reflections. Reverb blends countless reflections into a smooth, indistinct wash of sound. Delay produces repeats that are clearly distinguishable from the original signal.
Category | Reverb | Delay |
|---|---|---|
Nature of reflections | Dense, blended tail that gradually fades | Distinct, audible repeats clearly separate from the source |
Spatial character | Simulates a real acoustic environment (room, hall) | Manipulates time-based echo for perceived depth |
Impact on the mix | Can cause low-end buildup and muddiness | Adds clean depth without obscuring the dry signal |
Tempo synchronization | Difficult to lock to BPM precisely | Easily synced to BPM for rhythmic repeats |
Genre suitability | Classical, ballads, pop, cinematic | EDM, rock, hip-hop, funk |
As eMastered's comparison guide summarizes: "Delay creates a cleaner, more two-dimensional sense of space, while reverb is a three-dimensional tool that adds depth and realism to a mix." Both are essential — the skill lies in knowing when and how to deploy each one.
Types of Reverb and When to Use Each
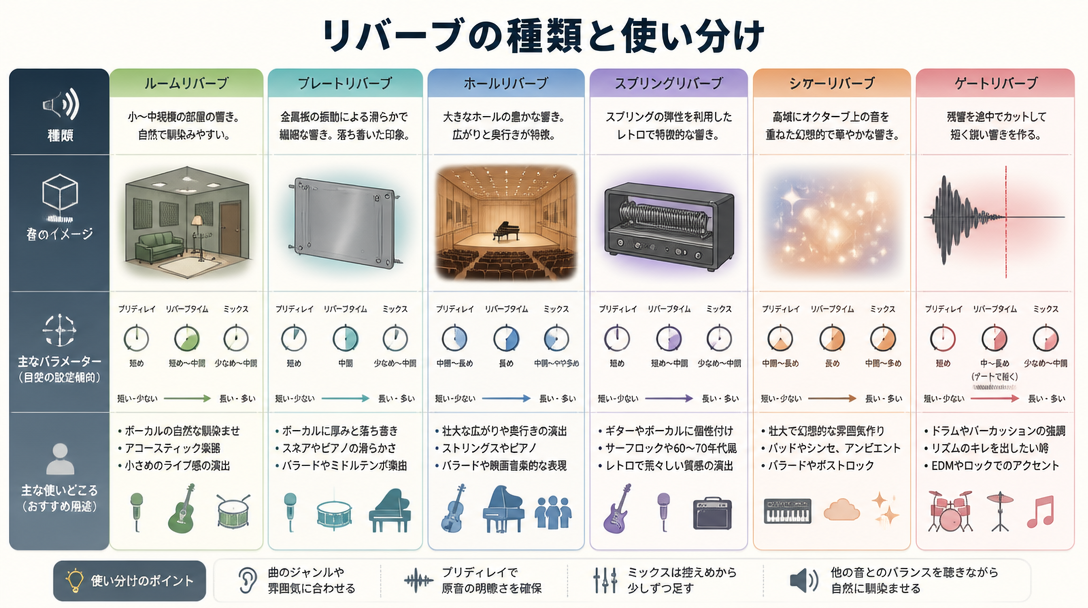
Room Reverb
Room reverb simulates the acoustic reflections of a relatively small, enclosed space — a recording studio, a rehearsal room, a home studio. Decay times typically fall in the 0.3 to 0.8 second range, and the effect is characterized by prominent early reflections (the first distinct echoes that arrive before the tail develops).
Room reverb is the go-to choice when you want to add natural "air" and a sense of physical presence without drawing attention to the effect itself. It works particularly well on drums and percussion, giving kit elements the feeling of being recorded in a real acoustic space without washing out the transients or cluttering the low end. In groove-heavy genres like funk, soul, R&B, and hip-hop, room reverb is often the only reverb used — if any at all.
Hall Reverb
Hall reverb recreates the expansive acoustics of a concert hall or large auditorium. Decay times extend to 1.5 to 3 seconds or longer, producing a lush, sweeping tail that envelops the listener. This is the sound associated with orchestral recordings, film scores, power ballads, and any music that aims for grandeur and emotional sweep.
The trade-off is that hall reverb is inherently dense and requires careful application. In fast tempos or densely arranged productions, a long hall reverb tail will blur transients, cause low-end buildup, and make individual elements difficult to distinguish. As Music Guy Mixing's guide advises, "at faster tempos, choosing delay over reverb is often the better call to keep the mix clear and uncluttered."
Plate Reverb
Plate reverb originated as a physical device: a large, thin sheet of metal suspended in a frame. Transducers would vibrate the plate, and contact microphones would capture the resulting resonance. The electronic simulation of this process produces a smooth, dense, and somewhat bright reverb tail with a distinctive metallic sheen.
Plate reverb has been a staple of professional recording studios for decades, particularly for vocals and snare drums. It provides an elegant, polished sound that sits well in a mix without becoming diffuse or washy. If you're going for a vintage studio aesthetic — think classic Motown, '70s rock, or early '80s pop — plate reverb is an essential tool.
Convolution (IR) Reverb
Convolution reverb takes a fundamentally different approach from algorithmic reverb types. Instead of using mathematical models to simulate spaces, it uses impulse response (IR) recordings — real-world measurements of how an actual acoustic space responds to sound. By convolving an audio signal with this IR data, the plugin recreates the sonic signature of that exact environment with remarkable accuracy.
- Ideal when you want the authentic acoustics of a specific, famous venue — Carnegie Hall, Abbey Road Studio One, the Pantheon in Rome
- Tends to be more CPU-intensive than algorithmic reverbs due to the processing demands of convolution
- Notable examples include Logic Pro X's Space Designer, Waves IR-1, and Altiverb by Audio Ease
The limitation of convolution reverb is flexibility. Because it's modeling a fixed, real space, parameters like decay time and early reflections are less freely adjustable than with algorithmic designs. However, for realistic acoustic placement, nothing beats it.
Spring Reverb and Gated Reverb
Spring reverb uses a physical spring mechanism — the same type found inside vintage guitar amplifiers and dedicated hardware units — to produce a distinctive, slightly metallic, "boingy" reverb character. It's synonymous with surf rock, rockabilly, and vintage Western sounds, and it adds an unmistakable retro texture that no algorithmic reverb can fully replicate.
Gated reverb is a technique rather than a reverb type per se. A noise gate is placed after a reverb (usually a large hall or room), set to abruptly cut the reverb tail after a specific duration. The result is a huge, punchy sound that expands aggressively and then stops cold — no gradual fade. This technique defined the drum sound of 1980s pop and rock (think the enormous snare on Phil Collins' "In the Air Tonight") and has experienced a significant revival in modern production. As eMastered notes, "gated reverb gives drums a massive, powerful quality while simultaneously keeping the mix tight and controlled."
Types of Delay and When to Use Each
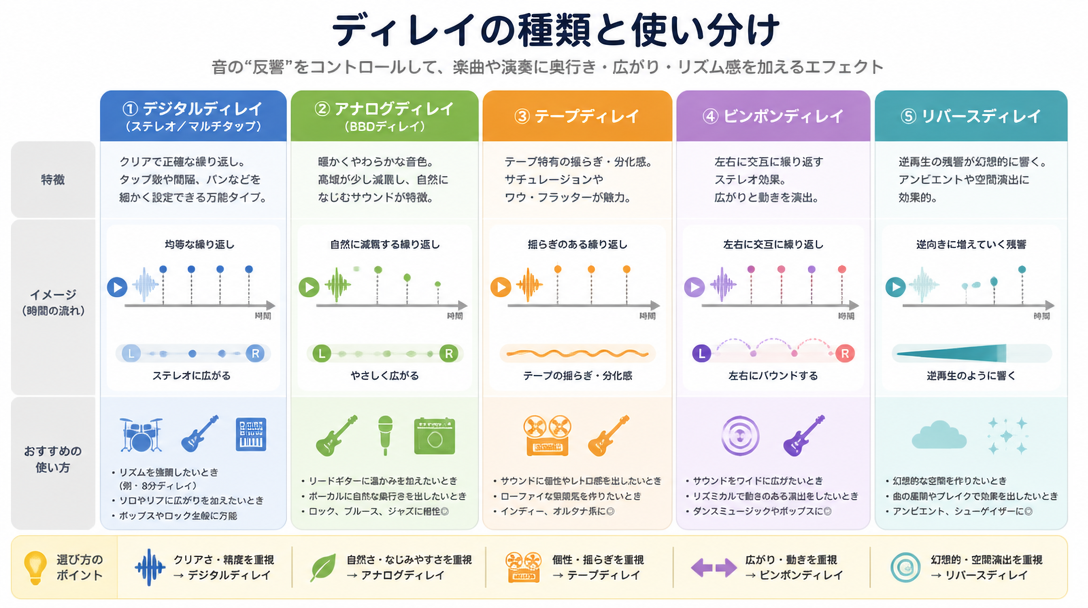
Slapback Delay
Slapback delay is one of the simplest and most effective delay techniques in mixing. It involves a single repeat set to a very short delay time — typically 40 to 120 milliseconds — with feedback set to near zero so the repeat occurs only once or twice. The result is not a clearly audible echo but rather a subtle thickening of the original signal.
Because the repeat comes so close on the heels of the source, the brain doesn't fully process them as two separate events. Instead, the sound gains perceived width, warmth, and body. Slapback is the foundational effect of rockabilly and early rock and roll vocal production, and it remains one of the cleanest ways to add stereo width and presence to a lead vocal or guitar without introducing the rhythmic complexity of a tempo-synced delay.
Ping-Pong Delay
Ping-pong delay alternates repeats between the left and right channels of the stereo field, creating the sensation of sound bouncing back and forth across the mix — hence the name. When synced to tempo, this effect is rhythmically engaging and adds significant stereo width and motion to otherwise static elements.
A classic ping-pong delay setup:
- Left channel: eighth note (synced to BPM)
- Right channel: dotted eighth note (synced to BPM)
- Feedback: 30–40%
Applied to an EDM synth lead or an arpeggiated figure, ping-pong delay transforms a straight melodic phrase into something that feels alive and dynamic. As noted in the OTO×NOMA mixing blog, "setting different note values for the left and right channels of a stereo delay creates a natural sense of width and movement that a single-channel delay cannot achieve."
Tape Delay and Modulation Delay
Tape delay emulates the behavior of vintage tape echo machines like the Echoplex and the Roland Space Echo. These units recorded audio onto a loop of magnetic tape and played it back at a short offset — but because tape is an imperfect medium, the repeats were subject to subtle pitch fluctuations, gentle high-frequency rolloff, and a warm, slightly compressed character. Modern tape delay plugins capture these imperfections and make them a feature.
Tape delay is the ideal choice when a clean, pristine digital echo feels too sterile. The natural warmth and slight degradation of each repeat creates a sense of organic depth that works beautifully on guitars, vocals, and keyboards in rock, blues, and indie productions.
Modulation delay adds chorus or vibrato to the delayed signal — the pitch of the repeats fluctuates gently as they play back. This creates a lush, shimmering quality that thickens chords and adds harmonic interest, making it particularly useful on sustained guitar chords, synth pads, and clean electric piano parts.
Essential Parameters You Need to Understand
Key Reverb Parameters
To use reverb with intention rather than guesswork, it's essential to understand what each parameter actually controls. Pre-delay and decay time, in particular, are described in many professional mixing resources — including guides from music production educators — as "the heart of spatial design."
Parameter | Function | Recommended Settings |
|---|---|---|
Pre-Delay | The gap between the dry signal and the onset of the reverb tail | Vocals: 20–40 ms / Drums: 5–15 ms |
Decay / RT60 | Time for the reverb tail to decay by 60 dB (effective length of the reverb) | Room: 0.3–0.8 s / Hall: 1.5–3 s |
Diffusion | Controls the density and scattering of reflections within the tail | Lower = more spacious feel; Higher = smoother, denser tail |
Early Reflections | The level of the first discrete echoes before the tail develops | Key factor in determining perceived room size |
Wet/Dry Mix | Balance between the original signal and the reverb signal | Set to 100% Wet when using send/return routing |
Pre-delay deserves special attention. By inserting a short gap between the dry signal and the reverb tail, pre-delay allows the initial attack and transient of the source to cut through clearly before the reverb fills in behind it. This preserves intelligibility and gives the impression of a larger, more defined space. Setting pre-delay too short causes the reverb to wash over the attack immediately, blurring the transient and making the signal sound smaller and less defined.
Key Delay Parameters
Delay plugins are generally simpler in their parameter sets, but the interaction between these controls enables a wide range of creative outcomes.
Parameter | Function | Recommended Settings |
|---|---|---|
Time | The delay interval in milliseconds or as a synced note value | Sync to the project BPM for musical results |
Feedback | How much of the delayed signal is fed back into the input (controls number of repeats) | 20–40% (higher values risk buildup and muddiness) |
High Cut / Low Cut | EQ applied within the delay's feedback loop to shape the tone of repeats | High cut around 8–12 kHz is standard practice |
Wet/Dry Mix | Balance between the dry signal and the delayed signal | Set to 100% Wet when using send/return routing |
Applying a high-frequency cut to the delay repeats is one of the most widely used professional mixing techniques. When the repeats are slightly duller than the source, they naturally recede into the background — they feel farther away and older, creating a convincing sense of front-to-back depth. Without this filtering, delay repeats at the same brightness as the original signal can compete for attention and clutter the mix.
Instrument-by-Instrument Guide: Reverb and Delay in Practice
Vocals
Vocals occupy the most prominent position in virtually any mix, which means spatial effects on the vocal track will have a disproportionate impact on the overall feel of the production. When adding space to dry vocal recordings captured in a home studio environment, consider the following approach:
- Short room reverb: Used continuously at a low level, this gives the voice a natural sense of physical presence — as if it exists in a real space rather than being pasted onto the track. Keep the decay under 0.8 seconds.
- Long hall reverb: Reserved for emotional peaks — the final chorus, a held note, a climactic phrase. Use sparingly; even a small amount of hall reverb on a chorus can dramatically open up the sound.
- Short slapback delay (40–80 ms): Applied via a send at a subtle level, this thickens the vocal without creating an audible echo. It's one of the most reliable tools for giving a lead vocal weight and presence.
- Quarter-note delay: Placed on the tail end of phrases, this fills the space between vocal lines with musical, rhythmically coherent repeats. It maintains energy during rests and creates a sense of continuity.
Music Guy Mixing recommends setting up two separate reverb sends for vocals — one short and one long — and blending them at different levels depending on the section of the song. This approach gives you real-time control over the sense of space and emotional intensity throughout the arrangement.
Drums and Snare
Drums require a more surgical approach to spatial effects than most other instruments. The goal is typically to add character and room ambience without softening transients or muddying the low end. Different elements of the kit benefit from different treatments:
- Snare: Plate reverb is the classic choice. Set decay between 0.3 and 0.6 seconds with 10–20 ms of pre-delay to keep the initial crack of the snare punchy and upfront. The plate's density and brightness complement the snare's sharp attack beautifully.
- Kick drum: Reverb on the kick should be kept to an absolute minimum — or omitted entirely. Low-frequency reverb quickly muddies a mix. If any room ambience is desired, a very light room reverb (short decay, low wet level) is the maximum.
- Cymbals and overheads: Cymbals have inherent natural decay, so additional reverb should be applied with caution. A subtle Haas effect — a mono delay of 20–40 ms panned opposite the source — can enhance stereo width without introducing dense reverb tails.
Guitar and Bass
Slapback delay is the traditional spatial effect for electric guitar, delivering thickness and stereo presence without obscuring the pick attack or chord definition. The Edge of U2 popularized the dotted eighth-note delay as a compositional device, turning the rhythmic interplay between the guitar and its own delayed repeats into a signature sonic texture. The most effective workflow is to shape the guitar's tone with EQ and compression first, then layer in delay to add spatial depth.
Spring reverb — whether hardware or plugin — captures the vintage aesthetic of early rock and country guitar, and is still widely used in those contexts. For cleaner styles, a short room reverb can provide just enough acoustic presence to make a guitar feel like it was recorded in a real space.
Bass guitar is the one instrument in a typical mix that should receive little to no reverb. Low-frequency reverb accumulates rapidly in the mix and creates a muddy, unfocused bottom end. If any spatial treatment is applied to bass, keep the wet level under 10% and use a very short decay. In most professional mixes, bass is left completely dry.
Synths and Pads
Synthesizer pads, string patches, and atmospheric textures pair naturally with hall reverb. Long decay times of 2 to 4 seconds allow pad sounds to dissolve into the reverb tail, creating seamless, immersive textures that blur the boundary between the instrument and the acoustic space. This is the foundational technique of ambient, new age, and cinematic music production.
For EDM synth leads and arpeggios, a tempo-synced ping-pong delay is the standard approach for adding motion and stereo width. Combining delay with sidechain compression can create a ducking effect where the delay repeats are briefly attenuated each time the kick drum hits — keeping the rhythmic energy clear while retaining the spatial effect between beats.
Professional Mixing Techniques
Use Send/Return Routing to Unify the Mix's Space
One of the most consistent habits of professional mixers is using send/return (aux send) routing for reverb and delay rather than inserting them directly on individual tracks. The workflow is straightforward:
- Create a dedicated auxiliary (bus) track and insert the reverb or delay plugin on it, set to 100% Wet.
- From each instrument track, create a send to this auxiliary track and adjust the send level to control how much of that instrument feeds into the shared reverb or delay.
- Multiple instruments sharing the same reverb or delay space will sound as if they're performing together in the same acoustic environment — a critical element of mix cohesion.
This approach also conserves CPU resources. Inserting a reverb plugin on every individual track means running multiple instances of a potentially heavy plugin. A single shared instance on an aux track handles the same job at a fraction of the processing cost. As the OTO×NOMA mixing resource explains, "sharing a single reverb across multiple tracks via sends is what gives a mix its sense of unity and common space."
Place Delay Before Reverb in the Signal Chain
When using both delay and reverb simultaneously, the order in which they appear in the signal chain matters significantly. According to eMastered's production guide, "routing delay before reverb means the delayed repeats flow into the reverb and get treated as additional sound sources, producing a more complex and natural sense of space." Running them in the reverse order — reverb into delay — causes the reverb tail itself to be repeated, which quickly creates an overly dense, indistinct wash.
The standard professional signal chain for combined use:
- Dry source → Delay (wet signal only) → Reverb (wet signal only) → Mix bus
In practice, this is most easily implemented by sending the delay's output to the reverb's aux track, or by chaining the plugins in series on a single effects bus.
The Abbey Road Reverb Trick
This technique is attributed to the engineers at Abbey Road Studios who worked on the Beatles' recordings, and it remains one of the most practical and effective tools in any mixer's toolkit. The concept is simple: place an EQ before the reverb plugin and apply a bandpass filter that passes only the 600 Hz to 6,000 Hz frequency range.
The results of this processing are significant:
- Low-frequency reverb buildup is eliminated, resolving the muddiness that long reverbs commonly introduce into the lower midrange and bass frequencies.
- Excessive high-frequency shimmer in the reverb tail is reduced, allowing the reverb to blend naturally with the source material rather than sitting on top of it.
- The overall reverb quality becomes cleaner, more focused, and more natural-sounding — it enhances the mix rather than competing with it.
This technique is particularly valuable when using long hall reverbs on dense arrangements or fast-tempo tracks where reverb buildup is a persistent problem. It's an easy modification to any existing reverb send setup and consistently delivers improved results.
Common Mistakes and How to Fix Them
Muddy Mix: When Everything Sounds Like It's Underwater
The most frequently encountered problem with reverb in home studio productions is over-application — too much reverb causing the mix to lose definition, transient punch, and low-end clarity. Understanding the most common causes makes the solution straightforward:
Cause | Solution |
|---|---|
Decay time too long for the tempo | Shorten the decay to suit the BPM — faster tempos require shorter reverb tails |
Too much low-frequency reverb | Insert a high-pass filter (low cut) before the reverb, cutting below 150–200 Hz |
Reverb inserted on too many individual tracks | Consolidate to a shared send/return setup |
Wet level too high | Reduce the wet amount; increase pre-delay to push the dry signal forward in the mix |
iZotope's production guide makes a valuable point: "When the tempo is fast or the arrangement is dense, choosing delay over reverb is often the more effective strategy for maintaining mix clarity." Delay adds depth and spatial interest without the low-end accumulation that reverb inevitably introduces.
Flat and Two-Dimensional: No Sense of Depth
The opposite problem — using reverb and delay but still ending up with a mix that sounds flat and lifeless — is equally common. The following checklist covers the most frequent culprits:
- Pre-delay too short: For lead vocals and featured instruments, a pre-delay of 20–40 ms is essential to push the dry signal to the front of the mix before the reverb tail develops. Without it, the source sounds distant rather than upfront and spacious.
- Same reverb on everything: Using a single reverb setting uniformly across all tracks flattens the stereo image. Foreground elements should have shorter, drier reverb; background elements should have longer, wetter reverb. This contrast creates the perception of front-to-back depth.
- Insufficient stereo width: Ping-pong delay and stereo reverb are the primary tools for left-right width. If the mix sounds narrow, consider adding a ping-pong delay to key melodic elements and ensuring reverb returns are spread across the full stereo field.
- Not checking in mono: A mix can sound spacious on headphones but collapse in mono due to phase cancellation between the dry signal and its reverb/delay returns. Always check spatial effects in mono — if the image collapses significantly, address phase issues before finalizing the processing.
Key Takeaways
Developing fluency with reverb and delay — understanding not just what they do but when and why to use each — is one of the most significant levers for improving the quality of a DAW mix. Here's a summary of the core principles covered in this guide:
- Reverb simulates real acoustic environments. The choice of type — room, hall, plate, convolution, spring, gated — fundamentally shapes the character of the effect. Each type has distinct sonic qualities suited to specific instruments and genres.
- Delay produces clearly audible repeats that can be locked to the tempo of a track. Slapback, ping-pong, tape, and modulation delays each offer different textural and rhythmic possibilities.
- Send/return routing is the professional standard for applying reverb and delay. Shared reverb sends create mix cohesion, reduce CPU load, and make it far easier to control the overall sense of space.
- Signal chain order matters: Delay before reverb produces a more natural and complex spatial result. Reverb before delay tends to create an uncontrolled, muddy buildup of reflected sound.
- Low-cut EQ before reverb is one of the simplest and most effective techniques for keeping a mix clean. Filtering out low frequencies from the reverb signal prevents the low-end buildup that is the primary cause of mix muddiness in reverb-heavy productions.