Mixdown Guide: How to Use EQ and Compressor Correctly
Learn how to use EQ and compression in your mixdown. From frequency bands and filter types to attack, release, and signal chain order for pro-quality sound.
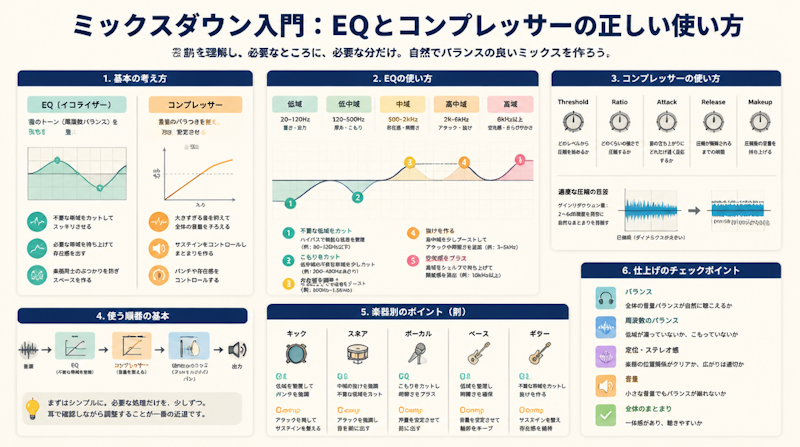
The mixdown is one of the most critical stages in music production — the process that transforms your raw DAW session into a polished, professional-sounding track. Among all the tools available to a mixing engineer, EQ (equalizer) and compression are used on virtually every track in every genre. Mastering these two processors is widely considered the single biggest factor that separates amateur mixes from professional ones. This guide breaks down exactly how EQ and compression work, what every parameter means, and how to apply them systematically to achieve a clean, balanced, and powerful mix.
The Role of EQ and Compression in a Mixdown
What an EQ Actually Does
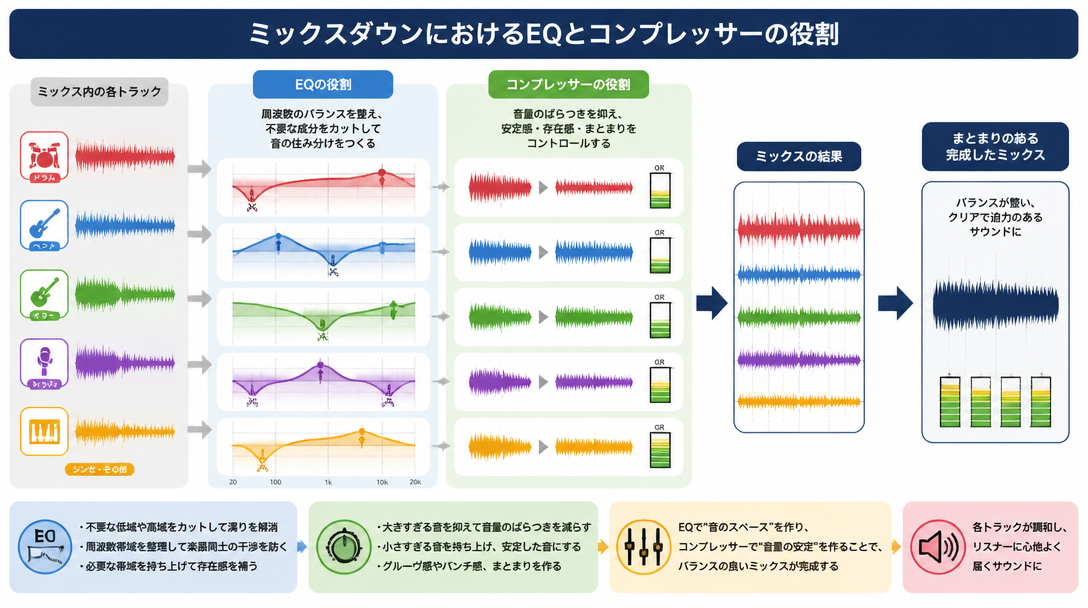
An equalizer is a tool that adjusts the frequency balance of an audio signal. By boosting or cutting specific frequency ranges, you can shape the tonal character of any track. There are four primary reasons to reach for an EQ during a mix:
- Removing unwanted low-frequency rumble or muddiness — cutting sub-bass buildup and low-mid congestion to create a cleaner, more defined sound
- Taming harsh resonant peaks — surgically reducing problem frequencies such as the 4 kHz harshness or instrument-specific resonances that cause listener fatigue
- Boosting high frequencies for presence and air — adding clarity, shimmer, and "cut-through" so a track stands out in the full mix
- Controlling perceived depth and distance — boosting or cutting around 2 kHz to push a sound forward or backward in the stereo field
What a Compressor Actually Does
A compressor is a tool that controls dynamics — the difference between the loudest and quietest moments in an audio signal. When a sound exceeds a set level, the compressor automatically reduces its volume, evening out the performance. The main applications in mixing include:
- Leveling out volume inconsistencies — smoothing the natural dynamics of vocals, bass, and other expressive performances so they sit consistently in the mix
- Shaping the attack and transient feel — controlling how punchy or smooth an instrument sounds, particularly with drums and percussion
- Tightening low-end energy — reining in the unruly low-frequency bloat on kick drums and bass guitars
- Increasing perceived loudness and density — creating a sense of power and cohesion across the entire mix
Understanding the Difference Between EQ and Compression
At the most fundamental level: EQ changes tone (which frequencies you hear), while compression changes dynamics (how volume evolves over time). Because they address completely different aspects of a sound, knowing which problem calls for which tool is essential. A common professional approach is to think of it this way — use EQ to identify and solve tonal problems, then use compression to control movement and behavior. Just as choosing the right DAW for your workflow is a foundational decision, understanding the distinct role of each core mixing tool is the fastest path to improvement. For more on DAW selection, see our complete DAW buying guide.
EQ Types and Frequency Band Characteristics
The Major EQ Filter Types
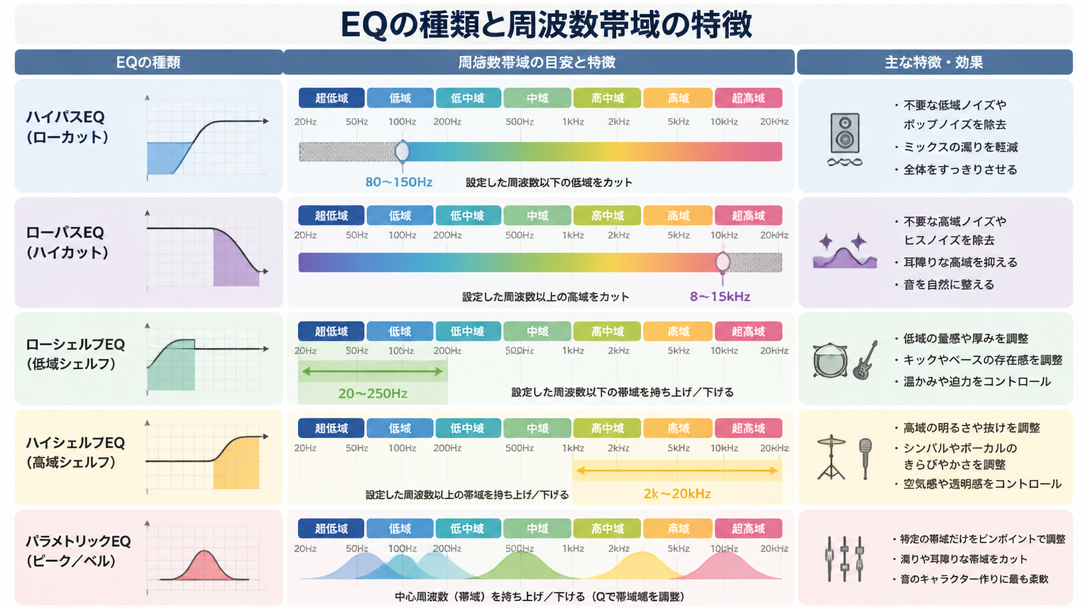
Modern DAW equalizers include multiple filter types, each designed for a specific purpose. Understanding what each one does is the first step toward effective, intentional EQ work.
Filter Type | Also Known As | Function and Typical Use |
|---|---|---|
Low-Cut Filter | High-Pass Filter (HPF) | Removes frequencies below the set point. Ideal for eliminating low-frequency rumble, hum, and mud from non-bass instruments |
High-Cut Filter | Low-Pass Filter (LPF) | Removes frequencies above the set point. Used to reduce harshness, sibilance, or unwanted high-frequency noise |
Low Shelf | Bass Shelf | Uniformly boosts or cuts all frequencies below the set point. Adjusts the overall weight and body of the low end |
High Shelf | Treble Shelf | Uniformly boosts or cuts all frequencies above the set point. Controls the overall brightness and air of a sound |
Parametric (Bell) | Peaking EQ | Targets a specific center frequency with an adjustable bandwidth (Q). The most versatile filter for surgical cuts or broad tone shaping |
Notch Filter | Band-Reject Filter | An extremely narrow, deep cut at a single frequency. Used to eliminate electrical hum (50/60 Hz) or a specific resonant problem |
The Human Hearing Range and Frequency Band Characteristics
Human hearing spans approximately 20 Hz to 20,000 Hz (20 kHz). Understanding how different parts of this spectrum affect the listener is essential for making informed EQ decisions. Audio Mentor's beginner EQ guide recommends thinking of the audible spectrum in terms of low, mid, and high regions as a practical starting framework.
Frequency Range | Sonic Character | Typical Sound Sources |
|---|---|---|
20–60 Hz (Sub-Bass) | Felt more than heard. Physical rumble and pressure. Difficult to reproduce on consumer speakers | Sub-bass, 808 drums |
60–200 Hz (Bass) | The weight and punch of a mix. Too much creates boominess and muddiness | Kick drum, bass guitar |
200–800 Hz (Low-Mids) | Fundamental tones of chords and melodies. A common source of muddiness and boxiness | Guitar body, piano fundamentals |
800 Hz–2 kHz (Mids) | The presence and forward energy of a mix. Directly affects vocal intelligibility | Vocals, snare drum |
2–5 kHz (Upper-Mids) | The range human hearing is most sensitive to. Defines attack, edge, and definition | Vocal consonants, guitar harmonics |
5–10 kHz (High-Mids / Highs) | Brightness and sparkle. Excessive boost causes harshness and listening fatigue | Cymbals, hi-hats |
10–20 kHz (Air) | Openness, space, and airiness. Often called the "air band." Adds a sense of acoustic ambience | Breath sounds, room ambience |
How to Use the Q Value (Bandwidth)
When using a parametric (bell) EQ, the Q value — also called Quality Factor or bandwidth — determines how wide or narrow your boost or cut is. A high Q value creates a narrow, surgical adjustment that affects only a small slice of the spectrum. A low Q value produces a broad, gentle curve that affects a wider range of frequencies.
As a practical rule: use a higher Q (around 0.7–1.5) when cutting to precisely remove a problem frequency without affecting surrounding tones, and use a lower Q (around 0.3–0.7) when boosting to create a natural, musical lift that doesn't sound forced or unnatural.
How to Use EQ in Practice: A Step-by-Step Workflow
Step 1: Apply a High-Pass Filter (Low-Cut) to Every Non-Bass Track
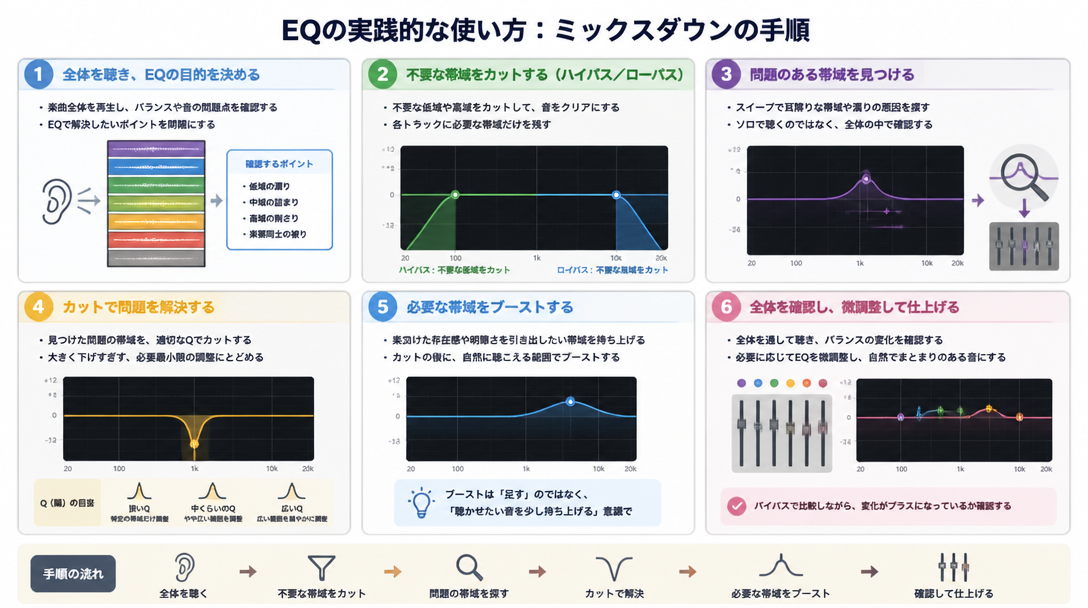
The first EQ move in almost any mix is applying a high-pass filter (HPF) to remove unnecessary low-frequency content from instruments that don't need it. Kick drums and bass guitars occupy the low-frequency space — everything else should be cleared out of that region to give those elements room to breathe.
General HPF starting points:
- Vocals: 80–120 Hz
- Electric guitar / synths: 100–200 Hz
- Acoustic guitar / piano: 80–100 Hz
- Hi-hats / cymbals: 200–400 Hz
According to Audio Mentor's mixing guide, removing unnecessary low-end from melodic parts using a high-pass filter is one of the highest-impact moves you can make to instantly improve overall mix clarity. The key is to sweep the cutoff frequency upward from a very low starting point (around 20 Hz) and stop just before the sound begins to lose its natural body and warmth. Always make this judgment while listening to the full mix — not in solo mode.
- Open the EQ on the target track and enable the HPF/low-cut filter
- Set the cutoff frequency very low (around 20 Hz) as a starting point
- Gradually increase the cutoff until the sound just begins to thin out
- Back off slightly and lock in the frequency
- Confirm the result in the context of the full mix, not in isolation
Step 2: Identify and Cut Problem Frequencies
Once the low end is cleaned up, the next step is a technique professionals often call "search and destroy" — hunting down and removing harsh, resonant, or muddy problem frequencies. The process works by temporarily boosting a narrow parametric band by +10 to +15 dB and slowly sweeping it across the frequency spectrum. When a particularly unpleasant or "wobbly" frequency jumps out, you've found your problem area. At that point, flip the boost into a cut and dial in the appropriate depth — usually between -3 and -8 dB depending on the severity of the issue.
This methodical identification and removal of problem frequencies is widely cited as a core technique for achieving a clear, professional-sounding mix. The goal is not to gut the sound, but to surgically remove what's causing clutter so the instrument can breathe.
Step 3: Make Gentle Presence Boosts
After cleaning up unwanted frequencies, the next step is to subtly enhance the frequencies that define each instrument's identity. The key word here is "subtly" — most presence boosts should be no more than +2 to +4 dB, applied with a relatively low Q for a natural, musical result. Aggressive boosting is one of the most common beginner mistakes and tends to make individual elements sound unnatural while destabilizing the overall mix balance.
Common presence boost examples:
- Vocals: 1–3 kHz for intelligibility and forward presence
- Snare drum: 3–5 kHz to sharpen the crack and attack
- Acoustic guitar: 8–12 kHz (high shelf) for sparkle and air
- Bass guitar: 800 Hz–1 kHz to bring out note definition
Step 4: Resolve Frequency Masking Between Instruments
Perhaps the most important EQ concept in mixing is frequency masking — what happens when two instruments occupy the same frequency range and compete with each other, causing one or both to disappear in the mix. The solution is to carve out dedicated "frequency space" for each instrument so they coexist clearly without fighting for the listener's attention.
For example, if a rhythm guitar and a lead vocal are both dense in the 2–3 kHz presence range, a small cut at 2–3 kHz on the guitar track will allow the vocal to cut through without needing to boost the vocal itself. This approach — giving each instrument its own slice of the frequency spectrum — is at the core of Berklee Online's approach to transparent EQ.
It's also worth noting that frequency conflicts can often be anticipated and minimized at the MIDI arrangement stage by consciously assigning different registers to different parts, which significantly reduces the workload during mixdown.
Understanding Every Compressor Parameter
Threshold: Where Compression Begins
Threshold sets the level at which the compressor starts to act on the signal. Any audio that exceeds the threshold gets compressed; anything below it passes through unchanged. For example, a threshold of -10 dBFS means that only the loudest peaks above that level will be compressed. Lowering the threshold makes the compressor engage more often and compress more of the signal, while raising it makes compression happen only on the very loudest transients.
A practical approach recommended by Universal Audio's compression guide is to set the other parameters first as a rough starting point, then adjust the threshold while watching the gain reduction meter to dial in the right amount of compression.
Ratio: How Hard the Compressor Works
Ratio determines how aggressively the compressor reduces the signal once it crosses the threshold. A ratio of 4:1 means that for every 4 dB above the threshold, only 1 dB passes through — effectively reducing those peaks to one quarter of their original level above the threshold.
Ratio Range | Compression Intensity | Best Applications |
|---|---|---|
1.5:1 – 2:1 | Very gentle | Acoustic guitar, strings, light-handed glue compression |
2:1 – 4:1 | Light to moderate | Vocals, piano, general-purpose starting point for most tracks |
4:1 – 8:1 | Moderate to heavy | Kick drum, bass guitar, snare |
8:1 – 20:1 | Heavy (approaching limiting) | Creative compression effects, aggressive parallel compression |
20:1 and above (∞:1) | Hard limiting (full brick wall) | Mastering limiters, clipping prevention |
Attack: How Quickly the Compressor Responds
Attack time determines how quickly the compressor clamps down after the signal crosses the threshold. It is measured in milliseconds (ms). The attack setting is one of the most powerful tools in a compressor because it directly shapes how the transient — the initial hit of a sound — comes through.
- Slow attack (50–100 ms and above): Lets the transient pass through before compression engages. This preserves the initial punch and snap of percussive instruments like kick and snare, making them feel more impactful and alive.
- Fast attack (1–10 ms): The compressor responds almost immediately, smoothing out the transient and creating a more even, sustained sound. This works well on vocals and sustained instruments where consistent level is more important than transient impact.
One important caution: setting attack too fast — particularly on low-frequency instruments — can introduce distortion, as the compressor begins acting within a single waveform cycle. Start conservatively and use your ears.
Release: How Quickly the Compressor Lets Go
Release time sets how long it takes for the compressor to return to its uncompressed state after the signal drops below the threshold. This parameter has a major impact on how natural or unnatural the compression feels. According to Universal Audio's compression resource:
- Release too short: The compressor recovers rapidly between transients, which can cause an audible "pumping" effect — the background level seems to breathe in and out unnaturally.
- Release too long: The compressor stays engaged too long and begins affecting subsequent notes or beats, robbing the performance of its natural dynamic feel.
The general guideline is to set release time in relation to the tempo and rhythm of the track. For fast-paced rhythmic material, shorter release times (50–100 ms) tend to work well. For slower, more spacious music, longer releases (150–300 ms or more) allow the compression to breathe more naturally.
Knee: The Shape of the Compression Curve
The knee setting controls how abruptly or gradually the compressor transitions into its full ratio as the signal approaches and crosses the threshold.
- Soft knee: The compressor begins gently applying compression slightly before the threshold and reaches the full ratio gradually. This produces a smoother, more transparent sound that is often imperceptible to the listener — ideal for vocals, acoustic instruments, and any situation where natural dynamics are important.
- Hard knee: The compressor switches to the full ratio instantly the moment the signal crosses the threshold. This gives precise, predictable control and a more assertive character — better suited to drums, bass, and situations where you want clearly defined compression behavior.
Makeup Gain (Output Gain): Restoring Lost Volume
When a compressor reduces the loudest peaks in a signal, the overall perceived volume of the track drops. Makeup gain (also labeled Output Gain on some units) compensates for this by boosting the output level after compression has been applied. As a starting point, apply the same amount of gain that the compressor is reducing — for example, if the gain reduction meter is showing approximately -4 dB of compression on average peaks, add +4 dB of makeup gain.
For reference, mixing engineers working on mastering sessions often use conservative settings: attack around 25 ms, release around 55 ms, ratio of 2:1, and an average gain reduction of approximately -2.5 to -3 dB. These figures serve as a useful benchmark for understanding how lightly compression is often applied at the highest levels of the craft.
Should You Use EQ Before or After Compression?
EQ First, Then Compression: The Standard Workflow
The most widely recommended signal chain order for individual tracks is EQ before compression. According to iZotope's mixing resource, placing EQ upstream of the compressor allows you to remove problem frequencies before they ever reach the compressor. This matters because a compressor responds to the overall level and energy of the signal passing through it — if a track has a significant low-frequency buildup, the compressor will react to that buildup rather than to the musical content you actually want to control. Cleaning up the signal with EQ first results in more accurate, predictable compression behavior and a tighter overall sound.
Compression First, Then EQ: When It Makes Sense
Placing a compressor before the EQ is a deliberate creative choice that produces a distinctly different result. As explained in Berklee Online's signal chain guide, running EQ after compression tends to yield a warmer, rounder tone, while running EQ before compression produces a cleaner, more transparent sound. Even experienced professional engineers use post-compression EQ on a significant portion of their tracks — it's not a "wrong" approach, just a different tool for a different result.
The Two-EQ Approach: EQ → Comp → EQ
Many professional engineers — particularly on lead vocals and featured solo instruments — adopt a dual-EQ workflow: a corrective EQ before the compressor and a second, tone-shaping EQ after it. The logic is straightforward: the first EQ strip handles clinical correction (removing problematic resonances and unnecessary low end), the compressor then controls dynamics on a clean signal, and the second EQ adds the final layer of harmonic color and tonal shaping.
Signal Chain Order | Sonic Result | Best Used For |
|---|---|---|
EQ → Comp | Transparent and clean | Tracks with significant problem frequencies; standard starting workflow |
Comp → EQ | Warm and cohesive | Already well-recorded sources; harmonic shaping and color |
EQ → Comp → EQ | High precision, combines both benefits | Lead vocals, featured instruments, and the most important tracks in the mix |
EQ and Compression Settings by Instrument
Vocals
As the centerpiece of most mixes, vocals receive some of the most detailed EQ and compression treatment. A typical EQ workflow starts with a high-pass filter at 80–120 Hz to remove low-frequency handling noise and chest rumble. A gentle cut around 200–500 Hz addresses the typical "boxiness" or nasality that many microphones capture. A slight boost at 2–4 kHz adds intelligibility and helps the vocal cut through a dense mix without needing to be louder. A high-shelf boost above 10 kHz can add air and openness.
For compression, a ratio of 2:1 to 4:1, attack between 10 and 30 ms, and release between 50 and 150 ms is a common starting point. The goal is to smooth out the naturally wide dynamic range of a vocal performance without squashing the life out of the delivery. Aim for an average gain reduction of around 3–6 dB, leaving the most expressive peaks largely intact.
Kick Drum
An effective kick drum sound depends on two defining elements: the low-frequency thump (60–80 Hz) that provides physical weight, and the click or attack transient (2–5 kHz) that allows the kick to cut through and be heard on smaller speakers. Use a low-shelf boost around 60–100 Hz to reinforce the body, and a parametric boost at 2–4 kHz to sharpen the beater attack.
For compression, use a relatively slow attack (30–50 ms) to let the transient pass through before the compressor kicks in — this preserves the punchy feel that makes a kick drum drive the rhythm. Set the release around 50 ms and keep the gain reduction moderate (4–6 dB maximum). Over-compressing a kick drum is one of the most common mistakes in electronic music production; it causes the drum to lose its definition and impact.
Bass Guitar / Synth Bass
Bass sits right alongside the kick drum in the low-frequency spectrum, which means the two elements must be carefully EQ'd to coexist without masking each other. The fundamental character of bass lives between 60 and 120 Hz, while its note definition and presence come from the 800 Hz to 1 kHz range. Use EQ to slightly cut the specific frequency range that belongs to the kick, leaving space for both elements to be clearly heard.
Bass benefits from heavier compression (ratio 4:1 to 8:1) to even out the level differences between notes and keep the low end consistent throughout the track. An even-sounding bass is the foundation of a well-controlled low end, and it works in tandem with a well-compressed kick drum to create a solid, locked-in rhythmic groove. Avoiding low-frequency conflicts between bass and kick is widely recognized as central to achieving a clean, powerful mix.
Acoustic Guitar and Piano
Acoustic instruments are rich with overtones and natural resonances, which makes them both rewarding and challenging to EQ. A gentle cut around 200 Hz (sometimes called the "mud zone") clears up boxiness and allows the natural midrange character to shine through. A subtle high-shelf boost above 8–12 kHz adds sparkle and shimmer without making the instrument sound artificially bright.
Compression should be applied lightly (ratio 2:1 to 3:1) to preserve the natural expressive dynamics that make acoustic performances feel alive. The goal is consistency, not control — enough compression to keep the quieter passages audible in the mix, while leaving the louder phrases with their natural energy intact.
Common Beginner Mixing Mistakes and How to Fix Them
Over-EQing: Too Much of a Good Thing
One of the most damaging mistakes beginners make is applying too much EQ — particularly too many large boosts. As described in resources from Berklee Online, overly boosted EQ tends to produce sounds that are either harsh and fatiguing or hollow and lifeless. The fundamental principle to internalize is this: keep boosts to around +3–4 dB maximum, and try to solve tonal problems with cuts before reaching for boosts. Even cuts should generally stay within -6 to -8 dB unless you're dealing with an extreme resonance problem.
Another common EQ mistake is making adjustments while listening in solo mode. The solo button is useful for locating a problem, but it is never a reliable context for judging the result of your EQ decision. Always confirm every EQ move in the context of the full mix playing back.
Over-Compression: Squashing the Life Out of a Track
Applying too much compression strips away the natural dynamics that give music its sense of energy and emotion, leaving behind a flat, lifeless performance with no breathing room. The gain reduction meter on your compressor is your primary guide — for most mixing tasks, an average gain reduction of 3–6 dB is appropriate. Anything beyond that should be a deliberate creative choice, not a default setting.
Watch the gain reduction meter as the track plays back in the full mix. If the needle (or the bar) is constantly pinned at a high reduction value, the threshold is set too low or the ratio is too high. Release the signal and let it breathe. The best compression is often the kind the listener doesn't consciously notice — they simply feel that the track sits better in the mix.
Inadequate Monitoring Environment
EQ and compression decisions are only as good as the monitoring environment they are made in. Consumer-grade speakers and everyday earbuds are typically tuned to flatter the listener — often with an exaggerated low end and hyped high frequencies — which makes accurate tonal judgments extremely difficult. The ideal approach is to work on studio monitor speakers designed for flat, accurate frequency reproduction and cross-reference on a reliable pair of closed-back studio headphones.
Beyond that, checking the mix on multiple playback systems — a phone speaker, a car stereo, a laptop — is a technique known as reference monitoring, and it remains one of the most effective ways to ensure a mix translates across different listening environments. Pairing a good monitoring setup with a quality audio interface is a foundational investment for any home studio.
Not Using a Reference Track
Comparing your mix against a professionally produced reference track — a commercially released song in a similar genre with a mix you admire — is one of the most powerful calibration tools available to any mixer. Import the reference track directly into your DAW session, match its perceived loudness to your mix, and use an A/B comparison switch to flip between the two in real time. The differences in EQ balance, dynamic feel, and stereo width will become immediately apparent.
As highlighted in Serenade Magazine's beginner guide to sound engineering, reference track comparison is consistently described by working professionals as the fastest path to developing mixing judgment and closing the gap between amateur and commercial-quality results.
Summary
EQ and compression are the twin pillars of professional mixdown technique. Here is a concise recap of the key principles covered in this guide:
- EQ shapes tone by adjusting frequency balance — cut problem frequencies to clean up the mix, and apply modest boosts (+2–4 dB) to bring out the defining character of each instrument
- Compression controls dynamics over time — understand threshold, ratio, attack, release, knee, and makeup gain as a connected system rather than isolated knobs
- The standard signal chain is EQ then compression, though a two-EQ approach (EQ → Comp → EQ) delivers the highest precision on lead vocals and featured instruments
- Avoid over-EQing and over-compressing — always evaluate results in the context of the full mix, and keep gain reduction to around 3–6 dB for most mixing applications
- Monitor in multiple environments and use reference tracks regularly to calibrate your decisions against professional standards
These principles apply regardless of genre, DAW, or the specific plug-ins in your signal chain. With consistent practice and careful listening, the use of EQ and compression becomes intuitive — and the quality of your mixes will reflect that understanding in every detail.