Mastering Basics: Loudness Standards & Pre-Release Guide
Learn mastering fundamentals: LUFS loudness standards, Spotify, Apple Music & YouTube specs, True Peak control, dithering, and export formats for streaming releases.
Mastering is the final step in music production, yet it remains one of the most misunderstood and frequently neglected stages for independent producers. The old mindset of "just make it louder" still persists in many circles, but in today's streaming-dominated landscape, mastering without accurate knowledge of loudness standards can actively harm your sound quality rather than improve it. This guide covers everything you need to know before releasing music: mastering fundamentals, loudness normalization, platform-specific LUFS targets, True Peak management, export formats, and dithering — all in a systematic, actionable format.
What Is Mastering? Understanding the Difference from Mixing
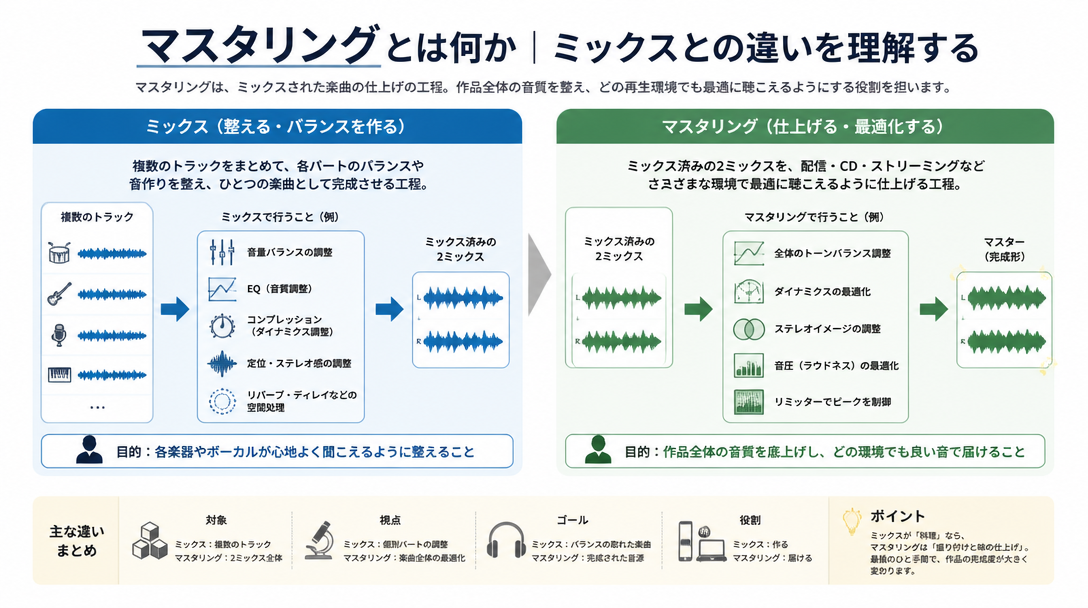
How Mixing and Mastering Divide Their Responsibilities
In music production, mixing and mastering are often used interchangeably, but they serve entirely different purposes. Mixing is the creative stage where individual tracks — drums, bass, vocals, synths, and everything else — are balanced in volume, panned across the stereo field, and shaped with EQ and dynamics processing. The goal is to craft the sonic identity of the song itself.
Mastering, on the other hand, takes the finished stereo mix (2-mix) and prepares it for distribution across a wide range of listening environments — smartphones, car speakers, earbuds, studio monitors, and home hi-fi systems — while ensuring it meets the technical specifications of distribution platforms. Think of it as the quality control stage of music manufacturing: the creative decisions have already been made, and mastering ensures those decisions translate faithfully to every listener.
A critical distinction: during mixing, individual tracks can still be edited and adjusted. During mastering, processing is applied only to the final stereo file. This means there is a hard limit to how much can be corrected at the mastering stage. If problems exist in the mix — imbalanced frequencies, muddy low end, clashing elements — mastering can soften their impact but cannot fully resolve them. The quality of the mix directly determines the ceiling of what mastering can achieve.
What Actually Happens During Mastering
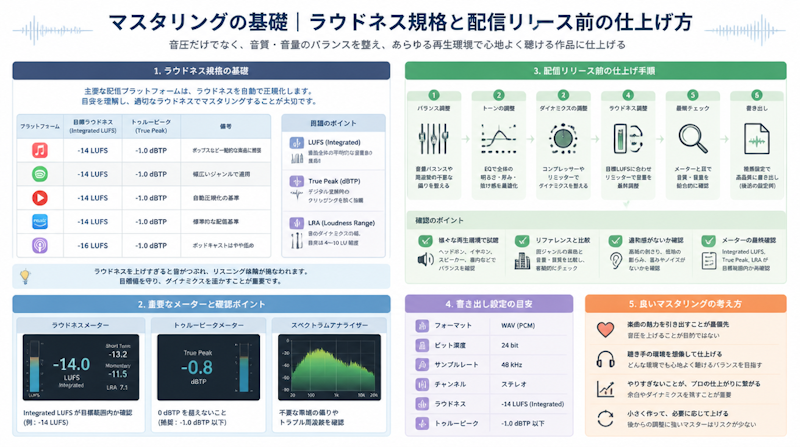
The mastering process typically involves three broad categories of work:
- Tonal and dynamic shaping: Using EQ, compression, and limiting to refine the frequency balance, control dynamics, and bring the track to an appropriate loudness level.
- Loudness optimization: Setting the integrated loudness (measured in LUFS) to align with the target specifications of streaming platforms.
- Export processing: Verifying True Peak levels, applying dithering where necessary, and rendering the final file in the correct format (WAV or FLAC at the appropriate bit depth and sample rate).
Through these steps, the track is brought to a state where it plays back consistently and cleanly across devices, without technical artifacts, and in compliance with the delivery requirements of streaming services. For a deeper look at the mix stage that precedes mastering, see Mixdown Basics: How to Use EQ and Compression Correctly.
Loudness Normalization and LUFS: The Essentials
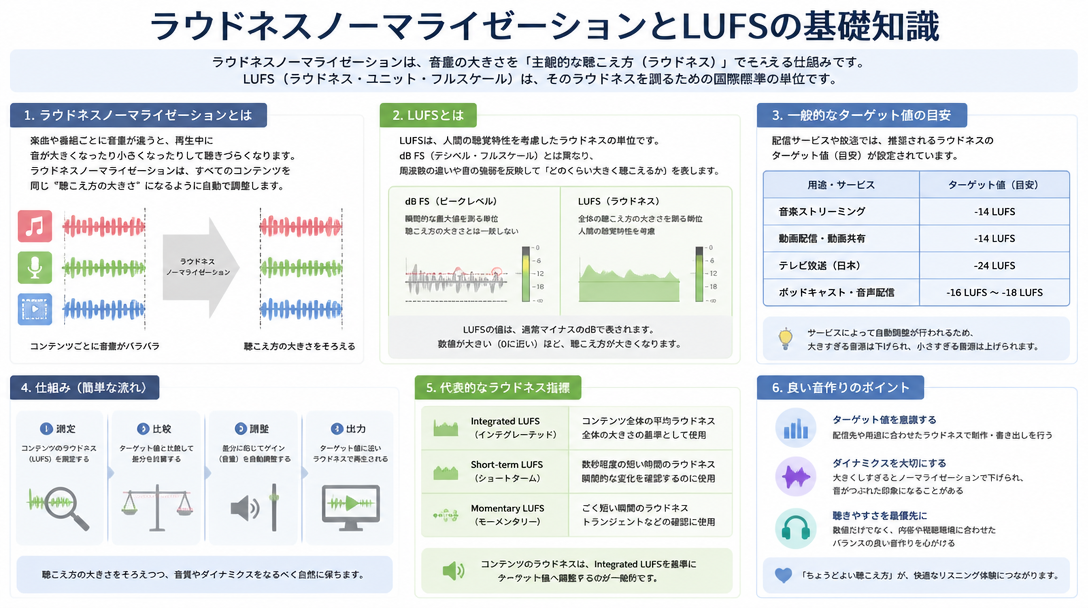
What LUFS Means and Why It Matters
LUFS stands for Loudness Units relative to Full Scale. It is a loudness measurement unit designed to reflect how humans actually perceive volume, rather than simply measuring the peak amplitude of a waveform. The standard is defined by the International Telecommunication Union's ITU-R BS.1770 specification, first published in 2006 and widely adopted by broadcasting and streaming platforms.
Traditional dBFS (decibels relative to full scale) measures the highest sample value in a waveform — essentially the tallest spike in the audio. LUFS, by contrast, integrates loudness over time, producing a value that better matches how loud a piece of music actually sounds to a human listener over its full duration. This makes it far more useful for comparing tracks in a playlist context, where the goal is perceptual consistency, not waveform similarity.
Two LUFS values are particularly important in mastering:
- Integrated LUFS: The average loudness across the entire track. This is the primary number that streaming platforms use for normalization.
- Short-term and momentary LUFS: Loudness measured over shorter windows (3 seconds and 400 milliseconds, respectively), useful for monitoring dynamic variation within a track.
How Loudness Normalization Works on Streaming Platforms
Spotify, Apple Music, YouTube, and other major platforms all use loudness normalization to create a consistent listening experience when moving between tracks in a playlist or library. The system measures the integrated LUFS of each uploaded track and compares it to the platform's target loudness. If a track is louder than the target, the platform applies a gain reduction during playback. If it is quieter, the gain may be increased.
A key technical point: normalization does not modify the uploaded file itself. The gain adjustment happens in real time during playback. Spotify's official loudness normalization documentation confirms this — the original master is preserved, and only the playback gain is adjusted on the listener's end.
The practical implication is significant: if a track is mastered to, say, -6 LUFS (extremely loud), Spotify will simply turn it down by 8 dB to reach its -14 LUFS target. The track does not play back louder than a well-mastered track at -14 LUFS. Worse, the aggressive limiting required to achieve -6 LUFS typically destroys dynamic range, making the track sound flat and fatiguing — and it still gets turned down. There is no competitive loudness advantage in over-limiting for streaming.
The Loudness War and Why It No Longer Applies to Streaming
The so-called "Loudness War" refers to a decades-long trend in commercial music production, peaking in the late 1990s and 2000s, where engineers and labels competed to make their releases sound louder than competitors on radio and in CD players. Since there was no automatic normalization system, a louder record genuinely stood out — at least briefly, before the listener adjusted the volume. The result was progressively more compressed, dynamically flattened masters throughout the era.
Loudness normalization on streaming platforms effectively ended the competitive rationale for extreme loudness. As iMusician's analysis notes, the lesson from the Loudness War for modern producers is straightforward: master for dynamic range and tonal quality, and let the platforms handle playback level. A well-mastered track at -14 LUFS with preserved dynamics will sound more professional and engaging than an over-limited track at -6 LUFS that gets turned down anyway.
This does not mean loudness is irrelevant — targeting an appropriate LUFS value for the genre and platform still matters. It means that loudness should be a byproduct of good mastering decisions, not the primary objective.
Loudness Standards by Streaming Platform
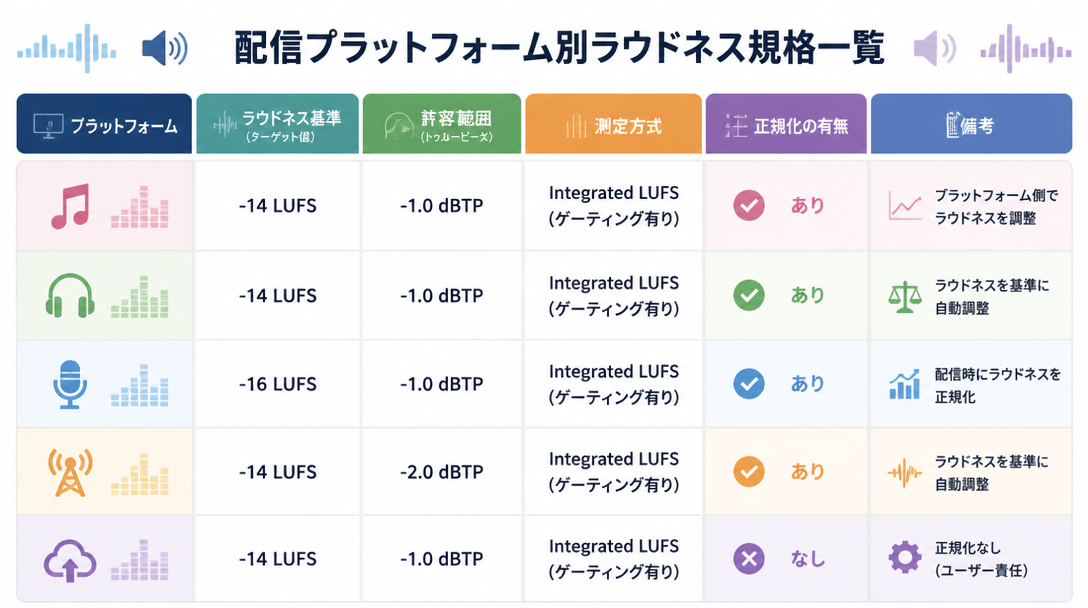
Target LUFS and True Peak Limits for Major Platforms
Each major streaming and distribution platform has its own loudness normalization target. The table below summarizes the current specifications as a mastering reference. Note that platforms may update these values; always verify with official documentation before final delivery.
Platform | Loudness Target | True Peak Limit | Notes |
|---|---|---|---|
Spotify | -14 LUFS (default) | -1 dBTP | Users can select -19 / -14 / -11 LUFS normalization levels |
Apple Music | -16 LUFS | -1 dBTP | -14 LUFS masters also accepted (approx. 2 dB gain reduction applied) |
YouTube | -14 LUFS | -1 dBTP | Normalization always active; no option to disable |
Amazon Music | -14 LUFS | -2 dBTP | Track normalization only (no album normalization) |
Tidal | -14 LUFS | -1 dBTP | Supports album-level normalization |
Deezer | -15 LUFS | -1 dBTP | Track normalization only |
Sources: iZotope – Mastering for Streaming Platforms; Masteringbox Streaming Guide
The Universal Master Strategy: -14 LUFS / -1 dBTP
Rather than creating separate masters for each platform, most independent producers and engineers benefit from what is commonly called a universal master strategy: a single master targeting -14 LUFS Integrated and a True Peak ceiling of -1 dBTP. According to iZotope's official streaming mastering guide, this single setting falls within the acceptable range for Spotify, YouTube, Tidal, Amazon Music, and Deezer simultaneously, eliminating the need for platform-specific deliverables in most cases.
Apple Music targets -16 LUFS, so a -14 LUFS master will receive approximately 2 dB of gain reduction on that platform. This is a minor and generally imperceptible difference in practice, and Apple Music explicitly accepts -14 LUFS masters.
It is also worth noting that loudness targets vary meaningfully by genre. Real-world release data shows the following general tendencies:
- Classical and jazz: -16 to -14 LUFS (wide dynamic range is part of the genre's character)
- Pop, rock, and EDM: -10 to -8 LUFS (denser, more consistent energy)
- Hip-hop and R&B: -10 to -6 LUFS (heavily compressed, high-energy masters common)
Genres that tend toward louder masters will still be normalized down on streaming platforms, so the decision to master louder should be driven by artistic intent and genre convention, not the belief that it will result in louder playback.
The Mastering Signal Chain and Plugin Selection
The Correct Order of Processing
The order in which mastering processors are applied matters significantly. Running EQ after a limiter, for instance, can re-introduce peaks that exceed the True Peak ceiling. The standard recommended signal chain for mastering is as follows:
- EQ (Equalizer): Address frequency balance first — cut unwanted low-end buildup, add clarity to the high mids, and ensure the overall tonal character is balanced and translates well across systems.
- Compressor: Shape the macro dynamics of the track. Mastering compression is typically subtle — slow attack, moderate ratio — used to add cohesion and glue rather than heavy dynamic control.
- Spectrum analyzer: Insert a spectrum analysis tool (or use one on a return track) to visually monitor frequency balance before and after compression. Many engineers also monitor continuously throughout the chain.
- Limiter / Maximizer: The final gain-stage processor. Sets the True Peak ceiling and brings the track to its target integrated loudness. Must come last in the main processing chain.
- Dithering: Applied only when reducing bit depth (e.g., 24-bit to 16-bit). Always the absolute last process in the chain — nothing comes after dithering.
Placing the limiter anywhere but the end of the chain (before dithering) creates a problem: any processor inserted after the limiter may generate new peaks above the set ceiling, defeating the purpose of the True Peak limit.
Key Plugins and Metering Tools for Mastering
The following tools are widely used for home studio and independent mastering work. Most professional workflows combine a dedicated loudness meter with a high-quality limiter at minimum.
Category | Tool | Key Features | Price Range |
|---|---|---|---|
All-in-one suite | iZotope Ozone | Integrated EQ, compressor, imager, and limiter with AI-assisted mastering assistant | Paid (Elements version available at lower cost) |
Limiter | FabFilter Pro-L 2 | Industry-standard True Peak limiter with multiple algorithm modes; ISP metering built in | Paid |
EQ | FabFilter Pro-Q 3 | High-resolution linear phase EQ with dynamic EQ capability; surgical and musical | Paid |
Loudness metering | Youlean Loudness Meter 2 | Real-time LUFS (integrated, short-term, momentary) and True Peak display; free version available | Free (Pro version paid) |
Spectrum analysis | SPAN (Voxengo) | High-accuracy FFT spectrum analyzer; completely free | Free |
For producers new to mastering, iZotope Ozone offers the lowest barrier to entry, consolidating the essential mastering tools into a single interface with educational guidance built in. That said, the stock plugins included in most modern DAWs are capable of producing competent masters — the non-negotiable addition is a limiter with True Peak metering capability. For guidance on choosing a DAW, see the Complete DAW Selection Guide.
Using Reference Tracks Effectively
Professional mastering engineers routinely compare their work against reference tracks — commercially released recordings in the same genre that represent the target sound. Loading two or three reference tracks into the DAW session and switching between them and the work-in-progress gives an objective read on differences in loudness, frequency balance, stereo width, and dynamic feel.
The critical rule when using reference tracks: match the playback loudness of both tracks before comparing them. Human perception reliably judges louder audio as "better," regardless of actual quality differences. If the reference track is louder than the work-in-progress, the comparison is misleading. Use a loudness meter (Youlean Loudness Meter 2 works well here) to match integrated LUFS values before switching between tracks.
Reference tracks are most useful early in the mastering session for calibrating EQ decisions, and again at the end for a final reality check before export.
True Peak: Correct Understanding and Settings
True Peak vs. Sample Peak: Why the Difference Matters
Digital audio has two distinct types of peak measurements that are easy to confuse but have very different implications for mastering.
Sample peak (also called digital peak) is the value shown on a standard DAW level meter. It measures the amplitude at each individual sample point — essentially the highest value in the digital waveform. If a track's sample peak reads -0.1 dBFS, that means no individual sample in the file exceeds -0.1 dB below the digital ceiling. This sounds safe, but it does not tell the whole story.
True Peak measures what actually happens when that digital audio is converted back to an analog signal, or when it is encoded into a compressed format like MP3 or AAC. During this conversion, the reconstruction filter used in D/A conversion can generate peaks between samples — so-called inter-sample peaks (ISP) — that exceed the original sample peak value. A track with a sample peak of 0 dBFS can produce True Peaks of +1 dBTP or higher after compression encoding, causing clipping in the output even though the original file appeared clean.
This is why streaming platforms specify True Peak limits rather than dBFS limits, and why mastering limiters used for streaming work must have ISP detection and control. A standard peak limiter that only sees sample values provides no protection against inter-sample clipping after encoding.
Recommended True Peak Settings for Streaming Masters
The standard True Peak targets for different release scenarios are as follows:
- CD masters (uncompressed WAV/AIFF): True Peak -0.1 to -0.5 dBTP. Since no lossy encoding is involved, the headroom requirement is minimal, but a small safety margin below 0 dBFS is still recommended.
- Streaming / digital distribution (compressed formats): True Peak -1.0 dBTP. This is the widely accepted industry standard for streaming delivery and accounts for the inter-sample peak increase that occurs during AAC or MP3 encoding.
- Masters at -14 LUFS or louder: True Peak -2.0 dBTP recommended. Spotify's official guidelines specifically recommend -2 dBTP for masters at or above -14 LUFS, as these tracks are encoded with less headroom buffer relative to their loudness level.
In practice, the workflow for limiter setup is straightforward: first set the limiter's output ceiling (True Peak limit) to -1.0 dBTP, then reduce the input threshold until the integrated LUFS meter reaches the target value. This order ensures the ceiling is locked before any gain decisions are made. Plugins such as FabFilter Pro-L 2 and iZotope Ozone's Maximizer include dedicated True Peak limiting modes that account for inter-sample peaks during processing — using these modes is strongly recommended over standard peak limiting for streaming masters.
Export Formats and Dithering
Choosing the Right Sample Rate and Bit Depth
After completing the mastering processing chain, the final file must be rendered in a format appropriate for the release destination. The table below outlines the standard specifications:
Release Destination | Sample Rate | Bit Depth | Format |
|---|---|---|---|
CD manufacturing | 44.1 kHz | 16-bit | WAV / AIFF |
Streaming / digital distribution (standard) | 44.1 kHz | 24-bit | WAV / FLAC |
Streaming / digital distribution (hi-res) | 96 kHz / 192 kHz | 24-bit | WAV / FLAC |
Master archive | Match session rate | 32-bit float | WAV |
The current industry standard for streaming delivery is 44.1 kHz / 24-bit WAV or FLAC. Most distribution platforms accept this format, and it provides sufficient resolution for all practical purposes in streaming contexts. For hi-res audio distribution (Tidal Masters, Apple Music Lossless, Amazon Music HD), higher sample rates are accepted — but only if the original session was recorded and processed at those rates. Upsampling a 44.1 kHz project to 96 kHz before export adds no audio information and provides no quality benefit; the export sample rate should match the session's native rate.
Keeping a 32-bit float WAV archive of the pre-dithered master is recommended. This preserves the maximum internal resolution of the DAW's processing and allows future remasters without generational quality loss if standards change.
When and How to Apply Dithering
Dithering is the process of adding a precisely shaped low-level noise signal to a digital audio file before reducing its bit depth. When audio at 24-bit resolution is truncated to 16-bit, the mathematical rounding that occurs (quantization) introduces a form of distortion called quantization noise — a harsh, harmonically related artifact. Dithering randomizes this error into a form of noise that is far less perceptible to human hearing than the untreated quantization artifact.
The rule for when to apply dithering is simple: dithering is only necessary when the bit depth of the export is lower than the bit depth of the session processing. Specifically:
- Apply dithering: When exporting a 16-bit CD master from a 24-bit or 32-bit float session.
- Do not apply dithering: When exporting a 24-bit file from a 24-bit or 32-bit float session. Adding dither when it is not needed introduces unnecessary noise without any benefit.
There are three practical methods for applying dithering:
- Dedicated dithering plugin (e.g., iZotope MBIT+, POW-r Dither): Insert as the very last plugin in the mastering chain, after the limiter. This provides the most control over noise shaping options.
- Built-in dither in the limiter or mastering plugin: Many professional mastering tools (iZotope Ozone, FabFilter Pro-L 2) include dithering as an output option. This is the most convenient approach for most workflows.
- DAW bounce/export dither option: Some DAWs offer a dithering option in the export dialog. If using this method, ensure dithering is disabled within any plugins in the chain to avoid double-dithering.
Regardless of the method chosen, the non-negotiable rule is that dithering must be the absolute last process in the signal chain. Any processing applied after dithering — even a gain trim of 0.1 dB — re-quantizes the dithered signal and defeats the purpose of the process entirely. For a deeper understanding of the analog-to-digital conversion process that underlies these concepts, see Audio Interface Selection Guide: Home Recording Essentials.
Self-Mastering Checklist for Independent Producers
Pre-Mastering Preparation
Before beginning any mastering processing, confirm the following:
- Export the 2-mix in the correct format: Render the mix as a WAV file at 24-bit depth and the same sample rate as the project session. Do not convert sample rates at this stage.
- Verify adequate headroom: The exported mix should have an integrated loudness no higher than approximately -6 LUFS, with no clipping or limiting applied during the mixdown export. Headroom is essential for the mastering chain to work cleanly.
- Set up the monitoring environment: Ideally, have both studio monitor speakers and headphones available. Checking on multiple systems helps identify frequency response and stereo image issues that may not be audible on a single pair of monitors.
- Prepare reference tracks: Have two to three commercially released tracks from the same genre loaded and ready for comparison. Confirm their loudness so you can match levels during comparison.
Final Checklist Before Export
Before rendering the final master file, go through each of the following items systematically:
- Confirm with a loudness meter (such as Youlean Loudness Meter 2) that the Integrated LUFS value matches the target (typically -14 LUFS ± 0.5 LU for streaming).
- Confirm that True Peak does not exceed -1 dBTP (or -2 dBTP if the master is at -14 LUFS or louder, per Spotify's recommendation).
- Verify the export format settings: WAV or FLAC, 44.1 kHz, 24-bit for standard streaming delivery.
- If exporting to 16-bit (CD master), confirm that dithering is applied as the final step in the chain and not duplicated in both a plugin and the DAW export dialog.
- Perform a full playback check on at least two different playback systems — studio monitors and headphones at minimum, plus a consumer speaker or smartphone if available.
- Conduct a final reference track comparison at matched loudness levels to verify tonal balance and dynamic feel relative to commercial releases in the genre.
Once the technical mastering fundamentals are in place, the next important area to address before releasing music independently is understanding music copyright — how licensing works, and what registration with a performing rights organization means for protecting and monetizing your work. For a practical overview, see Music Copyright Basics for Independent Producers (coming soon).
Summary
The following points capture the core principles covered in this guide:
- Mastering is quality control, not creative reinvention: It takes a completed mix and ensures it sounds as intended across all playback environments and meets the technical requirements of distribution platforms.
- LUFS is the international standard for loudness measurement: It is based on human auditory perception and is the metric all major streaming platforms use for normalization. Understanding LUFS is non-negotiable for modern mastering.
- The universal master target is -14 LUFS / -1 dBTP: This single setting is compatible with the loudness normalization specifications of all major streaming platforms, making separate platform-specific masters unnecessary for most releases.
- True Peak prevents inter-sample clipping after encoding: Sample peak meters are insufficient for streaming mastering. Always use a True Peak-capable limiter and verify True Peak values with a dedicated metering tool before delivery.
- Dithering applies only when reducing bit depth: It must be the final process in the mastering chain, applied once and only once. No processing should follow dithering.
Related Articles
- Mixdown Basics: How to Use EQ and Compression Correctly — A practical introduction to the mix stage that precedes mastering.
- Complete DAW Selection Guide: Logic Pro vs. Ableton Live vs. FL Studio — An in-depth comparison of the three most widely used DAWs for independent music production.
- Audio Interface Selection Guide: Home Recording Essentials — How to choose the right audio interface for your home studio setup.