Beat Making Guide: Drum Patterns & Groove Techniques
Learn beat making from scratch: drum pattern basics, velocity, swing, humanize, and genre-specific patterns for hip-hop, house, and trap in your DAW.
Beat making is the process of programming drum patterns inside a DAW (Digital Audio Workstation) to build the rhythmic foundation of a track. Whether the genre is hip-hop, house, trap, or pop, the rhythm track is one of the single most important factors shaping a listener's experience of a song. This guide walks through everything from placing kick, snare, and hi-hat in the correct positions to generating genuine groove through velocity, swing, and humanization — all explained in clear, practical steps.
What Is Beat Making? How Drum Patterns Form the Skeleton of a Song
Definition and Role of Beat Making
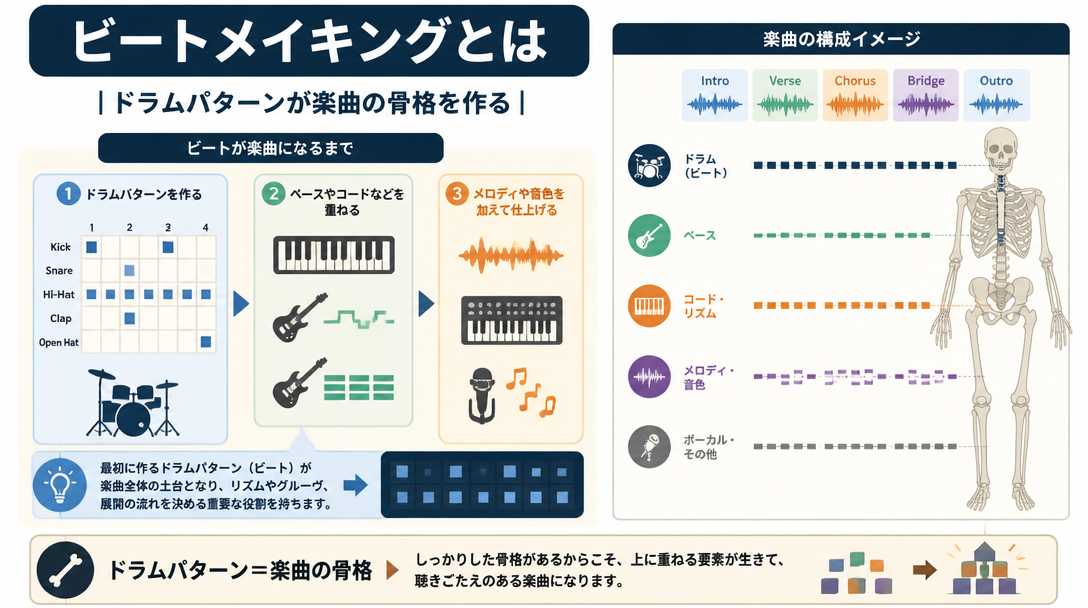
At its core, beat making means combining drum and bass rhythm patterns to produce the backing track of a piece of music. Once a beat is finished, it becomes the structural foundation on which melodies, chords, and vocals are layered. The completed rhythm track sets the tempo, the feel, and the genre identity of the entire song.
Beat making evolved primarily from hip-hop and R&B culture, but today the same techniques underpin pop, EDM, trap, rock, and virtually every other mainstream genre. The widespread adoption of affordable DAW software has dramatically lowered the barrier to entry, allowing anyone with a laptop to build a production-quality studio at home — a key reason the beat-making community has grown so rapidly over the past decade.
Understanding the Difference Between Rhythm and Groove
Rhythm and groove are often used interchangeably, but they describe fundamentally different things. Rhythm refers to the objective, time-based arrangement of notes — where sounds fall on a grid. Groove, by contrast, is the subjective sensation of "feel" or "pocket" that makes listeners want to move. A pattern that is perfectly quantized to the grid can be rhythmically correct yet completely devoid of groove.
As Native Instruments' official blog explains, adding swing rather than playing completely straight is what gives a beat its danceability and life. Groove emerges from three primary variables — velocity, swing, and timing — all of which are covered in detail later in this guide.
Setting Up Your Beat Making Environment: Choosing a DAW and Drum Sounds
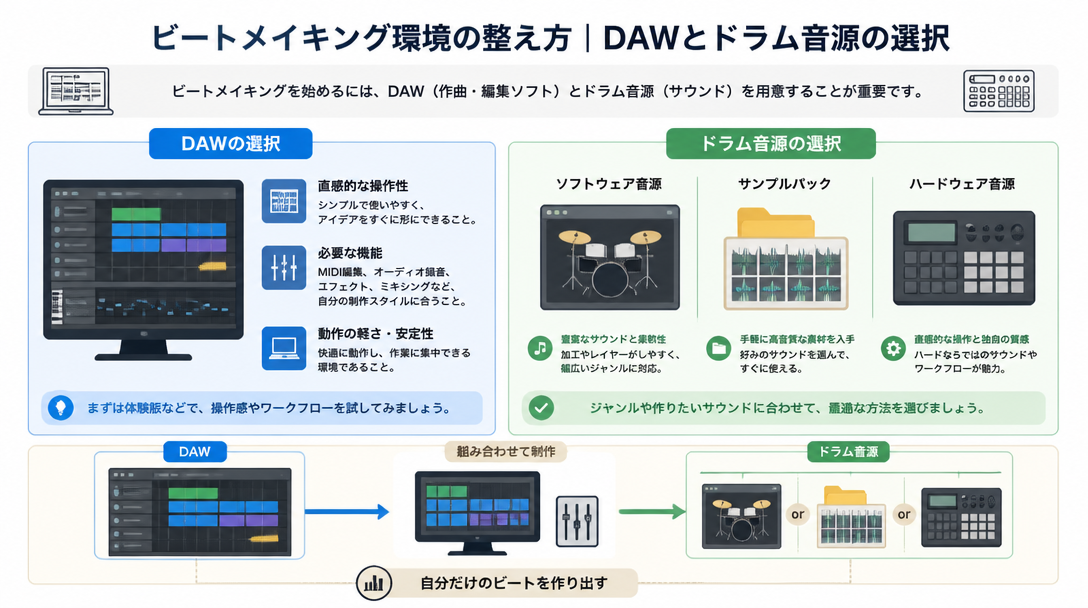
Major DAWs and Their Beat Making Strengths
The first decision every beat maker faces is which DAW to use. Each platform has a different workflow, and some are better suited to beat production than others. The table below compares the most popular options.
DAW Comparison for Beat Making | |||
DAW | Key Characteristics | Beat Making Suitability | Price |
|---|---|---|---|
FL Studio | Industry-leading step sequencer; consistently the top choice among beat makers worldwide | ◎ | One-time purchase (from ~$99) |
Ableton Live | Optimized for loop-based production; also excellent for live performance | ◎ | One-time purchase (from ~$99) |
Logic Pro | Mac-only; Drum Machine Designer is intuitive and beginner-friendly | ○ | One-time purchase ($199.99) |
GarageBand | Free for Mac and iOS; ideal first DAW for absolute beginners | ○ | Free |
Studio One | Pattern editor enables intuitive beat creation; free version available | ○ | Free to paid tiers |
For a deeper breakdown of each DAW's strengths and weaknesses, see the Complete DAW Selection Guide. When the primary goal is beat making, the quality and accessibility of the built-in step sequencer should be the deciding factor.
How to Choose Drum Sounds and Sample Packs
Once a DAW is chosen, the next step is sourcing drum sounds. There are three main categories to consider:
- Drum Plugins (VSTi/AU): Offer deep customization of individual drum sounds. Popular options include Native Instruments Battery and XLN Audio Addictive Drums.
- Sample Packs: Collections of pre-recorded WAV drum hits. Many are genre-specific and ready to use immediately, making them highly practical for beginners.
- DAW-Bundled Drum Sounds: Available immediately without any additional download or purchase. GarageBand's Drummer and FL Studio's FPC are strong examples.
Sound selection matters enormously. As TRIVISION STUDIO's drum programming guide points out, the quality of the drum samples chosen at the outset determines roughly 70% of the final rhythm track's perceived quality. Before investing time in advanced techniques, prioritize finding high-quality sounds that suit the target genre.
A MIDI controller or drum pad can also make beat input far more expressive and efficient. For a solid understanding of how MIDI works inside a DAW, the Complete Guide to MIDI Basics is an excellent starting point.
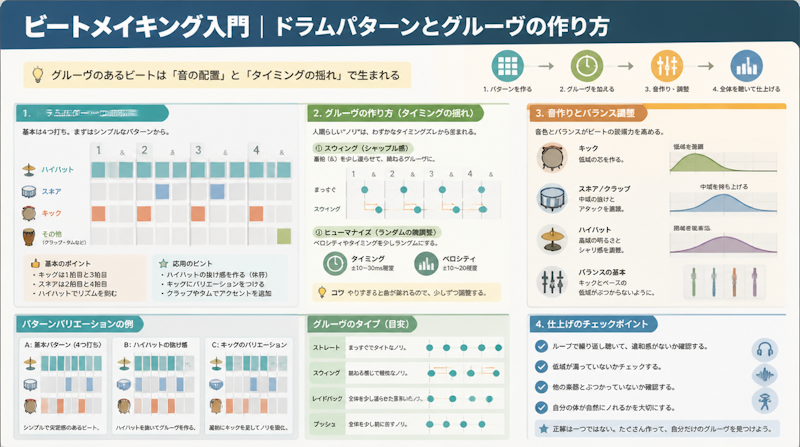
Drum Pattern Fundamentals: Placing Kick, Snare, and Hi-Hat Correctly
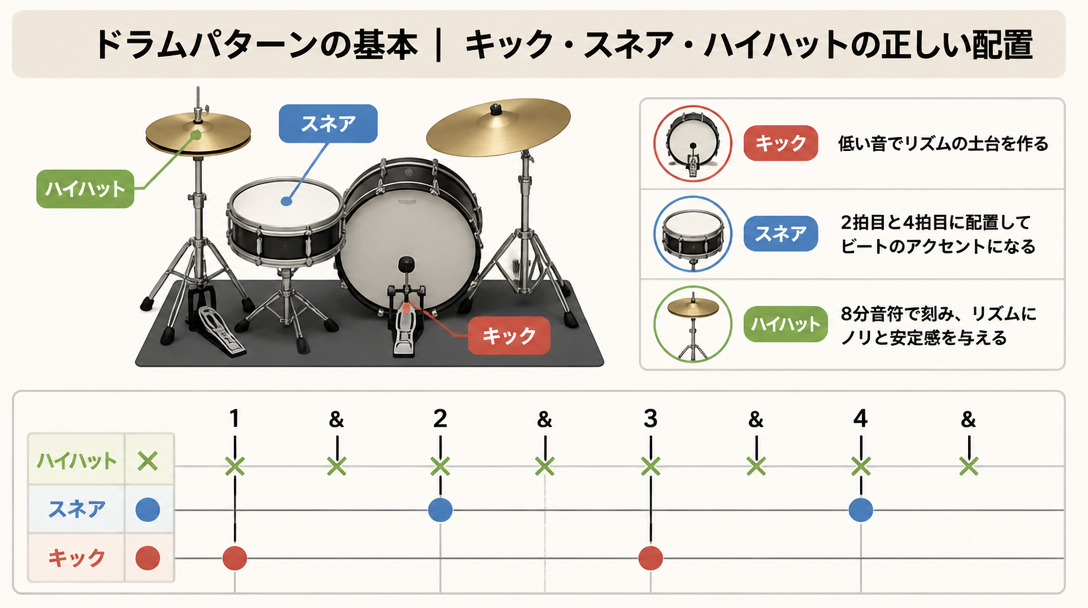
The 4/4 Grid and the Role of Each Drum Instrument
The vast majority of popular music is written in 4/4 time. Inside a DAW, one bar is displayed as four beats, each subdivided into four 16th-note steps — 16 steps total per bar. As LA Studio's beat making guide explains, understanding this 16-step grid is the fundamental starting point for all drum programming.
Each drum instrument serves a specific rhythmic function within that grid:
Drum Instrument Roles and Default Placement | ||
Instrument | Role | Standard Placement |
|---|---|---|
Kick (Bass Drum) | Low-frequency anchor; establishes the rhythmic foundation | Beats 1 and 3 (basic) |
Snare | Backbeat emphasis; creates rhythmic tension and release | Beats 2 and 4 |
Closed Hi-Hat | Keeps a steady pulse; drives the beat forward | 8th or 16th notes evenly spaced |
Open Hi-Hat | Accents and offbeat emphasis | Upbeats or wherever variation is needed |
Crash Cymbal | Section emphasis; emotional peaks | Downbeat of a new section (e.g., chorus) |
Toms | Fill-ins; section transitions | Used in drum fills |
Building a Basic Pattern in the Step Sequencer
According to BandLab's drum pattern guide, the first pattern every producer should learn is the eight-beat groove. Follow these four steps to build it:
- Place the kick drum: Activate step 1 (beat 1) and step 9 (beat 3). This creates the low-frequency backbone of the beat.
- Place the snare: Activate step 5 (beat 2) and step 13 (beat 4). This is the backbeat — the most critical placement in almost all popular music.
- Place the hi-hat: Activate every other step — steps 1, 3, 5, 7, 9, 11, 13, and 15 — for a continuous 8th-note pulse that drives the beat forward.
- Adjust velocity: Avoid leaving all notes at the same volume level. Adding dynamics is essential — this is covered in full detail in the next section.
These four steps produce what many producers describe as the foundational drum pattern used in the vast majority of popular music. Master this pattern first, then use it as the springboard for genre-specific variations.
Recommended BPM Ranges by Genre
Tempo — measured in BPM (Beats Per Minute) — varies considerably between genres. Setting the right BPM before building a beat will ensure the energy and feel align with the target sound:
- Hip-Hop (Boom Bap): 85–95 BPM
- Trap: 130–150 BPM (the half-time feel makes it seem slower)
- House: 120–130 BPM
- Techno: 130–150 BPM
- Drum and Bass: 160–180 BPM
- Pop / R&B: 90–120 BPM
- Rock: 100–140 BPM
The Three Elements of Groove: Velocity, Swing, and Humanization
Using Velocity to Add Dynamics and Human Feel
In MIDI, velocity represents how hard a note is struck — the intensity of each hit. DAWs typically express this as a value from 0 to 127. The single most common mistake beginners make is setting every note to the same velocity (e.g., 100 across the board). The result is a mechanically flat, lifeless pattern that lacks any sense of physical performance.
Native Instruments' drum pattern guide recommends setting prominent hits to around 100 while dropping subtler ghost notes to the 75–81 range to immediately increase the sense of groove. The following velocity guidelines provide a practical starting framework:
- Kick (beats 1 and 3): 100–115 — placed with authority as the rhythmic anchor
- Snare (beats 2 and 4): 95–110 — loud enough to cut through and define the backbeat
- Closed Hi-Hat (odd 8th-note steps): 70–80 — a bouncy, confident feel
- Closed Hi-Hat (even 8th-note steps): 50–65 — slightly softer to create natural alternation
- Ghost Notes (quiet snare hits): 20–40 — extremely low, felt more than heard
Simply alternating hi-hat velocity between the odd and even 8th-note steps introduces an immediate sense of forward momentum and groove. Velocity adjustment is one of the three fundamental pillars of drum programming, and getting it right has a major impact on how clearly the rhythm reads to a listener.
How to Use Swing to Create Feel
Swing is the technique of intentionally delaying the second note of each rhythmic pair, creating a triplet-like feel that departs from mechanical straightness. Every major DAW includes a swing percentage control: FL Studio has it in the pattern menu, and Ableton Live manages it through the Groove Pool.
As TRIVISION STUDIO's 10 drum techniques guide describes, swing is "a powerful tool for adding a natural rhythmic feel to drum tracks," noting that applying swing to hi-hats in particular produces the characteristic bounce of funk and hip-hop. The following swing ranges serve as general guidelines:
- 0–10%: Essentially straight (suited to EDM and techno)
- 20–40%: Light swing (suited to pop and R&B)
- 50–70%: Heavy swing (suited to hip-hop and funk)
- 70%+: Near-triplet feel (suited to jazz and blues)
Humanization: Adding Subtle Timing Variation for Realism
Humanization involves introducing small, random timing offsets to MIDI notes — either using a DAW's built-in humanize function or by nudging notes manually in the piano roll. Real drummers never play with perfect grid precision; the slight, natural variations in their timing are exactly what the human ear interprets as "feel" and musical life.
LA Studio's beat making guide emphasizes that achieving a professional sound requires combining humanization (subtle timing variation) with processing tools like compression and reverb. Here are three practical ways to implement humanization:
- Use the DAW's Quantize/Humanize feature and set a random offset of ±5–15 ms.
- Manually nudge specific notes by 1–2 ticks (the smallest unit of time inside the DAW).
- Leave the kick and snare locked to the grid for stability, and apply humanization only to hi-hats and percussion for the best balance between tightness and feel.
Genre-Specific Drum Patterns: Hip-Hop, House, and Trap
Hip-Hop (Boom Bap) Drum Patterns
Boom bap is the defining sound of 1990s New York hip-hop, and it remains one of the most beloved beat-making styles among producers today. Its hallmarks are heavily swung hi-hats and a punchy, snappy snare with a distinctive crack.
- BPM: 85–95
- Kick: Anchored on beats 1 and 3, with syncopated offbeat placements added to deepen the groove
- Snare: Strong, snappy hits on beats 2 and 4 — sound selection is critical; a tight, crackling snare is essential to the style
- Hi-Hat: 16th-note patterns with 30–50% swing applied; open hi-hats placed on upbeats for rhythmic interest
- Sampling: Chords and melodies are traditionally sourced from chopped jazz and soul records, adding warmth and character
House and Techno: The Four-on-the-Floor Pattern
According to BandLab's drum pattern guide, the foundation of house music is the "four-on-the-floor" pattern — a kick drum hit on every single beat of the bar. This relentless, driving kick is the engine that moves dance floors.
- BPM: 120–130
- Kick: On all four beats — the weight and depth of the kick sound are central to the genre's identity
- Clap / Snare: A clap or snare placed on beats 2 and 4 provides the backbeat
- Hi-Hat: Closed hi-hat on 8th notes throughout; open hi-hat on the upbeats (the "and" of 2 and the "and" of 4) adds energy and forward motion
- Sidechain Compression: A defining feature of house — bass and synth elements "pump" in rhythm with the kick via sidechain compression, creating the genre's signature breathing effect
For a detailed walkthrough of how to set up sidechain compression, see the article on Sidechain Compression: Ducking and Pumping in Your DAW.
Trap Drum Patterns
Trap originated in Atlanta and is defined by two signature elements: the booming TR-808 sub-kick and rapid-fire hi-hat rolls. As Native Instruments' blog notes, trap's sound is built on "tight TR-808 bass and high-speed hi-hat rolls" that work together to create a cinematic, hard-hitting atmosphere.
- BPM: 130–150 (the half-time feel makes the groove perceivably much slower — closer to 65–75 BPM in feel)
- 808 Kick / Bass: A long-release, pitch-sliding 808 sub-bass placed on beats 1 and 3 serves double duty as both kick and bassline
- Snare / Clap: Layered clap hits on beats 2 and 4, often processed with heavy reverb or echo to fill the sonic space
- Hi-Hat: Rapid 16th- and 32nd-note rolls with carefully varied velocity to replicate the feel of a live hi-hat performance; triplet patterns are also common
Advanced Techniques: Ghost Notes and Fill-Ins
Ghost Notes: Adding Depth and Texture to the Groove
Ghost notes are snare or hi-hat hits programmed at an extremely low velocity — typically 20 to 40. They are barely audible in isolation, yet their presence significantly increases the density, complexity, and groove of a beat. Think of them as the space between the notes that gives the pattern its sense of breathing and movement.
Native Instruments' drum pattern guide calls ghost notes "one of the most effective tricks for achieving a professional groove," recommending velocities of 75–81 for soft snare ghost notes inserted into the empty 16th-note positions between main snare hits. Key placement guidelines include:
- Insert ghost notes on the 16th-note steps immediately before or after the main snare hits on beats 2 and 4
- Keep velocity at 15–40 maximum — if ghost notes are too loud, they disrupt the overall dynamic balance
- Apply ghost notes to either hi-hats or snare, but not both simultaneously — using both at once can make the pattern feel cluttered
Drum Fill-Ins: Connecting Sections of the Song
A fill-in (or simply "fill") is a brief departure from the regular drum pattern placed at the transition point between song sections — for example, from verse to chorus. By introducing a short burst of toms, snare rolls, or extra kicks, the fill signals to the listener that something new is about to happen, creating anticipation and forward momentum. Here is a practical framework for building effective fills:
- Timing: The most common placement is the final two beats of every fourth bar — this gives the pattern breathing room before the fill.
- Tom Rundown: Moving from high tom to mid tom to floor tom in descending order is a classic, intuitive fill that works in nearly every genre.
- Snare Roll: A 16th-note snare roll that builds in velocity toward the downbeat of the new section is highly effective at creating climactic energy.
- Keep It Simple: Beginners should resist the urge to over-fill. A single beat of fill-in on the last quarter of bar 4 is cleaner and more musical than an elaborate pattern that distracts from the song.
Once the beat is fully programmed, the finishing work happens in mixdown. For guidance on EQ and compression for drum tracks, refer to the Introduction to Mixdown: EQ and Compressor Techniques. For reverb and delay on percussion, see How to Use Reverb and Delay: A Guide to Spatial Effects.
Summary
Beat making follows a clear progression: establish the basic pattern, add groove, apply genre-specific characteristics, then refine with advanced techniques. Here are the key takeaways:
- Start with the foundational pattern: Kick on beats 1 and 3, snare on beats 2 and 4, and hi-hat on evenly spaced 8th notes. This pattern underlies the majority of popular music and is the essential starting point.
- Groove comes from three elements: Velocity (dynamics), swing (rhythmic displacement), and humanization (timing variation). Combining all three transforms a mechanical sequence into a beat that feels alive.
- Match BPM and pattern to genre: Hip-hop sits at 85–95 BPM with heavy swing; house lives at 120–130 BPM with a four-on-the-floor kick; trap runs at 130–150 BPM with rapid hi-hat rolls and a half-time feel.
- Ghost notes add depth: Inserting low-velocity snare hits in the spaces between main hits significantly enhances groove complexity with minimal effort.
- Sound quality comes first: The quality of drum samples and plugins determines roughly 70% of the final impression of a track. Securing high-quality, genre-appropriate drum sounds is the highest priority before anything else.