Gymnastics Taping Guide: Wrist, Ankle & Knee Techniques
Learn proper taping techniques for gymnastics. Covers wrist, ankle, and knee taping, tape types, application steps, and injury prevention tips for gymnasts.
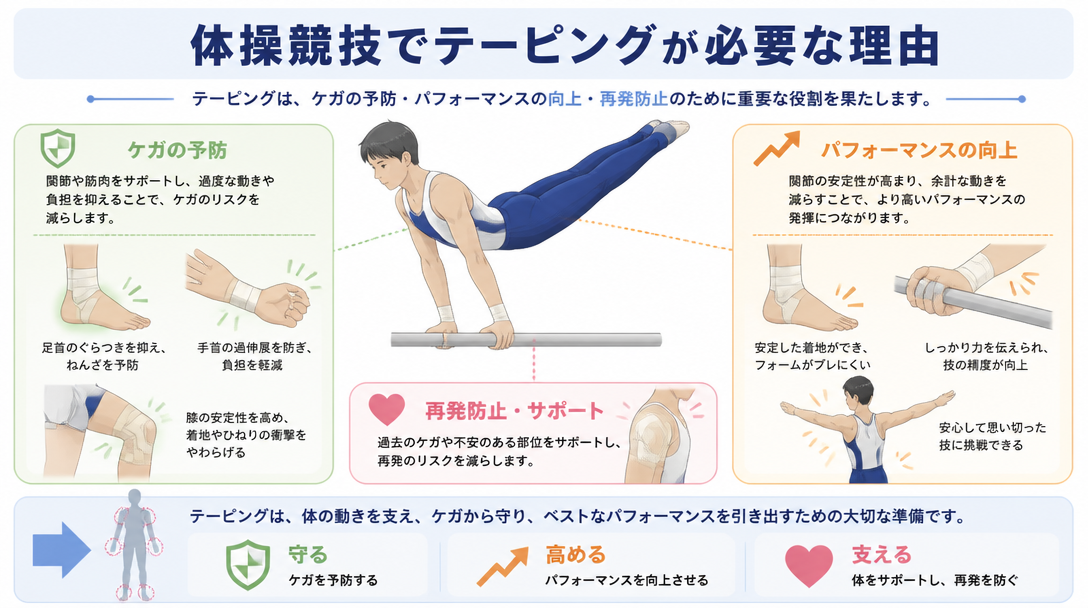
Taping is one of the most critical skills in a gymnast's injury-prevention toolkit. The repetitive stress placed on the wrists during bar, ring, and vault work, combined with the enormous impact forces absorbed by the ankles and knees during landings, creates a unique injury environment that few other sports can match. Without proper taping, the risk of both acute injuries and chronic overuse conditions rises significantly. This guide breaks down the purpose, tape selection, and step-by-step application methods for the three most commonly taped areas in gymnastics: the wrist, ankle, and knee.
Why Taping Is Essential in Gymnastics
The Unique Demands Gymnastics Places on Joints
Gymnastics is a multi-discipline sport that combines aerial skills, high-impact landings, and apparatus work. According to the Andrews Sports Medicine gymnastics injury guide, the most frequently injured body parts in gymnasts are, in order: the ankle and foot, lower back, knee, wrist, and hand. This injury profile reflects the sport's distinctive movement demands.
Several mechanics make gymnastics particularly hard on joints. Wrist hyperextension occurs constantly during bar hangs, ring strength elements, and vault takeoffs. Ankle inversion stress peaks at landing, when the foot strikes the mat at an angle that loads the lateral ligaments. The knee endures repeated flexion-extension cycles through jumps, tumbling, and dismount landings. Over months and years of high-volume training, this cumulative load damages ligaments, tendons, and cartilage. Research consistently shows that landing forces in gymnastics can reach many multiples of body weight, making proactive joint support not optional but necessary.
The Four Core Functions of Taping
Athletic taping serves four overlapping purposes that are all relevant to gymnasts:
- Injury prevention: Restricting joint range of motion within safe limits reduces excessive strain on ligaments and tendons before an injury occurs.
- Return-to-sport support and re-injury prevention: After a mild sprain or contusion, taping allows a gymnast to continue training while reducing the risk of making the original injury worse.
- Pain reduction: Supporting a joint mechanically offloads some of the stress that would otherwise be felt as pain during movement.
- Psychological confidence: Athletes who have previously been injured often experience anxiety about re-injury. Taping a previously injured area provides a tangible sense of security that can improve performance and willingness to train fully.
These four functions are well-documented in sports medicine literature and are consistently cited by athletic trainers working with gymnasts at all levels.
Types of Taping Tape and How to Choose

Rigid (Non-Stretch) Athletic Tape
Rigid tape — often called white tape or zinc oxide tape — does not stretch. Its primary purpose is firm fixation and compression. In gymnastics, rigid tape is the default choice for wrist stabilization and ankle sprain prevention because it provides a hard mechanical stop against unwanted joint motion. It is best suited to competition and high-intensity training sessions where maximum support is needed.
The main limitation of rigid tape is that its inelastic nature can impair circulation if applied too tightly or worn for extended periods. Skin checks and circulation monitoring are essential whenever rigid tape is used.
Elastic Athletic Tape
Elastic tape is made from a stretchable fabric and strikes a balance between support and freedom of movement. It is broadly categorized into several subtypes: maximum-restriction elastic tape for strong support, motion-friendly elastic tape for everyday training, muscle-support tape, and self-adherent wrap for easy self-application. Elastic tape is well suited to routine practice sessions where some restriction is helpful but the gymnast also needs full range of motion for skill execution.
Kinesiology Tape
Kinesiology tape is engineered to stretch at a rate similar to human skin and muscle — up to approximately 200% of its resting length. Rather than restricting motion, it facilitates movement while providing gentle support to the underlying musculature. According to the Gymnastics Direct guide on wrist taping, kinesiology tape is the preferred choice during injury recovery and for muscle activation work, while rigid tape is better suited to injury prevention and pain management during active loading. Because kinesiology tape can be worn continuously for three to seven days without significant skin irritation, it is a practical option during recovery periods between training sessions.
Tape Selection Guide by Body Part and Purpose
Tape Type | Elasticity | Primary Use | Best Situation |
|---|---|---|---|
Rigid tape (white/zinc oxide) | None | Firm fixation, sprain prevention | Competition and high-intensity training |
Elastic athletic tape | Moderate | Range restriction with mobility | Routine practice and supplementary support |
Kinesiology tape | High (up to ~200%) | Muscle support, recovery facilitation | Recovery periods and light support |
Underwrap (pre-wrap foam) | High | Skin protection and base layer | Applied under any tape to protect the skin |
Wrist Taping for Gymnastics: Protecting Against Bar, Ring, and Vault Stress
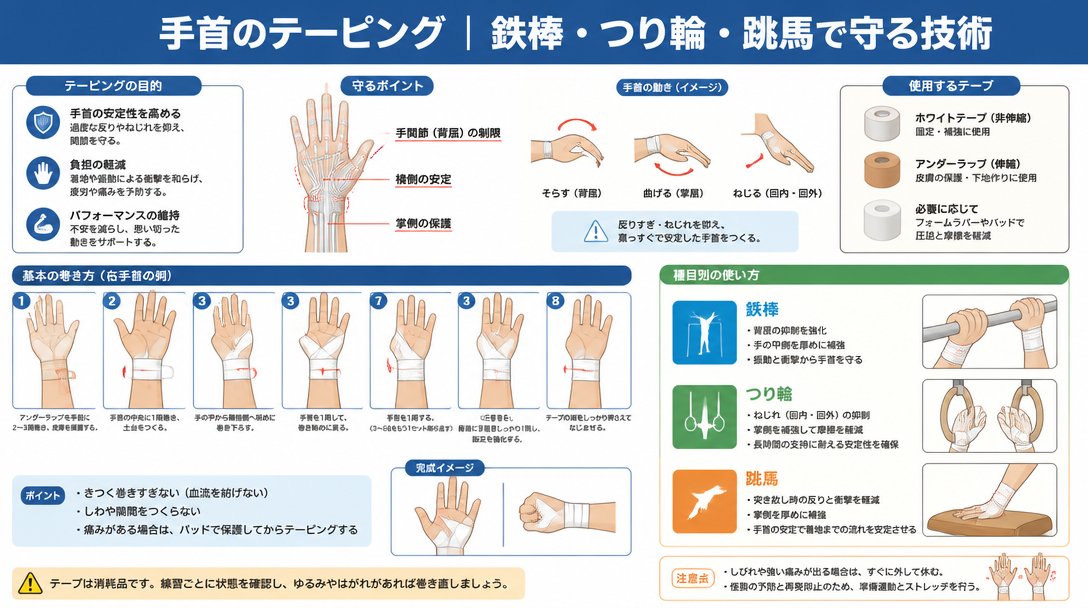
Common Wrist Injuries in Gymnasts
Hanging and swinging on the horizontal bar, performing strength elements on rings, and pushing off the vault table all subject the wrist to repeated hyperextension stress. The most common wrist injuries in gymnastics include ligament sprains, triangular fibrocartilage complex (TFCC) tears, and tendinopathy. TFCC injuries are particularly relevant to apparatus gymnasts because the forceful ulnar deviation and rotation required during bar swings and ring elements directly load this structure. Left untreated or inadequately supported, TFCC damage can become chronic and force extended time away from training.
Vault takeoffs present a different but equally serious challenge: the wrist snaps into sudden, forceful dorsiflexion (backward bending) at the moment of hand contact. Taping that limits this dorsiflexion range is directly protective against the ligament damage that can result from this motion.
For a comprehensive look at wrist and ankle injury management in gymnastics, see the complete guide to wrist and ankle care for gymnasts.
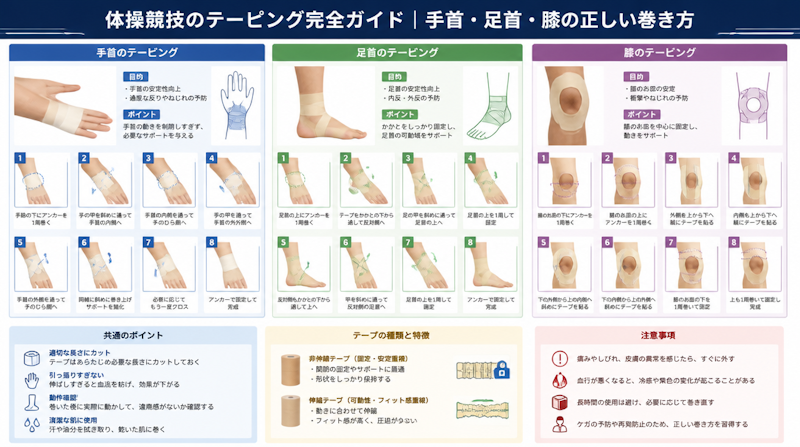
Wrist Taping Methods and Step-by-Step Instructions
Two primary wrist taping approaches are used in gymnastics: rigid taping for maximum fixation, and kinesiology taping for mobility-preserving support.
Rigid Taping (Fixation-Focused) — Step-by-Step
- Skin preparation: Apply adhesive spray from 15–20 cm away in a thin, even coat. Allow to dry fully before proceeding.
- Underwrap layer: Apply one to two layers of pre-wrap foam over the bony prominences of the wrist (ulnar styloid and radial styloid) to protect the skin.
- Anchor strips: Apply two anchor strips of rigid tape approximately 3 cm above the wrist joint on the forearm. These anchor strips are what all subsequent strips will attach to and pull from, so they must lie flat and adhere firmly.
- Spiral wrapping: Beginning just below the wrist joint, apply rigid tape in a spiral pattern moving upward toward the forearm, maintaining a 50% overlap with each successive strip.
- Finishing anchors: Secure the top of the taping job with two additional anchor strips to lock the tape in place and prevent rolling or peeling during training.
Kinesiology Taping (Mobility-Preserving) — Step-by-Step
- Cut a strip of 3–5 cm wide kinesiology tape to the circumference of the wrist. Round all four corners with scissors to prevent premature peeling.
- Spread all five fingers wide to put the wrist skin on stretch before applying.
- Position the tape so it covers the actual wrist joint line precisely — not above or below it.
- Because kinesiology tape is designed to work through its own elasticity, do not pull or stretch the tape as it is applied. Lay it down with minimal tension for a supportive wrist taping result.
Common Wrist Taping Mistakes and How to Avoid Them
- Over-tightening: If fingers become numb, tingle, or turn blue after application, remove the tape immediately and reapply with less tension. Circulation compromise is a serious risk with rigid wrist tape.
- Tape migration during movement: If the tape shifts away from the joint during training, it provides no protection. Proper anchor placement is the main defense against migration.
- Rigid tape directly on bare skin for extended periods: Without an underwrap base layer, rigid tape can abrade and damage skin, especially during repetitive grip work on apparatus. Always use pre-wrap under rigid tape for sessions lasting more than a few minutes.
- Consecutive daily application to the same skin: Reapplying tape to the same area day after day without rest leads to contact dermatitis and skin breakdown. Build one to two tape-free days into the weekly schedule.
Ankle Taping for Gymnastics: Managing Landing Impact
The High Ankle Sprain Risk in Gymnastics
Lateral ankle sprain — caused by the foot rolling inward under the body — is one of the single most common injuries in gymnastics. At the moment of landing from a dismount, tumbling pass, or vault, forces several times body weight are transmitted through the ankle joint. If the foot lands even slightly off-center, the anterior talofibular ligament and calcaneofibular ligament on the outside of the ankle bear the brunt of that load and can tear.
A history of ankle sprain creates a vicious cycle: once the lateral ligaments have been stretched or torn, the ankle becomes mechanically less stable and significantly more susceptible to future sprains. Prophylactic taping is one of the most evidence-supported interventions for breaking this cycle. Sports medicine resources consistently identify re-injury prevention as a primary rationale for ankle taping in athletes with a prior sprain history.
Equipment Needed for Ankle Taping
- Adhesive spray (improves tape-to-skin adhesion)
- Pre-wrap foam underwrap (skin protection)
- 38 mm rigid athletic tape (main taping material)
Step-by-Step Lateral Ankle Sprain Prevention Taping
The following sequence follows established athletic training protocols for inversion sprain prevention taping:
- Skin preparation: Apply adhesive spray from 15–20 cm away and allow it to dry completely. The spray dramatically improves how long the tape stays adhered during athletic activity.
- Underwrap: Starting from the top of the foot and working toward the ankle, apply a layer of pre-wrap foam. Keep the ankle at 90 degrees (neutral position) throughout the entire taping procedure — this is non-negotiable and affects the final taping geometry.
- Anchor strips (×2): Apply two anchor strips of rigid tape approximately one hand's width above the medial malleolus (inner ankle bone). Apply the first strip firmly; overlap the second strip by one-third. These anchors serve as the attachment points for all subsequent strips.
- Stirrups (×3): Beginning at the medial (inner) anchor, pass the tape under the heel and up to the lateral (outer) anchor, pulling firmly toward the outside as the tape crosses under the heel. Apply three stirrup strips, fanning them slightly so they spread across the heel from front to back.
- Horseshoe strips (×3): Center each horseshoe strip on the back of the heel bone and wrap it forward in a U-shape to protect and support the Achilles tendon insertion. Apply three horseshoe strips, each slightly higher than the previous.
- Circular (compression) strips: Apply two to three circumferential strips around the ankle to reinforce the stirrups and horseshoes. Each strip should overlap the previous one by approximately one-third.
- Figure-eight strip: Starting on the top of the foot, cross over the ankle in a figure-eight pattern and finish at the lower leg. This step integrates the foot and ankle portions of the taping job and adds global stability.
- Heel lock (×2, one each side): To prevent the heel from shifting laterally or medially — a critical final step — start on the outside of the heel, pass under it, and pull firmly upward toward the anchor strips on the inner side. Repeat from the inside out. Heel locks are what prevent the heel from "popping out" during the high torque of a landing.
Ankle Taping Key Points and Safety Checks
- Maintain the ankle at exactly 90 degrees throughout application. Any plantarflexion (pointing) during taping will result in a taping job that restricts motion when the foot is flat on the floor.
- The stirrup strips must be pulled firmly toward the lateral side as they pass under the heel — this tension is what mechanically resists inversion.
- Maintain a consistent one-third to one-half overlap between adjacent tape strips to ensure there are no gaps in coverage.
- After completing the taping job, check toe sensation, skin color, and warmth. The gymnast should also confirm there is no tingling or numbness.
- Remove tape after each session, cleanse the skin, and allow it to breathe before re-taping. Never sleep in athletic tape.
Knee Taping for Gymnastics: Supporting the Most Overloaded Joint
Common Knee Injuries in Gymnasts
The knee is subjected to repeated high-load flexion and extension through virtually every gymnastics skill: jumps, tumbling passes, beam mounts and dismounts, and floor choreography. The most clinically significant knee problems in gymnasts fall into three categories:
- Anterior cruciate ligament (ACL) injury: ACL tears most commonly occur when the knee collapses inward (valgus collapse) during landing — a pattern often described as "knee-in, toe-out." These injuries frequently require surgery and extended rehabilitation, making prevention strategies critically important.
- Patellar tendinopathy (jumper's knee): Repeated jumping and landing cycles cause cumulative micro-damage to the patellar tendon below the kneecap. Tendinopathy develops gradually but can become severely limiting if not managed early.
- Medial collateral ligament (MCL) sprain: Inward-directed stress during landing can stretch or tear the MCL along the inside of the knee, causing pain and instability on the medial side.
Knee injury prevention is strongly linked to muscular strength and balance. Combining taping with targeted off-season strength training that addresses the quadriceps, hamstrings, and gluteal muscles produces better outcomes than taping alone. These muscle groups collectively stabilize the knee and reduce the peak forces the ligaments must absorb.
Knee Taping Methods and Step-by-Step Instructions
Knee taping in gymnastics generally serves one of two purposes: medial (inner) stability support for MCL protection, or patellar tendon support for jumper's knee management. The procedures differ meaningfully.
Medial Stability Taping (MCL Protection) — Step-by-Step
- Position the knee in approximately 15–20 degrees of flexion (a very slight bend). This is the functional position that ensures the taping job does not restrict normal movement.
- Apply pre-wrap foam underwrap from just above the knee to just below, covering all surfaces where tape will contact skin.
- Beginning on the anterior (front) thigh, pass the tape around the outside of the kneecap (patella) and down to the upper calf, describing a figure-eight pattern that crosses over the joint line medially.
- Secure the top and bottom of the taping job with two firm anchor strips above and below the knee to prevent the figure-eight strips from migrating.
Patellar Tendon Support Taping (Jumper's Knee) — Step-by-Step
- Identify the inferior pole of the patella (the lower tip of the kneecap) and the patellar tendon attachment point just below it. This is the anatomical target.
- Apply two to three horizontal strips of rigid tape across the patellar tendon, applying slight upward tension as each strip is placed. The goal is to mechanically unload the tendon by lifting it slightly toward the patella.
- Reinforce with anchor strips above and below the horizontal strips to secure the assembly and prevent movement during activity.
Knee Taping Safety Considerations
- Never apply tape directly into the popliteal fossa (the hollow at the back of the knee). This area contains major neurovascular structures; compression there can cause nerve damage and circulatory compromise.
- After completing the taping job, have the gymnast perform several slow knee bends to confirm full functional range of motion and normal sensation.
- A general guideline of eight to twelve hours of daily wear applies to knee tape. Remove all tape before sleep.
- Allow one to two tape-free days per week for the same area to prevent skin breakdown and contact dermatitis.
Universal Taping Precautions and Best Practices
Pre-Application Skin Assessment and Preparation
No taping procedure should begin without a brief skin assessment. The following checks apply regardless of which body part is being taped:
- Skin integrity: Do not apply tape over open wounds, active eczema, rashes, or areas of active skin infection. These conditions will worsen under tape occlusion.
- Hair removal: Dense body hair significantly reduces adhesion and makes removal painful. Shaving or clipping the area prior to taping improves tape performance and reduces skin trauma during removal.
- Clean and dry skin: Sweat and surface contamination cause premature tape failure. Wipe the area with a clean cloth or isopropyl alcohol wipe and allow it to dry before applying adhesive spray or tape.
- Underwrap for sensitive skin: Gymnasts with reactive or sensitive skin should always use a pre-wrap layer between the skin and rigid tape, even if it slightly reduces adhesion.
Monitoring During and After Application
- Immediately after taping, check for numbness, cold sensation, or color changes (blue or purple) in the digits or tissues distal to the tape. Any of these signs indicate vascular compromise and require immediate tape removal.
- During practice, periodically ask the gymnast about sensation in the taped area. Sensations should be consistent and normal — support without tightness.
- If tape begins to loosen, sag, or bunch during a session, remove and reapply. A loose taping job provides no mechanical benefit and can create a false sense of security.
- To remove tape safely, peel it back in the direction of hair growth while using the opposite hand to stabilize the adjacent skin. Alternatively, soak the tape in warm water for several minutes to soften the adhesive before removal, reducing the risk of skin stripping.
Managing Tape Allergies and Skin Reactions
Some gymnasts develop contact dermatitis from the adhesives used in athletic tape or adhesive sprays. Common culprits include latex (found in some elastic tapes) and acrylic-based pressure-sensitive adhesives. Symptoms range from mild redness and itching to blistering in severe cases.
When skin reactions recur despite adequate skin preparation, switching to a hypoallergenic or latex-free tape is the first step. Self-adhesive cohesive bandage (which sticks to itself rather than the skin) is another option for athletes with significant adhesive sensitivity. Persistent or worsening reactions should be evaluated by a sports medicine physician or dermatologist, and the treating clinician should be informed about the specific tape products being used.
Self-Taping vs. Trainer-Applied Taping
Benefits and Best Practices for Self-Taping
The ability to tape one's own joints is a valuable skill for gymnasts who train in environments without full-time athletic training staff — which describes the majority of club and school programs. Kinesiology tape is particularly well-suited to self-application because its elasticity and gentle adhesion make it forgiving for beginners. For rigid tape self-application, the following practices improve outcomes:
- Position the joint correctly before starting — ankle at 90 degrees, knee in slight flexion — and maintain that position by placing the foot on a slightly raised surface or sitting with the leg straight.
- Pre-cut all tape strips to the correct length before beginning, and round all corners. Pre-cutting eliminates the need to handle scissors mid-application and reduces waste.
- Use a mirror or phone camera to verify placement accuracy, especially for ankle and knee taping where the critical strips are on the posterior or lateral surfaces that are hard to see directly.
- Learn the technique directly from a certified athletic trainer or sports physiotherapist before attempting unsupervised self-taping. Even one supervised session builds the muscle memory needed for consistent results.
Incorporating taping into a structured pre-training routine alongside flexibility work and warm-up exercises makes injury prevention a consistent daily habit rather than an afterthought.
When to Seek Professional Taping Assistance
There are situations where self-taping is not appropriate and professional application by a certified athletic trainer, sports physiotherapist, or physician is required:
- Acute injuries: Taping immediately after a significant sprain, fracture, or dislocation should be performed by a trained professional as part of a broader first-aid assessment. Improperly applied tape on an acute injury can obscure the injury's severity and delay necessary medical treatment.
- Complex anatomical areas: The shoulder, elbow, and hip involve intricate structures and movement patterns that make taping technically demanding and easy to get wrong. These should always be taped by a qualified practitioner.
- Recurrent skin reactions: If a gymnast repeatedly develops skin irritation under tape, a professional can assess the cause, recommend alternative materials, and apply tape in ways that minimize skin contact.
- High-stakes competition taping: Before a major competition, important taping jobs should be performed or at least inspected by a qualified professional. The consequences of a taping failure at competition are too significant to leave to chance.
As the Andrews Sports Medicine gymnastics injury resource emphasizes, taping is fundamentally a preventive and supportive tool — it does not treat serious injuries. Any gymnast with a significant injury should receive a proper medical evaluation before returning to training, regardless of whether the injured area has been taped.
Summary
Taping technique is an essential competency for gymnasts, coaches, and the support staff working with them. The key takeaways from this guide are:
- Match tape type to purpose: rigid tape for maximum fixation at competition, elastic tape for everyday practice support, and kinesiology tape for recovery periods and gentle muscle activation.
- Wrist taping for gymnastics focuses primarily on limiting dorsiflexion. The rigid taping sequence — anchors, spiral wrapping, finishing anchors — provides reliable protection for bar, ring, and vault work.
- Ankle inversion sprain prevention taping follows a specific sequence: anchors → stirrups → horseshoes → circular strips → figure-eight → heel locks. Each step builds on the previous one and cannot be skipped without compromising the result.
- Knee taping protocols differ by target structure. MCL protection uses a figure-eight wrapping pattern; patellar tendon support uses horizontal strips with upward tension. The back of the knee must never be taped.
- Pre-application skin assessment, consistent underwrap use, and post-application circulation checks are mandatory safety steps for every taping procedure on every body part.