How to Choose an Audio Interface: Home Recording Guide
Learn how to choose the right audio interface for home recording. Covers sample rate, bit depth, I/O ports, phantom power, and top recommended models by budget.
Choosing the right audio interface is one of the first major decisions anyone faces when setting up a home recording studio. The market spans everything from entry-level units under $100 to professional-grade systems costing thousands of dollars, and it can be genuinely difficult to know where to start. This guide breaks down the key specifications — sample rate, bit depth, input/output configuration, phantom power, and more — and explains how to match those specs to real-world recording needs and budgets.
What Is an Audio Interface?
How Analog-to-Digital Conversion Works
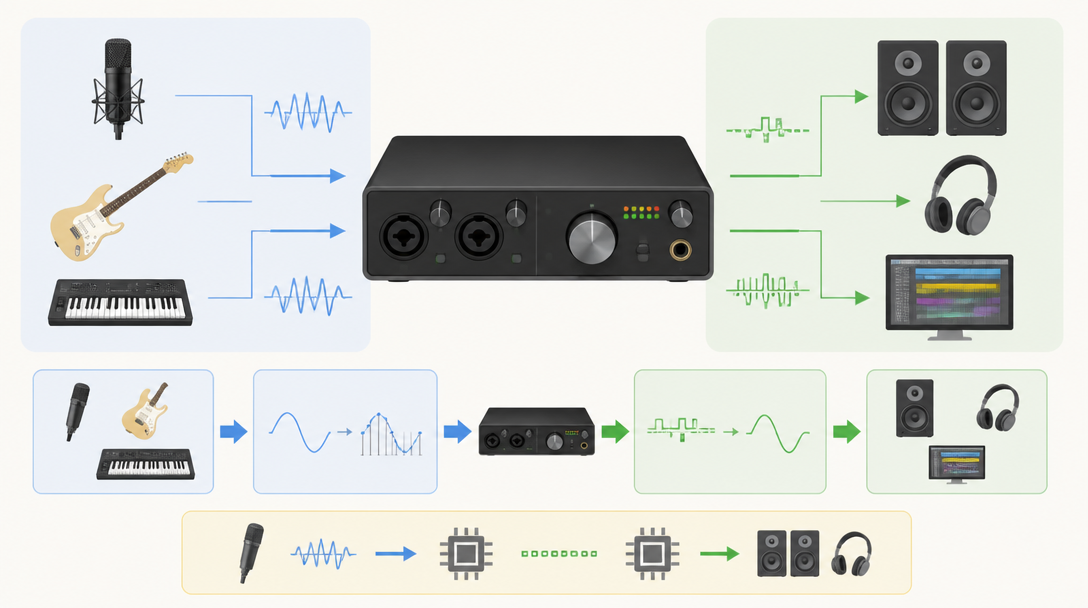
An audio interface is the hardware bridge between the analog world of microphones, guitars, and instruments and the digital environment of a computer-based recording setup. It contains both an ADC (analog-to-digital converter), which captures incoming sound and converts it into digital data, and a DAC (digital-to-analog converter), which translates digital audio back into an analog signal for playback through speakers or headphones. The quality of these converters is one of the most direct determinants of recording and playback fidelity.
Conversion quality is measured by two core specifications: sample rate and bit depth. According to iZotope's Digital Audio Basics guide, sample rate determines how many times per second the analog signal is measured — and therefore defines the upper frequency limit that can be reproduced — while bit depth determines the resolution of each measurement, which governs the dynamic range of the recording.
How Audio Interfaces Differ from Built-In Sound Cards
Every laptop and desktop computer includes some form of built-in audio hardware. However, these onboard sound cards are engineered for general consumer tasks — video calls, streaming, casual listening — not for music production. The limitations quickly become apparent in a recording context:
- Onboard microphone preamps are typically low-quality, resulting in insufficient gain and a high noise floor
- Latency (the delay between an input signal and its playback) is too high for comfortable real-time monitoring while performing
- Built-in audio lacks XLR inputs for condenser microphones and Hi-Z inputs for guitars and basses
- Phantom power (+48V), which is required to operate condenser microphones, is not available
A dedicated audio interface addresses every one of these shortcomings. It provides low-noise microphone preamps, a dedicated low-latency driver stack, and a variety of professional connectors. Critically, most interfaces also include direct monitoring — a hardware-level feature that routes the input signal directly to the headphone output without passing through the computer, effectively eliminating recording latency entirely.
Common Use Cases for Home Recording
An audio interface is a practical tool across a wide range of home studio scenarios, including:
- Recording vocals and acoustic instruments via microphone
- Direct input (DI) recording of electric guitar and bass
- Line-level recording from synthesizers, electronic pianos, and drum machines
- Multitrack music production inside a DAW
- Live streaming and podcast production
In the context of DAW-based music production, the interface plays a central role in both sound quality and workflow efficiency, so choosing one that pairs well with the DAW of choice is an important part of the overall setup decision.
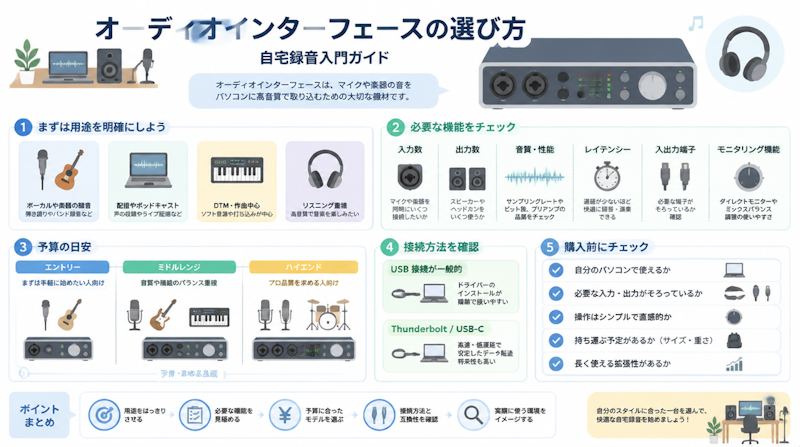
How to Choose an Audio Interface ① Understanding Core Specifications
Reading Sample Rate and Bit Depth Specifications
Product listings often display figures like "24-bit/192kHz," and understanding what these numbers actually mean is the first step in evaluating any audio interface. According to Black Ghost Audio's technical breakdown, the two specifications serve fundamentally different purposes:
Specification | What It Measures | Common Values | Practical Guide |
|---|---|---|---|
Sample Rate | Number of samples captured per second; determines the maximum reproducible frequency | 44.1 kHz / 48 kHz / 96 kHz | 44.1 kHz: CD standard; 48 kHz: video and streaming standard; 96 kHz+: professional studio production |
Bit Depth | Amplitude resolution of each sample; determines dynamic range | 16-bit / 24-bit / 32-bit float | 16-bit: CD standard; 24-bit: recording standard; 32-bit float: latest format with extended headroom |
The current industry standard for music production is 24-bit/48 kHz. iZotope notes that 48 kHz is "fast becoming the de facto minimum standard for modern digital audio," while 96 kHz and 192 kHz are primarily used in professional studio and post-production environments. For beginners, a 24-bit/48 kHz-capable interface provides more than sufficient quality.
It is also worth noting the emergence of 32-bit float recording. Interfaces supporting this format capture audio with such an extensive dynamic range that clipping on the way in — or recording too quietly — can often be corrected in post-production without any audible degradation. This makes 32-bit float particularly forgiving for less experienced recordists.
Choosing the Right Number of Input and Output Channels
Product names and descriptions frequently include shorthand like "2-in/2-out" or "4-in/4-out," which refers to the number of audio channels that can be recorded or played back simultaneously. The appropriate channel count depends entirely on how the interface will be used:
- 2-in/2-out: Ideal for recording one or two sources simultaneously — a vocalist and a guitarist, for example. The vast majority of solo home studio users will never need more than this.
- 4-in/4-out: Opens up multi-microphone recording (such as a basic drum setup) and simultaneous multi-performer sessions. Suitable for intermediate users.
- 8-in and above: Designed for live band recording, professional session work, and full studio production environments. Appropriate for advanced users and working professionals.
Latency and Buffer Size Explained
Latency is the delay between when a sound enters the interface and when it can be heard through speakers or headphones. Even a small amount of latency — more than around 10 milliseconds — can feel disconcerting when a vocalist is trying to monitor their own voice in real time. Minimizing roundtrip latency is therefore one of the most practical performance considerations when choosing an interface.
Buffer size is the key DAW-side setting that controls this trade-off. A smaller buffer means lower latency but higher CPU demand; a larger buffer reduces CPU load but increases delay. As a general rule, use a small buffer (64–128 samples) during tracking sessions and a larger buffer (512–1024 samples) during mixing, when real-time monitoring is less critical. On Windows systems, installing the manufacturer's ASIO driver is a prerequisite for achieving low latency — using the default Windows audio driver will result in significantly higher delays.
How to Choose an Audio Interface ② Checking Connection Types
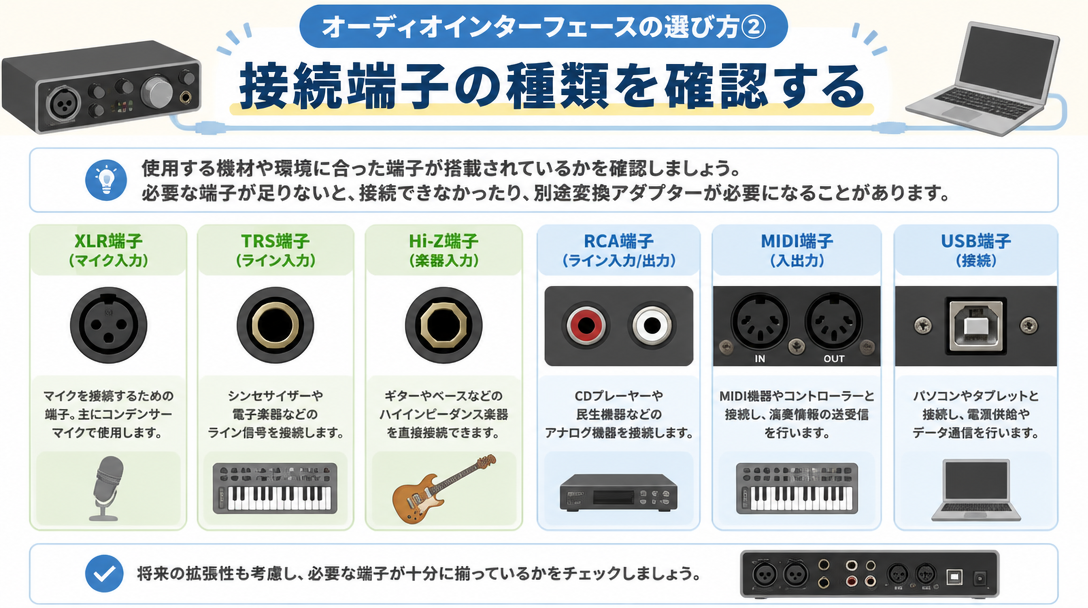
XLR Inputs, Combo Jacks, and Hi-Z for Guitars
Microphones connect via 3-pin XLR connectors, which carry a balanced signal and are highly resistant to interference over long cable runs. Most modern audio interfaces use combo jacks — sockets that accept both an XLR plug and a standard 6.35 mm (¼-inch) TRS phone plug in the same opening, maximizing flexibility without requiring additional inputs. The main connector types and their applications are summarized below:
Connector Type | Primary Uses | Balanced Signal |
|---|---|---|
XLR (3-pin) | Microphones, monitor speakers | Yes — excellent noise rejection |
TRS Phone (3-pole, ¼-inch) | Line-level devices, stereo headphones | Yes — when used in a balanced configuration |
TS Phone (2-pole, ¼-inch) | Electric guitar and bass (Hi-Z) | No — unbalanced |
Electric guitars and basses have a high output impedance that is incompatible with a standard line-level input. Plugging a guitar directly into a standard line input will result in a thin, weak signal. Interfaces designed for guitar recording include a dedicated Hi-Z (high-impedance) input, sometimes labeled "INST" for instrument. When using this input, the interface's corresponding channel must be switched to instrument mode — a step that is easy to overlook but essential for getting a proper guitar tone.
Why Phantom Power (+48V) Matters
Unlike dynamic microphones, which are self-powered, condenser microphones require an external power source to operate. Audio interfaces supply this through a feature called phantom power, which delivers +48 volts of DC current through the XLR cable to the microphone. Most interfaces include a dedicated phantom power switch (often labeled "+48V") that can be activated per-channel or globally.
There are several important safety considerations when working with phantom power:
- Never connect or disconnect microphone cables while phantom power is active — doing so can produce a loud pop that may damage speakers or the microphone itself
- Always reduce the monitor volume and turn off phantom power before plugging in or unplugging a microphone
- Phantom power can permanently damage ribbon microphones; always verify a microphone's compatibility before enabling phantom power
Microphone Type | Phantom Power | Characteristics | Best Applications |
|---|---|---|---|
Condenser | Required (+48V) | High sensitivity, wide frequency response, captures fine detail | Vocals, acoustic instruments |
Dynamic | Not required | Rugged, handles high SPL, lower sensitivity | Live streaming, guitar amplifier recording |
Ribbon | Generally not required (damage risk) | Warm, natural sound; fragile internal element | Studio recording (intermediate to advanced users) |
Computer Connection: USB-C vs. Thunderbolt
The vast majority of audio interfaces available today connect to a computer via USB — either USB 2.0 or the newer USB-C standard. USB-C has become the dominant connection type across entry-level and mid-range interfaces, offering a reversible connector, reliable bus power (so no external power adapter is needed), and broad compatibility with both Mac and Windows computers. For the overwhelming majority of home studio users, USB-C is the right choice.
Thunderbolt connections appear on high-end professional interfaces, primarily targeting Apple-platform power users. Thunderbolt provides significantly greater bandwidth and can achieve ultra-low latency figures that USB cannot match, but compatible hardware is expensive and less widely available. Unless the workflow genuinely demands Thunderbolt's performance ceiling — large channel counts at very low buffer sizes, for instance — USB-C is a perfectly capable and far more cost-effective connection standard.
How to Choose an Audio Interface ③ Matching the Interface to the Use Case
Vocals and Singer-Songwriter Recording (1–2 People)
For someone recording vocals alongside an acoustic or electric guitar — the classic singer-songwriter setup — a 2-in/2-out entry-level interface is entirely sufficient. The checklist for this use case is straightforward:
- At least one XLR input with phantom power (+48V) for a condenser microphone
- A Hi-Z instrument input for direct guitar recording
- Direct monitoring for zero-latency headphone feedback while performing
- USB-C connectivity with bus power (no separate power supply required)
- A compact, portable form factor for a home desk setup
Music Production and Band Arrangement (Multiple Instruments)
Producing more complex arrangements — whether tracking a full band in stages or recording multiple instruments simultaneously — calls for an interface with at least four inputs. The ability to record a stereo keyboard alongside a DI'd bass, for example, requires four independent channels. For producers working extensively with synthesizers and hardware, checking whether the interface includes built-in MIDI I/O is also worthwhile; otherwise, a separate MIDI interface will be needed.
In a DAW-heavy production environment, driver stability and compatibility with the chosen DAW deserve close attention. Checking manufacturer forums and user reviews for reports of compatibility issues with the specific DAW and operating system version in use is a reliable way to avoid frustrating technical problems after purchase.
Live Streaming and Podcasting
For content creators focused on live streaming or podcast production, the most important feature to look for is loopback functionality. Loopback allows the interface to mix the computer's internal audio output — background music, sound effects, alert sounds — with the live microphone signal and route the combined feed directly into streaming or recording software, without needing to route audio through a DAW.
Some interfaces, such as the Yamaha AG03MK2, are specifically designed with streaming in mind. They include onboard DSP processing (compressor, reverb, EQ) that runs entirely on the hardware, meaning the computer's CPU is not taxed during a broadcast. For streamers who also run graphics-intensive games or applications alongside their stream, this hardware-side processing is a meaningful practical advantage.
Recommended Audio Interfaces by Price Range
Entry-Level (Under $200)
The Focusrite Scarlett Solo 4th Generation is the most consistently recommended entry-level interface on the market, and for good reason. It covers every fundamental need for solo home recording at an accessible price point. Key specifications are as follows:
Specification | Details |
|---|---|
I/O Configuration | 2-in / 2-out (XLR × 1, Hi-Z instrument × 1) |
Bit Depth / Sample Rate | 24-bit / up to 192 kHz |
Dynamic Range | 112 dB (input) / 120 dB (line output) |
Connection | USB 2.0 Type-C (bus-powered) |
Phantom Power | +48V |
Bundled Software | Pro Tools Intro, Ableton Live Lite, Cubase LE |
Weight | 382 g |
The fourth-generation Scarlett Solo introduces a revamped "Air" mode with two settings: Presence mode and Harmonic Drive mode. These simulate the character of vintage analog console preamps, adding warmth and presence to recordings in ways that go well beyond what earlier Scarlett generations offered. The Solo is particularly well-suited to first-time home studio builders — it is compact, durable, and the bundled DAW licenses mean the entire recording environment can be up and running for minimal additional cost.
Mid-Range ($150–$400)
The mid-range tier opens up more specialized options depending on the intended workflow. Three models stand out as leading choices:
- Yamaha AG03MK2 (approx. $200): A 3-channel interface with built-in DSP effects (compressor, reverb, EQ), loopback functionality, and Yamaha's Class-A D-PRE microphone preamp. Purpose-built for streaming and content creation, it functions as an all-in-one solution that requires no additional mixer or outboard gear.
- MOTU M2 (approx. $220): Uses ESS Technology converters that deliver benchmark-topping dynamic range and signal-to-noise performance for its price class. The front panel includes a real-time level meter. Widely regarded as the best-sounding interface in its price range and a top choice for quality-focused producers.
- Focusrite Scarlett 2i2 4th Gen (approx. $200): The bestselling model in Focusrite's flagship line. Two simultaneous XLR/Hi-Z inputs make it ideal for recording two sources at once — duos, guitarist-vocalist setups, or stereo instrument pairs. A natural step up from the Solo for anyone who needs that second channel.
High-End ($500 and Above)
At the upper end of the price spectrum, the defining feature of flagship interfaces is onboard DSP processing — dedicated hardware chips that run professional-grade plug-ins in real time with zero latency. The Universal Audio Apollo series is the most prominent example, offering preamp hardware that matches professional studio consoles alongside the ability to apply UA's acclaimed plug-in collection (tape emulations, compressor models, EQ processors) during the recording process itself, without any monitoring delay.
High-end interfaces also tend to offer Thunderbolt connectivity, expanded channel counts, and modular I/O expansion. These are tools for serious working professionals — session engineers, commercial composers, and mix engineers who require studio-grade conversion and ultra-low latency at high channel counts. For the home studio user whose work is heading in a professional direction, investing in this tier can make sense; for beginners and intermediate producers, the mid-range options above represent a far better value proposition.
Essential Gear to Add After Purchasing an Interface
Choosing a Microphone: Condenser vs. Dynamic
The right microphone depends heavily on both the recording environment and the source material. Condenser microphones — such as the Audio-Technica AT2020 or the RØDE NT1 — deliver exceptional detail and a wide frequency response that flatters vocals and acoustic instruments in well-treated spaces. However, they are sensitive by design, which means they also capture room noise, HVAC systems, and external sounds that are easy to overlook when setting up in a bedroom or living space.
For untreated home environments, a dynamic microphone can actually be the more practical choice. Dynamic mics are less sensitive, more directional in practice, and more forgiving of suboptimal acoustic conditions. Classics like the Shure SM7B or the Electro-Voice RE20 are used on professional broadcasts and podcasts precisely because they reject off-axis noise so effectively. The right choice is the one that suits the actual recording environment — not just the source quality specifications.
DAW Software Integration
Most audio interfaces include bundled DAW software licenses, which is a significant part of the overall value proposition. Focusrite Scarlett interfaces, for instance, include Ableton Live Lite, Cubase LE, and Pro Tools Intro — three of the most widely used DAWs on the market — at no additional cost. This means a complete recording environment can be assembled immediately after unboxing.
The recommended approach for new home studio builders is to learn the fundamentals using a bundled DAW, then consider upgrading to a full license once the workflow and feature requirements become clearer. A full comparison of DAW options including Logic Pro, Ableton Live, and FL Studio is covered in a separate guide. Purchasing decisions for DAW and interface should ideally be made together, since the two pieces of software work in close concert.
Monitor Speakers and Headphones
Mixing and critical listening require monitoring equipment with a flat frequency response — meaning the speakers or headphones reproduce audio as accurately as possible, without boosting bass, scooping midrange, or enhancing treble. Consumer-grade headphones and speakers are deliberately tuned to sound pleasing rather than accurate, which makes them a poor basis for making mixing decisions.
For most home studios, the most cost-effective starting point is a pair of studio monitor headphones. Industry workhorses like the Sony MDR-7506 and the Audio-Technica ATH-M50x deliver reliable accuracy at accessible prices and work well in untreated rooms where speaker reflections would otherwise complicate the listening environment. Monitor speakers — such as the Yamaha HS5 or the KRK Rokit series — can be added later as the studio space matures and acoustic treatment is addressed.
Common Beginner Mistakes and How to Avoid Them
Driver Installation and Initial Setup Errors
One of the most common sources of frustration for first-time audio interface users on Windows is skipping or incorrectly completing the driver installation process. Without the manufacturer's ASIO driver installed, Windows will fall back to its generic audio driver, resulting in high latency and the interface failing to perform as intended. The correct setup procedure is straightforward:
- Windows: Download the ASIO driver from the manufacturer's official website and install it before launching the DAW. Then, in the DAW's audio settings, select the ASIO driver (not the Windows default driver) as the audio device.
- Mac: macOS uses Core Audio natively, which provides low-latency performance without requiring third-party driver installation. Most interfaces are plug-and-play on Mac.
- iOS / iPadOS: USB-C or Lightning adapters allow many interfaces to connect to iPad and iPhone. Compatibility with apps like GarageBand should be verified before purchasing for mobile use.
Confusing Loopback with Direct Monitoring
Two features commonly found on audio interfaces are frequently confused with one another, particularly by users setting up a streaming or podcasting workflow for the first time:
- Direct Monitoring: Routes the input signal (microphone, instrument) directly to the headphone output at the hardware level, bypassing the computer entirely. This eliminates recording latency for the performer. It is a feature for the person recording — heard only by them in their headphones.
- Loopback: Captures the computer's audio output (music playback, game audio, notification sounds) and feeds it back into the interface's input stream, where it can be mixed with the live microphone signal and sent to streaming or recording software. This is the feature that allows a streamer to include background music or system audio in their broadcast.
Loopback is not included on every audio interface. Anyone purchasing specifically for streaming or podcast production must confirm that the chosen model explicitly supports loopback before buying — it is not a feature that can be added via firmware or software after the fact.
Summary
Selecting the right audio interface becomes straightforward once the core decision points are understood. Here is a concise recap of everything covered in this guide:
- Specifications: 24-bit/48 kHz is the current standard and more than sufficient for home recording. 32-bit float recording adds additional headroom and forgiving error correction — a genuine advantage for beginners.
- Connections: Condenser microphones require an XLR input with phantom power (+48V). Electric guitar and bass require a Hi-Z (instrument) input. Confirm both before purchasing.
- Channel Count: 2-in/2-out handles solo and duo recording comfortably. Band-level and multi-instrument sessions call for four or more inputs.
- Computer Connection: USB-C is the current mainstream standard and handles the needs of the vast majority of home studio users. Bus power eliminates the need for a separate power supply.
- Budget Guidance: The Focusrite Scarlett Solo is the recommended starting point for solo home recording. The Yamaha AG03MK2 is the top choice for streaming-focused setups. The MOTU M2 leads the mid-range tier in raw audio quality for DAW-based production.
- Setup Reminder: Windows users must install the manufacturer's ASIO driver to achieve proper low-latency performance. This step is non-negotiable for a functional recording setup on PC.
The best approach is to start by defining the primary use case clearly — solo recording, multi-instrument production, streaming — then work through the checklist of required inputs, phantom power, Hi-Z, and loopback as needed. With bundled DAW software included in most entry-level and mid-range interfaces, it is possible to build a fully functional home studio environment at a much lower total cost than many beginners expect.